Social Media Design Tips

Social Media Design Tips to Skyrocket your Traffic | Feeling creatively challenged when it comes to social media graphics? No worries, I've got you covered! Use these crazy simple design tips plus step by step guide to create social media graphics that look professional and cohesive everywhere. #socialmedia #graphicdesign

As a blogger or online business owner you probably know that sharing captivating visuals on social media is crucial for getting your audience to engage with you. Which means that good social media design is crucial to attracting your ideal customers.

But did you know that the reason has to do with how the human brain processes information?

Consider this:

  • Your followers on social media are sorting through thousands of messages every single day, some studies say up to 10,000!
  • In order to cope, they sort out what’s meant for them (and what’s not) in the fastest way humanly possible.
  • Rather than carefully examining every word, they “skim and scan” first, looking for visual cues to help them find subjects that are relevant to them.
  • All of this happens faster than you can imagine. According to this study done by MIT, the human brain processes visual information first and in as little as 13 milliseconds!

Milli. Seconds. ?

Visuals can make or break your engagement, but what makes an effective social media design?

A big mistake people make with design is assuming that its function is just to make things look cool. Ooof! The pressure!

If graphic design isn’t your cup of tea, luckily for you it’s much simpler than that, and I’m going to share some tips that’ll have you feeling like a design pro in no time.

First, let’s go back to how your audience is skimming, scanning, and sorting out messages on social:

The best way to level-up your design game on social media is to begin to think about it as the way you’re going to help your audience understand the context of your post as quickly as humanly possible.

Your graphics should also work hard for you to accomplish several goals:

  • Express the personality of your brand. How do you want people to feel when they see something from you in their feed? Do you want to be perceived as trustworthy? Zany? Serious? Inspiring?

Communicating your brand personality visually is accomplished by choosing fonts, colors and imagery that are in alignment with those traits.

  • Enhance brand recognition. Recognition leads to trust which makes engaging with your posts more likely. This happens by being consistent with your visuals so your audience instantly notices and registers who it’s from when they see a post from you.
  • Remove uncertainty. You want to make sure that your audience knows that if they pay attention to your message it will be useful to them.

This happens when you communicate clearly and avoid using trickery — like irrelevant images just to grab attention and “clickbait” titles that don’t follow through on their promises.  

Why designs fail to capture attention on social media

In most cases, when a design fails to capture attention, it’s because there’s too much information to process and it’s difficult to read or understand.

Good design is only as complicated as it needs to be to communicate clearly and no more. It’s as much about restraint than it is about adding pretty-looking things.

And here’s a secret: designers follow rules. (Yes, rules can be broken! But you first need to know what they are.)

The great thing about that is if creating attention-worthy graphics isn’t something you feel confident about, this is something you can absolutely learn.

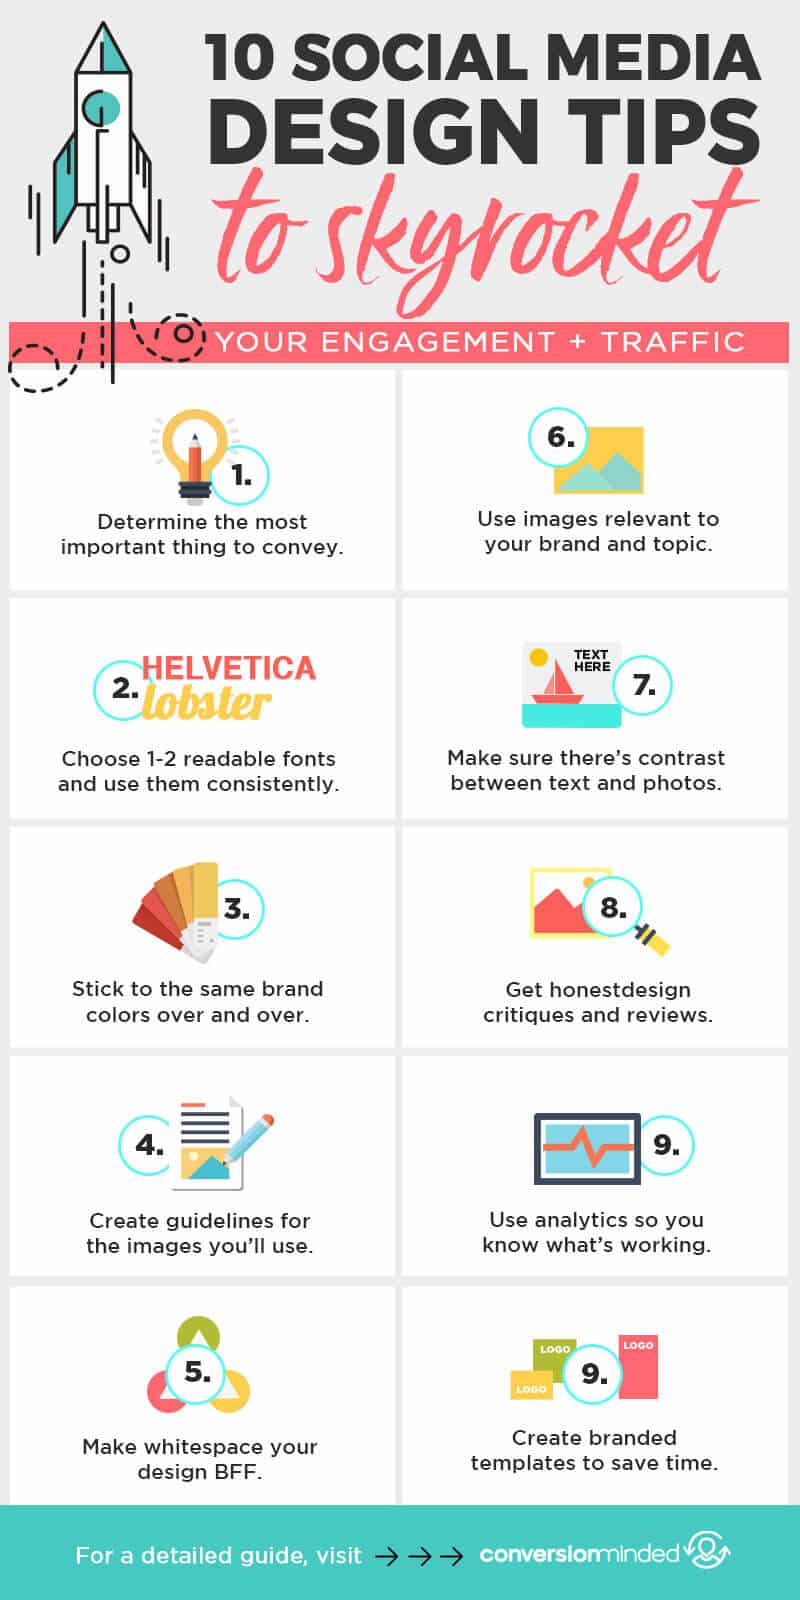
Without further ado, let’s dive in to some of these rules so you can take your social media design to the next level!

#1. Determine your most important thing

Think about the MAIN thing you want people to notice about your graphic first. What will your audience care most about?

In design lingo this is called a focal point.

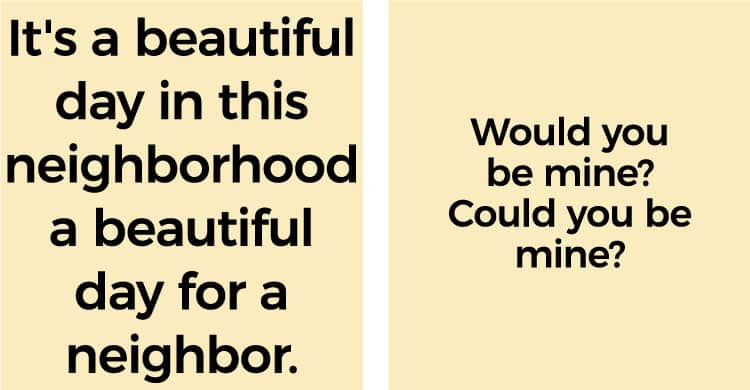
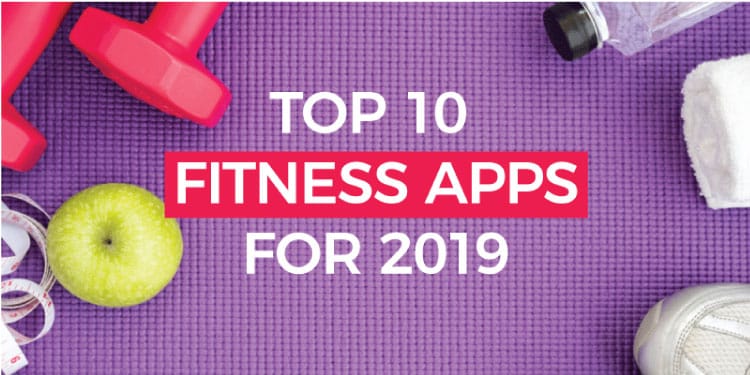
Contrast is an excellent way to draw the eyes where you want them to focus. For  example, you might highlight a highly-descriptive word or phrase with a different color or a contrasting font.

example of a high-contrast font

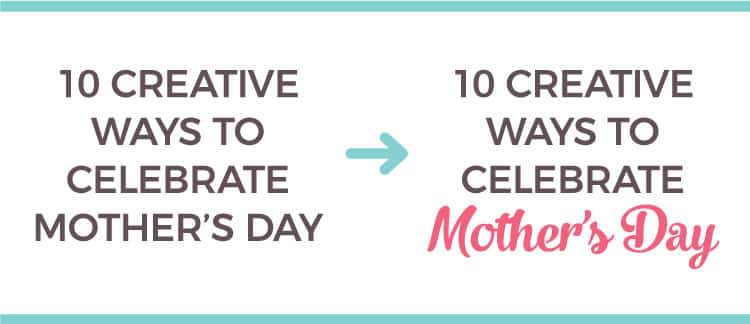
Because “Mother’s Day” is in contrast to the rest, your eyes naturally go there first.

See, it’s not so much about using a pretty color and a pretty font, it’s about solving the problem of “where do I want their eyes to go so they immediately understand this post is for them?”

(BTW, design is just another way to say “problem solving”!)

Before you finalize your design, take look to see if there are any elements that are distracting from your most important thing and remove any visual clutter that’s competing for attention.

#2. Choose 1-2 readable fonts to use consistently

I know how tempting it is to change your fonts every time there’s a sale over on TheHungryJpeg. (You know who you are. *slowly raises hand*)

But reinventing the wheel by experimenting with different fonts for every design you create is not only a bad use of your time, it can actually work against you in the noisy social media feed.

Remember that your audience is looking for cues for what to pay attention to and that it happens fast. By using the same fonts time and time again, you’re training them to recognize and remember your content.

(If you’re getting bored looking at your fonts, you’re doing it right.)

Some ground rules:

Choose one main font for setting text.

At least half of your audience will see your graphics on mobile, so you want to choose a font that’s suuuuper easy to read.

As a rule of thumb, sans serif fonts work best online. You can tell a sans serif font because it lacks the foot-like edges you see with serif fonts.

serif vs sans serif font

Google fonts is a great place to find free fonts that are available for commercial use. Just make sure you choose one that comes in multiple styles so you can create lots of contrast between headings, subheadings, and callouts.

Here’s what I mean by lots of styles:

Font styles for social media design

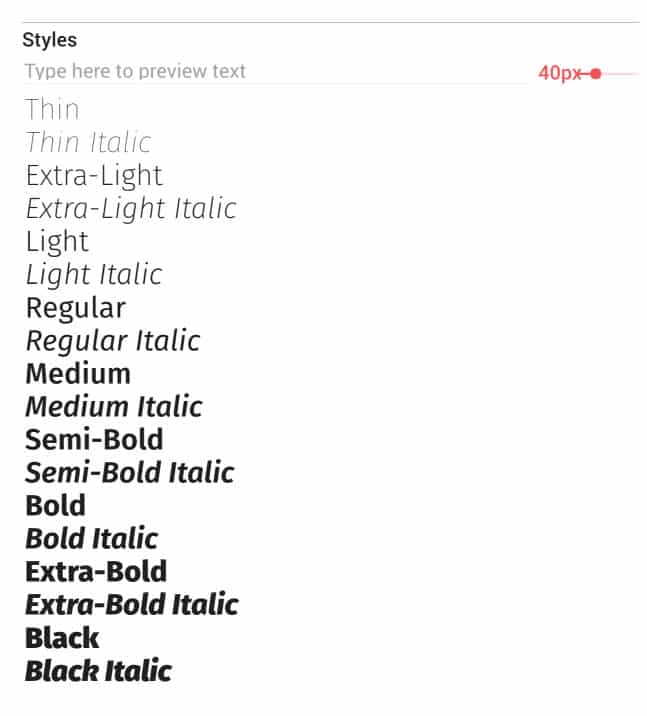
The above example is Fira Sans, but other versatile go-to Google fonts include Open Sans, Roboto, and Raleway.

Test your text on mobile!

I have been soooo guilty of this one because I primarily use my laptop when using social media, but you want to make sure your text is easy to read without squinting when viewing your graphics on a mobile device.

Test on all of the devices you can, because if it’s difficult to read, people aren’t going to zoom in to figure it out — they’re just gonna keep on scrollin’.

Start paying attention to other people’s graphics too. Which ones catch your attention? Which ones are too hard to read to even bother? Which ones are totally (un)missable?

Pin examples

Don’t use too many fonts.

You might’ve heard this one before. But a lot of people misunderstand this advice so I want to dig in a bit deeper and clarify.

First, a font and a typeface are two different things, and it’s helpful to understand the difference because this is where it can get confusing.

Think of a typeface as a font family. For example: Arial is a typeface.

A font is one specific style within that family. For example: Arial regular, Arial bold, and Arial italic are all fonts.

But, the words “font” and “typeface” are used interchangeably these days.

So when someone says “stick to 1-2 fonts” (*ahem*… like I did in the beginning of this section), what they really mean to say is “stick to 1-2 typefaces for your brand.”

(Sometimes 3 but you don’t want to get carried away.)

When I say “don’t use too many fonts” what I mean is don’t use too many font styles — even if you’re only using one typeface.

Still with me? How ‘bout let’s do an example to illustrate.

In the following graphic, I’m only using one typeface: Raleway.

In the example on the left, there are way too many fonts. Notice all the different styles and sizes and weights competing for attention and creating visual chaos. I have no idea where to put my eyes first, do you?

One typeface, too many fonts.

Too many fonts make your social media post hard to read.

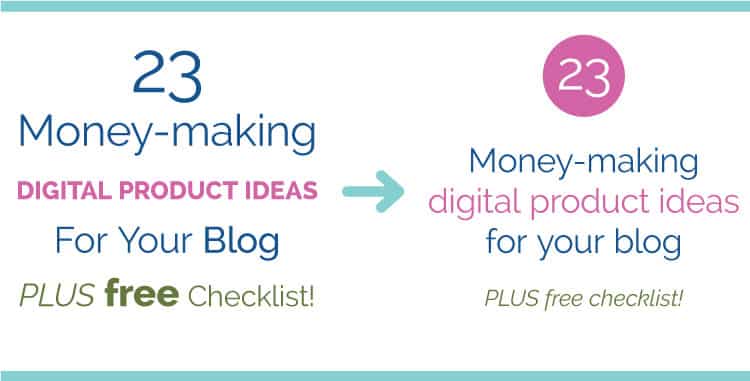
In the example on the right, I’m also using just Raleway, but fewer font styles.

It’s clear that the first thing I want you to notice is that there are a lot of tips in store for you (23!). Then, that this is about “digital product ideas,”  because I used a contrasting color from the rest of the text to set it apart. Then, I want you to notice there’s a free checklist.

This is called visual hierarchy. Take a look at the total composition of your graphic to see if it’s clear what you want people to notice first, then whether it’s obvious  where their eyes should go next and so on.

By reducing the number of font styles used in the second example, I was able to create a sense of quiet in some areas and bring back contrast where I really wanted it.

Think of it like this: every time you add variation to your text — a different weight, size, or style (e.g. initial caps, all caps, italic) — you’re adding a new design element.

And the more design elements you use, the harder it is to create visual harmony and a strong focal point. Rule of thumb is to keep it simple, then make it fancy in strategic places.

Choose one brand-appropriate accent font.

Accent fonts are a fantastic way to draw the eye to something in your text that you want to emphasize, and they help with brand recognition too.

But, probably the biggest design crime out there is abuse of accent fonts.

I know, I know, I love fancy fonts too. But use them carefully and they’ll work much harder for you to capture your audience’s attention.

The main goal we have for your accent font is that it absolutely, positively, no-question-about-it must be READABLE.

Some ground rules:

Never set large bodies of text with a decorative accent font.

Example of overusing an accent font in an Instagram post.

You may love your accent font and know what it’s supposed to say, but don’t assume your audience will be able to read it. Anything that’s even remotely hard to read is just not worth the risk.

Below I’m using the same font applied to the word I want you to focus on. Not only does it draw your eyes where I want them to go, it elevates the font and makes it look way cooler!

Example of good use of an accent font

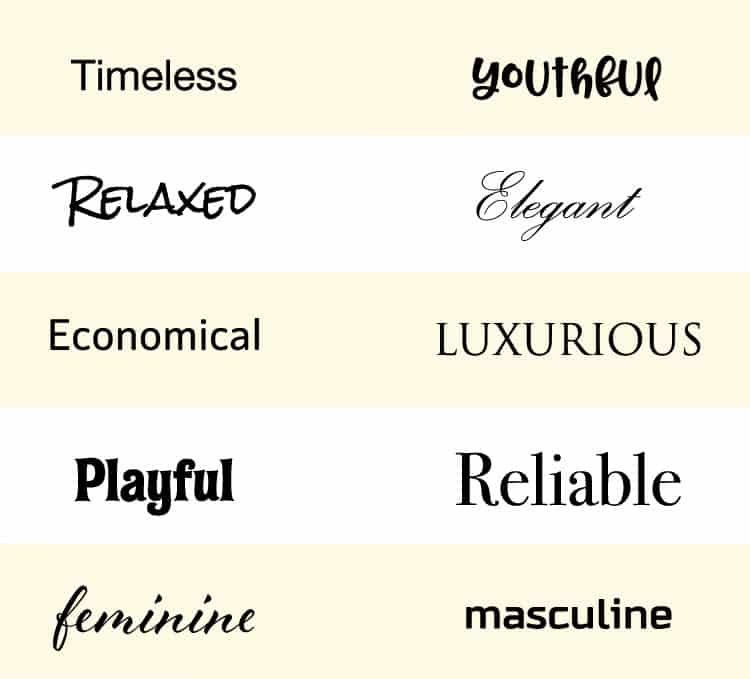
Choose an accent font that’s brand-appropriate.

Fonts have personality and your accent fonts should reflect your brand’s! It’s not so  much about picking out fonts you find pleasing to look at as it is choosing one that can be a great ambassador for your brand.

Are you casual and relatable consultant? Is your product reliable, sturdy and timeless? Do you stand for luxury and elegance? Do you have a quirky and youthful spirit?

Choose a font that best reflects the way you want people to perceive you.

Font personalities for social media graphics

#3. Choose brand colors and stick to them

Color evokes powerful psychological responses and they vary from person to person and culture to culture.

Rather than following the latest trends or just choosing colors you like, you want to use color strategically to help you stand out and capture attention.

The important things to consider when choosing a color palette for your branded social media graphics are:

Brand appropriate: Same as with fonts, colors have personality so go back to those brand personality traits you want to become known for. Then, choose a palette that’ll help you express those traits.

Social media brand colors

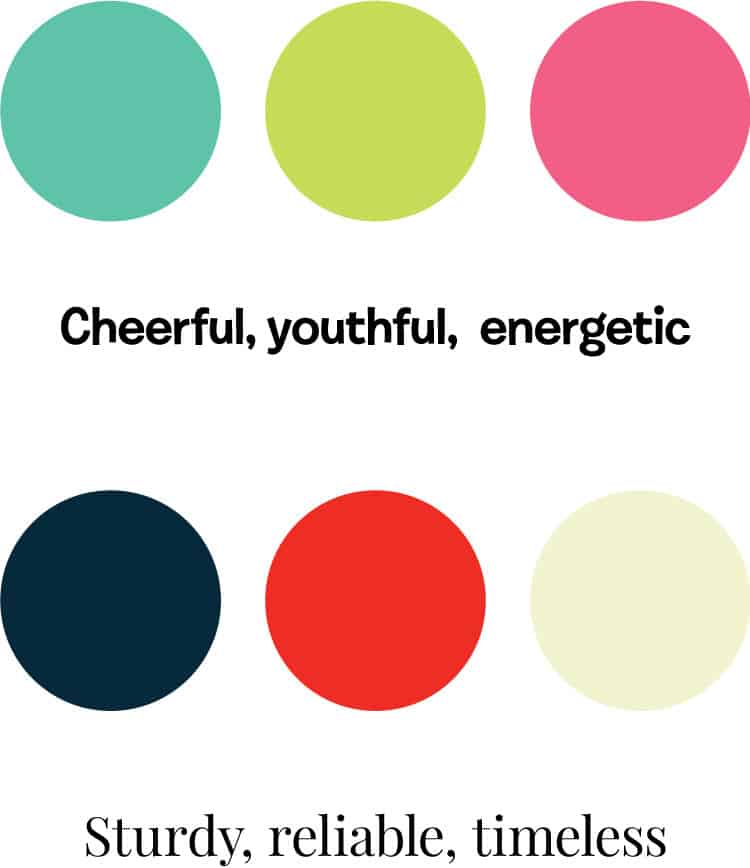
The most important thing is to use these colors consistently so you can begin to train your audience that when they see your brand colors, they instantly know it’s a post from you.

Competition: take a look at what others in your industry are doing — there are  usually color themes people in your industry or niche will follow.

Now think of ways you can use color to stand out from your competition (while also being brand appropriate).

For example, if everyone in your industry uses corporate blue, consider using Harvard red or forest green.

Versatility: You want to make sure that your colors are versatile enough so there’s enough opportunity for you to create contrast wherever you need it.   

Example of contrast color

Related: How to Choose Colors That Will Make Your Brand Stand Out

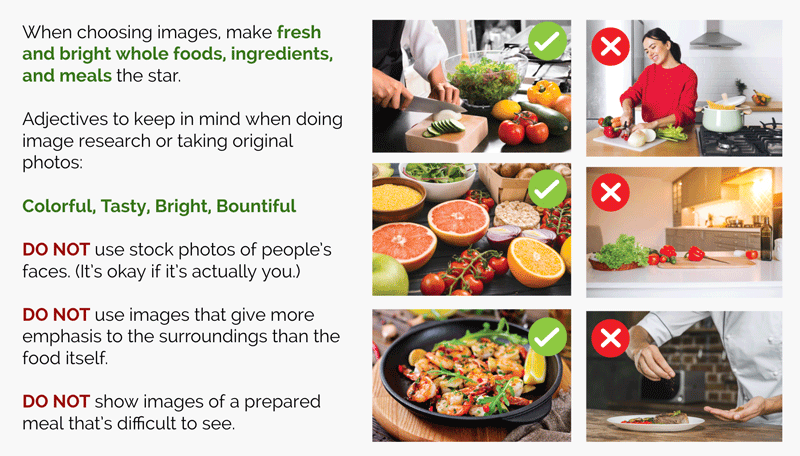
#4. Create some rules for the images you’ll use

Having a game plan for the types of images you’ll use will make researching images exponentially easier and it’ll help you create brand consistency too.

Will you use stock photography? Original photography? Illustrations?

What style? What mood do you want to convey?

Again, think about your brand’s personality and determine a few adjectives you can use when choosing images.

Here’s an example of some image rules I created for a foodie blog brand guide. You can see that by having some rules in place, the images tell a more consistent story.

Image brand style guide example

The more consistent you are in using the same fonts, colors and image styles, the more people will begin to recognize, remember, and grow to trust you. When people trust you, they’re more likely to engage with and share your content.

#5 Make whitespace your design BFF

Whitespace is not necessarily white, think of it as the space between things. One of the best ways to elevate your designs is to pay as much attention to the areas that surround your design elements as the elements themselves. Like…

Don’t push text right up to the edge, give it plenty of margin.

I see this a LOT on social media. While it’s tempting to make your text as big as possible and to use all the space available to you, bigger doesn’t always mean it’s more readable.

It’s actually better to allow plenty of breathing room around the words so the eyes have an easier time focusing.

whitespace in design and graphics

Align design elements and create even margins.

Wherever you can, make the spaces between things equal to improve visual harmony. Designers very often use grids and rulers and guides, but you don’t need to be pixel-perfect, just eyeballing it works too.

When you look at the following example, you might not immediately see the problem or even the difference between the top left graphic and the right, but when the top and bottom margins are measured, the left is off-balance.

add whitespace to your social media graphics

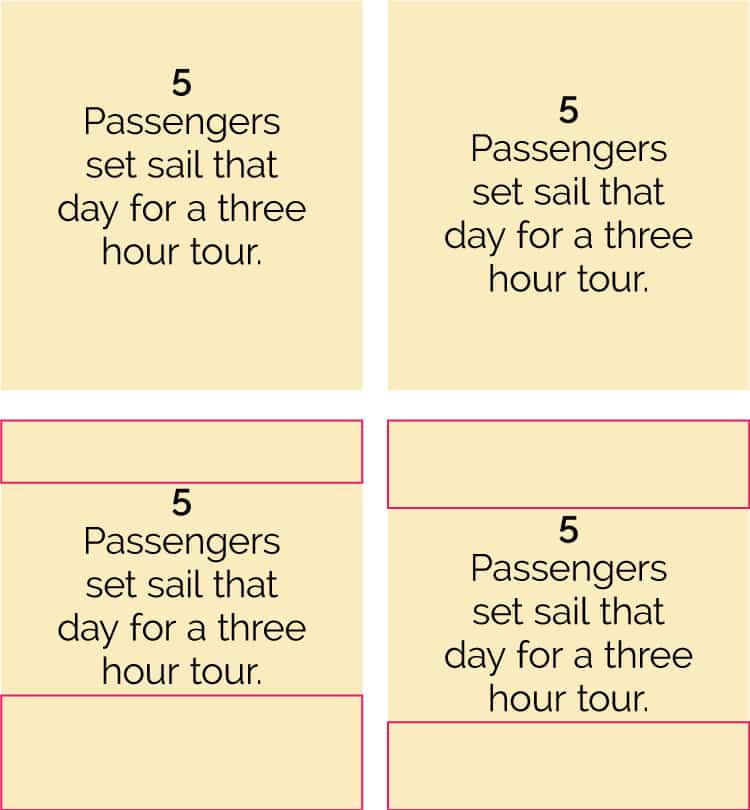
Is this nitpicky? Well yes, it is. But little details like this where something’s slightly off about a composition is like having “visual clutter” — and wherever possible you want to avoid that.

#6. Use relevant images

The other day a graphic caught my attention because it had a photo of yummy-looking, colorful cookies. Problem was, it was a blog post about affiliate marketing. (I’m still perplexed.)

Wherever possible, use relevant images to communicate your message.

The more relevant your image is to the topic of your post or story, the more it’s likely to grab the attention of people who are actually interested in that topic.

The following example works well to capture attention because we all need a weekend getaway to relax at the beach, right?

It immediately makes me go, “OMG I WANT THIS TO BE MY LIFE RIGHT NOW!”

weekend getaway on the beach

But the following example is even more relevant for people who struggle with the problem of always packing too much for short trips… which is the actual topic. (Not weekend getaways. Sadly.)

packing for a weekend trip

The great thing about social media is that you can test different graphics to see what works best!

Because most people are going to miss most of your posts most of the time (thanks algorhithms), it’s perfectly okay and even advised to share your posts multiple times.

Use the opportunity to experiment with different images to see what people respond to.

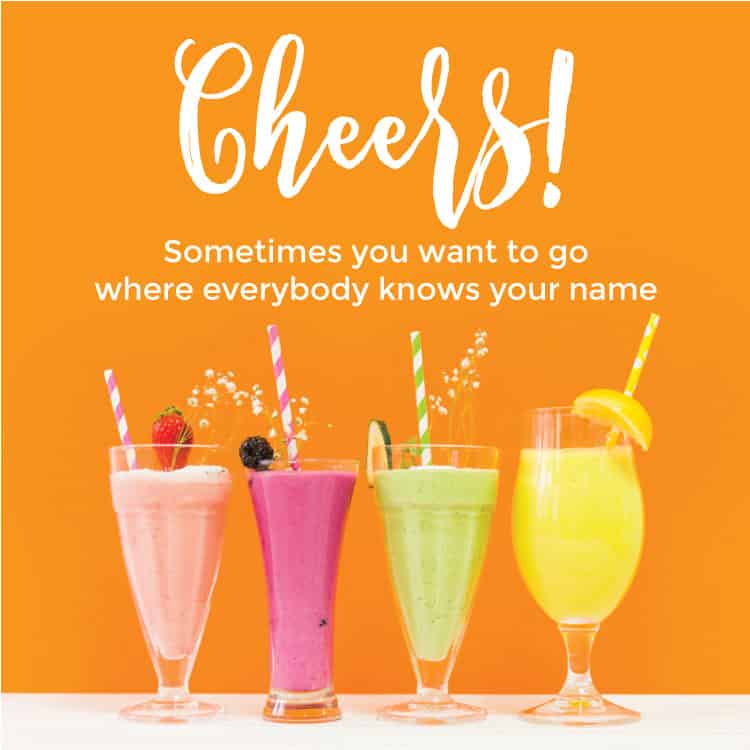
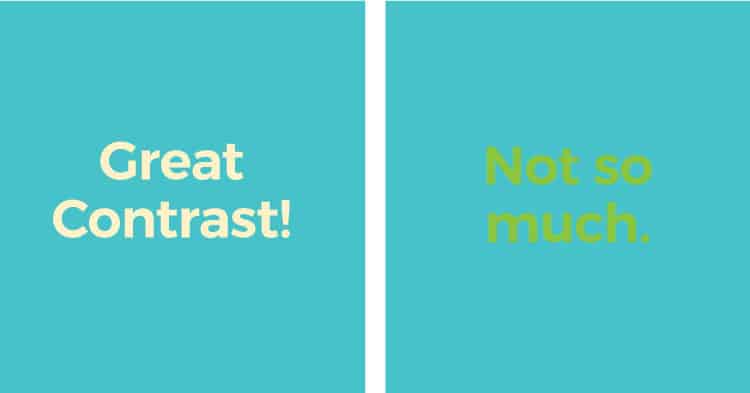
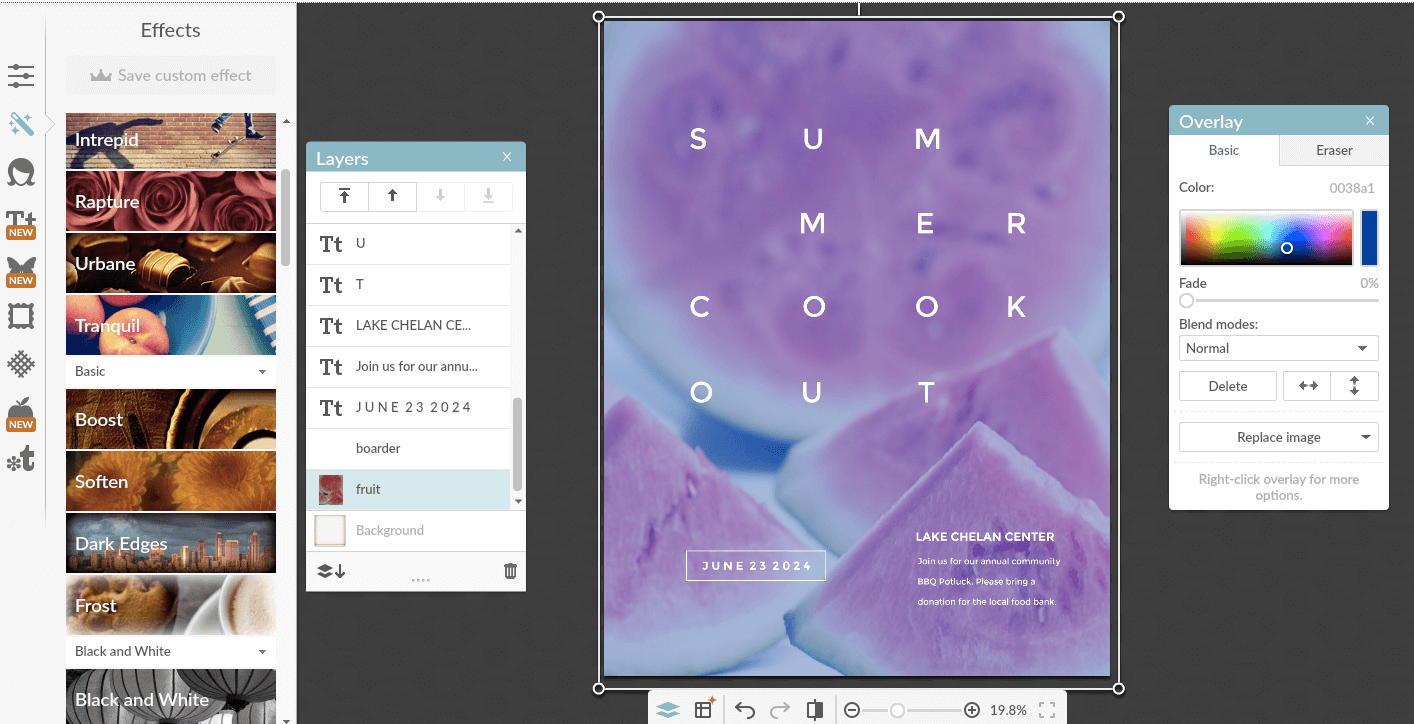
#7. When setting text on top of a photo, make sure there’s enough contrast

By now you’ve probably caught on that clear, easy to read graphics is the KEY to effective social media design.

One of the most common mistakes I see people making over and over again is setting text on top of a photo with virtually no contrast.

text overlay examples

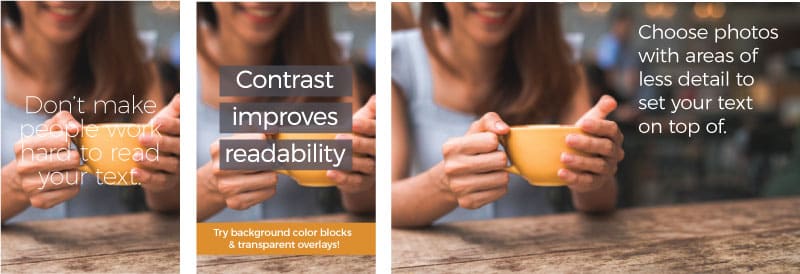
The way to fix that is to either choose photos that have areas with very little detail where text can easily be read when placed on top, or to use an overlay.

An overlay is basically just a shape with a background color either set to full opacity or a bit of transparency so the background can still be recognized.

Flat lay designs are very popular because they’re usually composed in a way that leaves a blank space that works perfectly for adding text on top. So when you’re researching images add the keywords “flat lay” (flat lay desk, flat lay floral, flat lay food, flat lay fitness, etc.) to your search!

flatlay or styled stock photo example

#8. Ask for design critiques

I know this is probably a terrifying concept, but one of the very best ways to create more engaging designs is to be open to critique and criticism.

A huge benefit of getting a formal design education is the valuable feedback that happens in the classroom, and professional designers consider processing criticism a necessary aspect of growth.

But you don’t need to go to design school to get the same benefit! If you’re not sure whether something you’ve created is click-worthy, get feedback from people in your target audience.

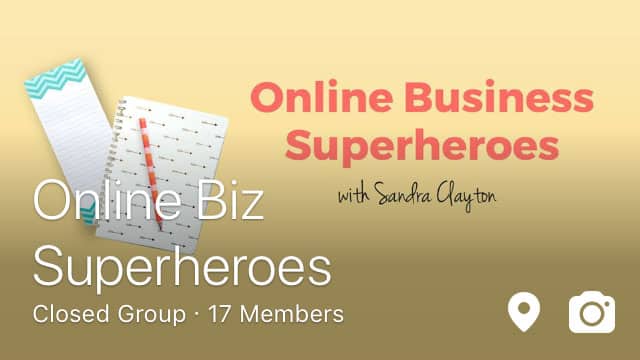
Facebook groups are great for this! People looooove to engage with “what do you think of this design?” posts. Everybody enjoys sharing their opinions about design.

Then, buckle up, because no design is ever going to satisfy everyone. Just take what’s useful to you and really listen, but don’t take it personally if someone doesn’t like it.

This is the fast track to becoming more objective about what you’re creating which is required for making effective, engaging graphics.

#9. Use analytics

A lot of times people will tell you they LOVE your graphic design handiwork (bless their hearts), but in practice you’re just not seeing the engagement you want.  

This is where analytics can be immensely helpful.

Check your social media analytics and see which tweets, pins and posts are performing the best. Then, look at posts that aren’t as successful.

The reason why could be the subject matter, but it might also be the design. Do you see any patterns in the graphics that perform best or worst?

When you use analytics for anything, think like a scientist:

–What’s working?
Why do I think it’s working?
–What isn’t working?
Why do I think it’s not working?

Then form a hypothesis and test it.  

For example: When I look at my top performing Pinterest pins for the last 30 days, I notice that graphics with a teal background are performing best.

I also have pins with pink backgrounds, white backgrounds, yellow backgrounds and gray backgrounds and those didn’t get nearly as much traction.

Pinterest analytics

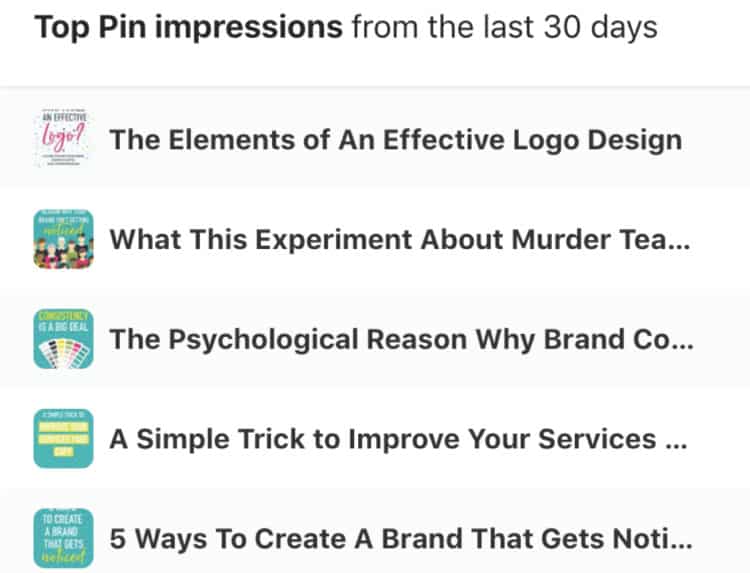
What’s my theory on this? Well…

  • It could mean that people are starting to recognize that teal color and because they trust my content, they’re engaging more.
  • It could be the subject matter is more popular and I’m getting better at creating the right content for my audience.
  • The teal pops and people love it.
  • It’s a coincidence. Maybe I just inadvertently made more teal graphics than usual this month.

It’s really just something to make a mental note of so you can compare results over time and get smarter and smarter about what works and what doesn’t.

But here’s where it gets interesting. The top performing pin uses a new color I’ve recently introduced into my palette–a light blueish-gray color.

This could mean that I’m on to something with this new style, or it could mean that  people just really liked the topic.

Because I saw more engagement on this pin than usual, I’m going to form a hypothesis: that people are responding more favorably to this style of graphic.

I’ll test it by creating more pins (for different blog posts) that follow that style and check back in a month to see what happens.

If those posts perform significantly better than their pink, teal, gray or yellow counterparts, I’ll modify my design templates accordingly going forward.

It doesn’t really matter that I prefer my pretty pink pins, what matters is what my audience responds to. Analytics will always give you the straight scoop and never sugar coat it for you.

And that’s great because when it comes to design, it’s easy to let our own personal taste and assumptions get in the way of results.   

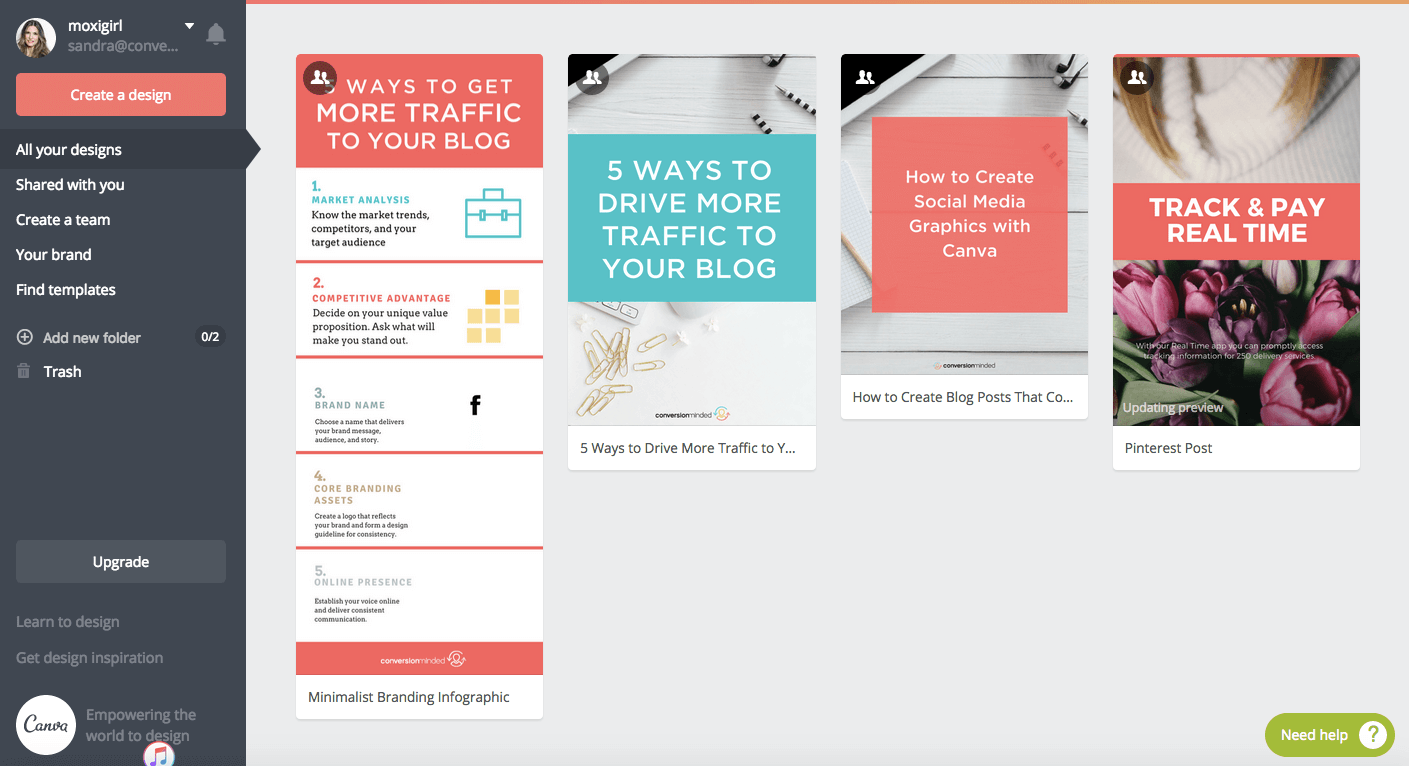
#10. Start with templates

Here’s another secret: there’s no reason to reinvent the wheel if you’re not comfortable designing graphics from scratch.

Using professionally-designed social media design templates as a starting point using a tool like Canva is one of the best ways to look like a pro even if you have no experience with design.

You don’t have to use templates forever, the idea is to develop an eye for how to compose an engaging graphic and learn the “rules” of design by actually doing design.

Pretty soon, you’ll be creating graphics from scratch and even grow comfortable making your own templates!

Pro design template packs like Biz-in-a-Box still allow you plenty of flexibility to put your own twist on things and make them unique to your brand.

Ready to level-up your social media design game?

I hope this post has been helpful and you’re ready to make social media a more beautiful place! If you have any questions, hit me up in comments below.

by

5 Easy Ways to Set Up Instagram Shoppable Posts | Want to sell more products? Want people to be able to buy them right from Instagram, without having to go to your website? This post is for you! It includes a simple step by step process for setting up Instagram shopping so you can level up your Instagram marketing and make more money with every post.
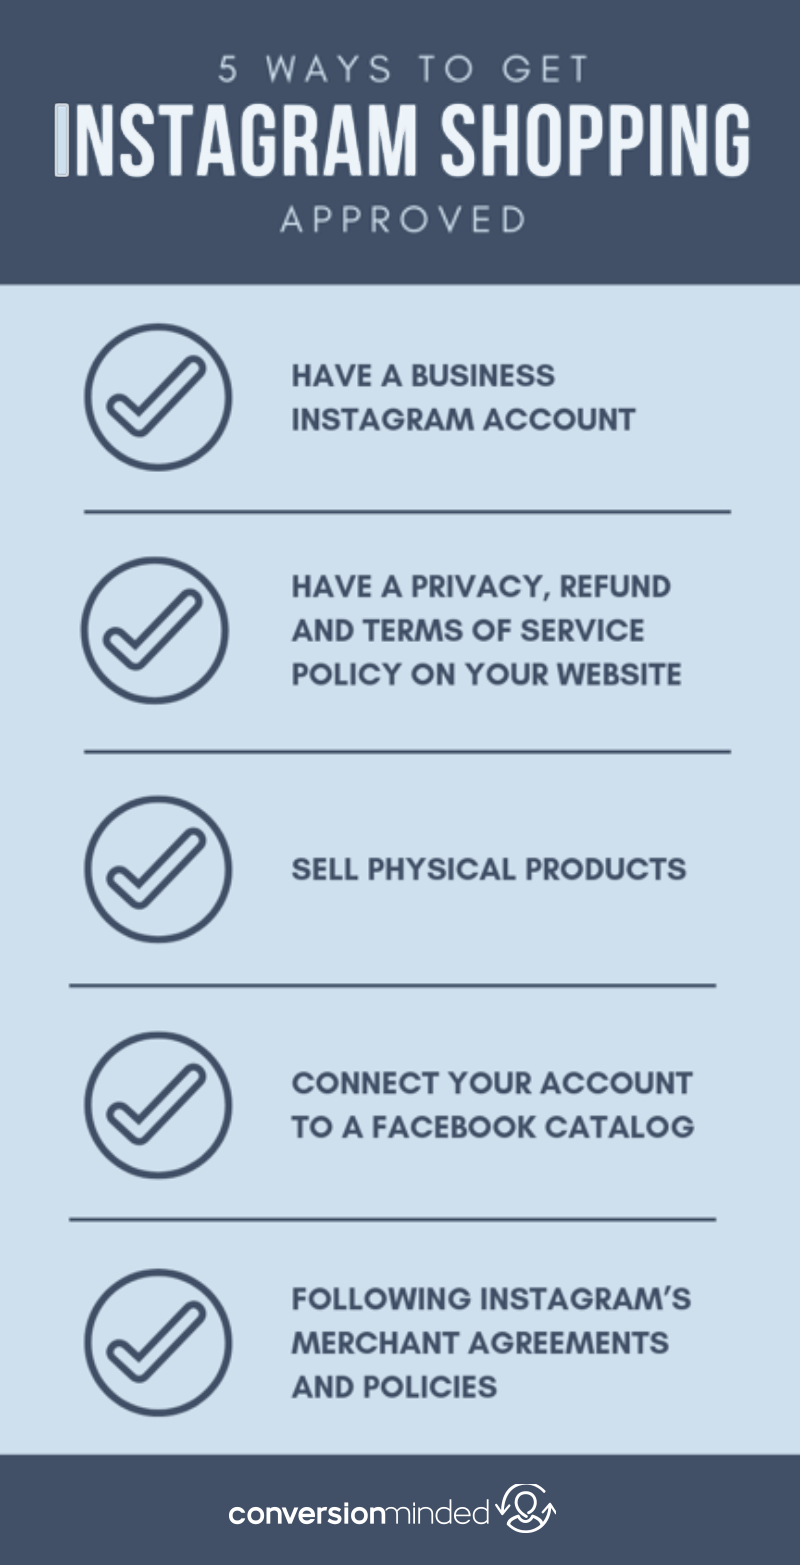
If you sell physical products, Instagram shoppable posts are your new best friend. So you probably want to know everything you can about how to get approved for them, right?

Because Instagram is the fastest-growing channel out there. Just look at these stats from Hootsuite and Omnicore:

  • 1 billion users (and counting)
  • 500 million daily active users
  • 68% of users are female
  • 38% of users check Instagram multiple times a day
  • 72% of users have bought a product they saw on Instagram

Luckily, my friend Yandy Zuo is here to share her steps for enabling Instagram Shopping. And believe me, she had to wrestle with Instagram’s guidelines for a looong time before she got approved.

If you’ve been wondering how to create shoppable posts, or if you’ve been struggling to get the thumb’s up from Instagram, this post will help.

First off, here’s what a shoppable post looks like:

Shoppable posts on Instagram

See that “Tap to View Products” button? Click on it, and you can buy right from within Instagram, which is HUGE. A total game-changer and worth going through the steps to get this set up, in my book. 🙂

Read on for Yandy’s best tips on setting up Instagram shoppable posts…

––––––––––––––

I’ve never felt happier than when I finally got approved for Instagram Shopping.

Now I can tag my products in my Instagram posts. When a customer sees one of my handmade cards or bookmarks in a post, they can click on the product and buy it right inside the app without having to go to my website.

My social media marketing is *next level* now.

If you sell products and use Instagram to market your products, shoppable posts are essential to increasing sales.

Think about it. Shoppers want to do the least amount of work possible. They don’t want to go to the trouble of heading to your website and manually finding the product. If they’re going to buy something, they want to buy it immediately.

That’s why Instagram Shopping made headlines when it was introduced. It’s also why I spent months trying to get approved. Before I set up shoppable posts, I had to direct people to my website and try to get them to buy. Basically impossible! Especially since Instagram gives you just one place to put a link…in your profile.

Now that I’m approved, I’m loving this feature! Not only can I tag my products in posts, but I can tag them in stories. Wow.

If you don’t yet have this Instagram shopping designation, you may be missing out on a lot of potential sales. But don’t worry.  Three months ago, I didn’t have it either.

Want to know how you get this super cool designation?

It’s actually quite simple to get approved if you follow these five easy steps…

1) First, have a business Instagram account.

This one should be a no-brainer. Why would a personal user need to tag products for people to buy?

Instagram only gives the product tagging to business accounts because they are selling stuff. Also, it’s a way for Instagram to ensure that your business is legitimate and won’t scam users.

To switch over to a business account, go to your settings and click “Switch to Business Profile”.

Related: How to Grow Your Instagram Followers Organically

2) Make sure you have the right policies on your website.

This was the big issue I had with getting approved. You need to have Privacy, Refund, and Terms of Service policies already on your website before you request approval from Instagram.

If you use Shopify, just head to the settings tab and go to the legal section. There, you can create your own policies or use the templates Shopify provides.

If you don’t have Shopify but use something like it (e.g., BigCommerce, WooCommerce), I’m sure they have a section for policies too.

If you use another hosting platform like Squarespace, Wix or WordPress, you can add your policy to the footer, as a link in your cart page or create a dedicated landing page on your website.

Whatever e-commerce platform you use, just make sure you check that all of your policies are there.

3) Sell physical products

This one comes straight from Instagram’s help center. I mean, how do you tag a service?

If you sell both services and products, Instagram will only allow you to tag your products.

If you sell a service or digital product, I recommend using Link in Profile or Link Tree to maximize that one link Instagram gives us. I use Link in Profile for my blog posts and custom order page.

4) Connect your account to a Facebook catalog.

Your Instagram account needs to be connected to a Facebook catalog. If you are using Shopify, head over to the sales channels section and add Facebook first, then Instagram to them.

When you add Facebook, Shopify creates a Shop section on your business Facebook page that displays all of your products. Follow the prompts and wait for Facebook to approve.

I got approved for Facebook right away, so unless your shop contradicts Facebook’s requirements, this shouldn’t be an issue.

If you are not using Shopify, set up your own Facebook page for your business and go to the Shop section. If it isn’t there, you will have to change your page template to the Shopping template. Just click “Set Up Shop” and follow the prompts from there.

Wondering why you need to connect to a Facebook catalog? Because that’s how Instagram can access your products and prices.

Once you have that out of the way, add Instagram to your sales channel and follow the prompts.

If you don’t use Shopify, you will have to manually add Instagram Shopping on Catalog Manager or Facebook’s Business Manager and wait for approval.

5) Comply with the merchant agreement and commerce policies.

This one, in addition to step #2 above, is essential to getting approved by Instagram.

Now, you’re probably already doing this, but it’s worth mentioning that to set up Instagram Shopping, you have to follow both Instagram and Facebook’s guidelines.

If you’re curious, below is a list of content that is prohibited from selling:

  • Commerce posts must not violate their Community Standards
  • Illegal, prescription or recreational drugs
  • Tobacco products and related paraphernalia (e.g. e-cigarettes, tobacco pipes, etc.)
  • Unsafe supplements
  • Weapons, ammunition or explosives
  • Animals
  • Adult products or services
  • Alcohol
  • Healthcare products
  • Real money gambling services
  • Anything that is fraudulent, misleading, deceptive or offensive
  • Subscriptions or electronic products
  • Digital media and electronic devices
  • Real, virtual or fake currency
  • Anything that constitutes Third-Party infringement
  • Anything discriminatory

Now, this doesn’t mean that you can’t post about something like this if you are a business account (although you might get shut down). It just means that you will not be approved for Instagram shopping. Which means you won’t be able to tag your products in your posts.

If you do post about and product tag one of the products/topics as mentioned above, Instagram can and probably will revoke your approval. Make sense?

That’s it! That’s how I got approved for Instagram shopping. Have you tried any of these tips? Let me know in the comments!

I even made you an infographic so you can easily share and access these steps:

Want to enable Instagram Shopping on your posts? Follow this simple step-by-step guide. It includes everything you need to know to get started with Shoppable Posts on Instagram so you can sell more products.

by

9 Pinterest SEO Secrets Every Blogger Should Know / Want to know how to use Pinterest for Business? This post is for you! It includes a complete Pinterest growth guide with SEO tips and tricks for bloggers. Pinterest fundamentals, Pinterest hacks, and more for bloggers. Click through to see all the steps!
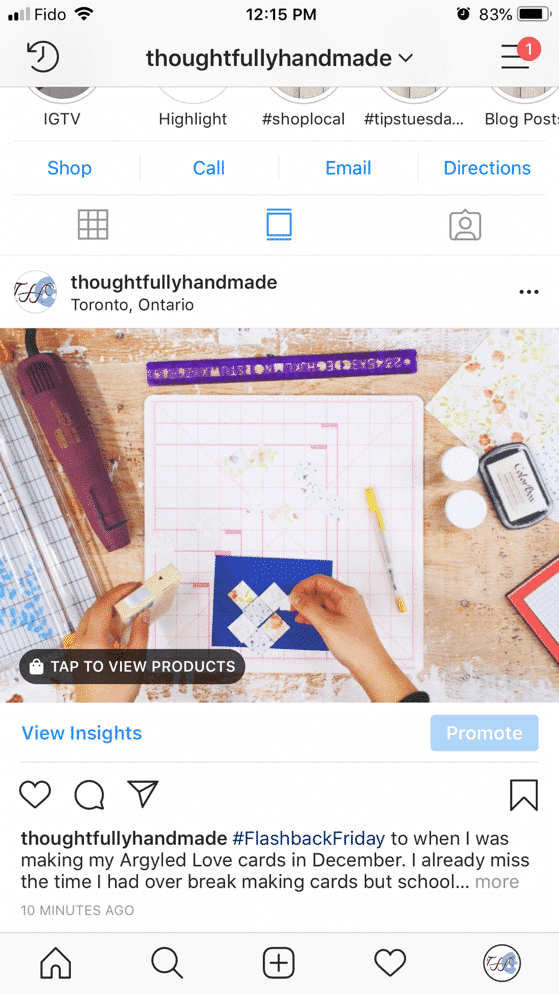
In my Blog Profit Plan series, I cover the four buckets to building an online business:

Content > Traffic > Subscribers > Products 

I also cover the process by which each bucket spills over into the next until they’re all full and your business is thriving.

Problem is, sometimes the buckets don’t spill over as quickly as you want. They usually slow down somewhere in the middle, between Traffic and Subscribers.

Sound familiar?

If you’ve been struggling to grow your traffic and email list, you’re not alone, friend. Many entrepreneurs and bloggers struggle to fill those two buckets up.

Luckily, there’s Pinterest. 🙂

Pinterest is a huge source of traffic for those who use it. In my experience, it’s the easiest source of social media traffic. So today, I’m drilling down on all things Pinterest to give you (what I hope to be) the ultimate guide to using Pinterest for business.

Here’s what I’ll be covering:

Part One: Pinterest Fundamentals

  • Why use Pinterest for Business?
  • Pinterest SEO Changes
  • Understand the SmartFeed
  • Set Up Your Account for Traffic

Part Two: Get found on Pinterest 

  • Create a Pinterest Content Strategy
  • Research Keywords
  • Add Keywords Everywhere
  • Pinterest SEO vs Google SEO

Ready to dig in? Let’s do it.


Part one: Pinterest Fundamentals

Step 1) First, why use Pinterest for business?

Because it’s ripe for the taking! If you’re still thinking that Pinterest is only for fashion tips and recipes, keep reading…

Pinterest is a goldmine for business.

When you get it right, you can explode your traffic in ways that you just can’t with Facebook or Instagram. In fact, Pinterest is very different than FB and IG. For starters, it’s not even a social media site.

It’s a SEARCH ENGINE and a SOCIAL BOOKMARKING SITE.

Where people are on Facebook and Instagram to be social, people are on Pinterest to find stuff. They’re searching for ideas of things they can buy/make/do…much like Google. And there are a whopping 200B monthly searches on Pinterest. Whoa.

So when your pins appear for their search queries, they’ll love you for it (and so will Pinterest!).

Pinterest knows that without content creators like you and me, there would be no Pinterest. And they want to help us reach a broad audience by encouraging others to share our pins.

That’s where the social bookmarking component comes in…

Between tribes and group boards, you have a huge opportunity to reach thousands of followers outside of your own.

If you keep all of this in mind, you’ll be able to steer your Pinterest strategy in the right direction.

Step 2) Pinterest SEO Changes

The Following Tab

When you log in to Pinterest, by default, you’ll see pins from your SmartFeed (step #3 below).

But what if you want more control over the pins in your feed?

Now you can have it with the new Following Tab. Toggle it on to see only pins from the people you follow. It’s right up here in the top menu:

The Pinterest Followers Tab

Looks like this new feature is designed to encourage you to spend more time on Pinterest by seeing only the pins you care about.

Hashtags

Yep. You can use them! And you should. It’s the second time around for Pinterest hashtags, and this time it looks like they’re here to stay.

When you use hashtags, you increase the chance that your new pins will be distributed to relevant hashtags and be seen by more people.

Notice I said *new pins.* Don’t bother going back and adding hashtags to your older pins. The reason is that the hashtag feed is prioritized by freshness. So adding hashtags to older pins won’t help them. Just add them to new pins from here on out, and you’ll be good.

I cover more on hashtags in step #8 below.

Image Sizes

Are infographic pins gone for good?

They could be. Here’s what Sarah says about longer images:

2:3 is recommended (600×900 or 735×1102). “If you deviate much from that, you might see less distribution or your Pins might be cut off in certain parts of the Pinterest app. Given that, we recommend sticking to that 2:3 ratio or lower.”

“Previously we truncated Pins, but now sometimes we just don’t show the Pin at all if it is super long. Even if currently our best Pins are super long, realize that these are still rolling out, and things will appear differently in different places.”

But here’s the thing:

My longer pins drive (waaay) more traffic and engagement than my 2:3 pins. So I’m willing to toss the dice on the longer pins and keep creating them for now. (I create three pins for every post – two are 2:3 and one is 1:2.)

For the full scoop on Pinterest images sizes, read The Ultimate Guide to Creating Pinterest Images that People Click.

Personal boards

Personal boards are where it’s at these days, guys.

Pinterest gives more weight to personal boards than group boards because many group contributors drop their pins without re-sharing from the group. Bleck.

This type of spammy activity causes your pins to have low engagement. When you share pins with low engagement, Pinterest may mark your domain as being low-quality and start squashing your pins.

That’s why personal boards are super important now. In fact, setting them up correctly is one of the most powerful things you can do to increase traffic.

Free webinar: Double Your Traffic with Pinterest

Step 3) Understand the SmartFeed

Your pins aren’t shown in chronological order like Facebook, Instagram, and Twitter.

In fact, before displaying any of your pins, Pinterest’s SmartFeed algorithm will give them a score based on quality and relevance. After it filters and scores your pins, it will display them in the feed.

What that means is that Pinterest displays “best pins” first rather *newest pins* first.

Pins with higher scores appear higher up in search results and are shown to more people. Pins with lower scores appear further down in the feed and can take a lot longer to show up – IF AT ALL.

Before I get into Pinterest’s filtering criteria, let me back up for a minute and explain the three groups of pins that are displayed in the Smart Feed.

When you log in to Pinterest, the pins you see are:

  • From people you’re following
  • Related to those you’re following
  • Similar to those you’ve shown an interest in

Ever notice how the pins in your feed look like ones you just repinned? Those are coming from your “interest” group.

The SmartFeed Filter at Work

When you share a pin, Pinterest is working behind the scenes to decide when (and if) to show it based on these four criteria:

  1. Domain quality
  2. Pin quality
  3. Pinner quality
  4. Relevance

The graphic below is a visual reference for what’s happening.

Pins are grouped into three categories, then put through the SmartFeed Filter, given a score, and displayed in your feed:

Pinterest's SmartFeed graphic

Here’s what each filter measures:

Domain quality – This is a measure of your overall domain. How many repins, close-ups, comments, and clicks do pins shared from your website receive overall?

Pin quality – A measure of your individual pin. How much engagement does it have?

Pinner quality – A measure of you as a content curator. Are the pins you share from others high quality?

Relevance – A measure of user intent. How relevant is your pin to a user’s search, interests, and search history?

Pinterest uses these checkpoints to ensure that only high quality, relevant pins are being shared by all. The higher your scores in each category, the better chance you’ll have of ranking #1 and reaching a broad audience with your pins.

In a nutshell, you need to be an epic content creator AND curator…create and share pins that are optimized for clicks and search.

A winning Pinterest SEO strategy combines these three elements:

Visibility + Searchability + Great Pin Design = Pinterest SEO Strategy

Sounds pretty easy, right? Actually, there’s a bit more to it.

But first, let’s get your account set up your correctly. I’m going to walk you though the steps right now!

Step 4) Set Up your Account for Traffic

Your Pinterest account, profile, boards, and pins need to be optimized for traffic. If you let Pinterest know right from the start that you’re a content creator, it can index and distribute your pins accurately.

Here’s how to do it.

First, create a business account.

A huge reason people don’t get traffic from Pinterest when they otherwise should is, they’re confusing their personal Pinterest with their business Pinterest – which confuses Pinterest too.

Remember, Pinterest is a search engine, and it’s looking for clues about your keywords from the pins you share. It’s not like Instagram, where you can get away with mixing personal and business posts, *kinda.

Instead, treat your Pinterest accounts the way you treat your Facebook profile vs Facebook page. Share personal pins to your personal Pinterest and business pins to your business Pinterest.

Don’t mix the two.

When you create a business account, Pinterest immediately knows that you create content. And it will love you for it! Because without people like you and me creating and sharing our content, Pinterest wouldn’t exist, and it knows it!

Creating a business account is free, and you can sign up for one right here. If you do decide to turn your personal into a business account, just head over to your profile settings and you’ll see an option to switch.

Next up, verify your account.

Once you create a business account, the next step is to verify or “claim” it. You can’t skip over this step because it’s really important!

You’ll get access to in-depth analytics on Pinterest and Tailwind. Plus, claiming your site is one of the first ways you’ll make your domain visible to Pinterest. All you’re really doing here is confirming your website with Pinterest so that it knows it’s you, and that you’re a blogger and content creator.

It’s very easy to verify your website. All you have to do is log in to your profile and go to your settings. Then scroll down to the Claim section:

Verify your website in Pinterest


Since my site is already verified, my website has a checkmark next to it, and the “unclaim” button is grayed out. Yours will be red and say “claim,” so just enter your website URL and select the button.

Next up, select “Add HTML tag.” Copy the tag and choose Next.

That tag needs to be added to the <head> section of your website, which sounds scary I know. But there’s an easy way to do it with the Yoast SEO plugin (for WordPress).

Then set up your boards for traffic.

You definitely want to create keyword-rich boards to help Pinterest index your pins.

For every board category (e.g., Travel), create one general and at least three specific, niched-down boards.

Here’s what that looks like:

Create broad and specific Pinterest boards.

Oh, and don’t just throw every keyword you find in there! Try to use them organically in complete sentences. Here’s the description for my social media marketing board:

Using social media marketing to grow your business + blog? Here you’ll find tools to help you do it. Pinning about social media marketing tools, social media strategy templates, social media marketing tips, marketing plans, social media cheat sheets, and more.

It sounds pretty natural, but I have a lot of keywords in there.

Now, I get that sometimes it’ll be easy to add a lot of keywords and sometimes it won’t. You just want to strike a balance between “keyword stuffing” and writing in a natural, organic way. After all, real humans are reading your board descriptions, so they need to make sense.

Note: There’s a lot more to boards than what I cover here…and they’re crazy important for Pinterest SEO today. I cover them in detail in The Pinterest Traffic Launchpad – including how to get Pinterest to “see” them, creating sections vs niche boards, how many you need, how to share your pins to them, and more.

Finally, enable rich pins.

Rich pins have confused a lot of folks, including me. I used to think they were the reason my name and logo started appearing beneath my pin image, but alas, that’s not the case! Your name and logo show up on pins after you verify your domain with Pinterest.

So what are rich pins really for, anyway?

What rich pins do is show the title and meta description of your posts.

Now, as I said before, you won’t see any of this metadata in your feed, only the first few characters of the description you added when you uploaded the pin:

Pinterest SEO | Pin Description
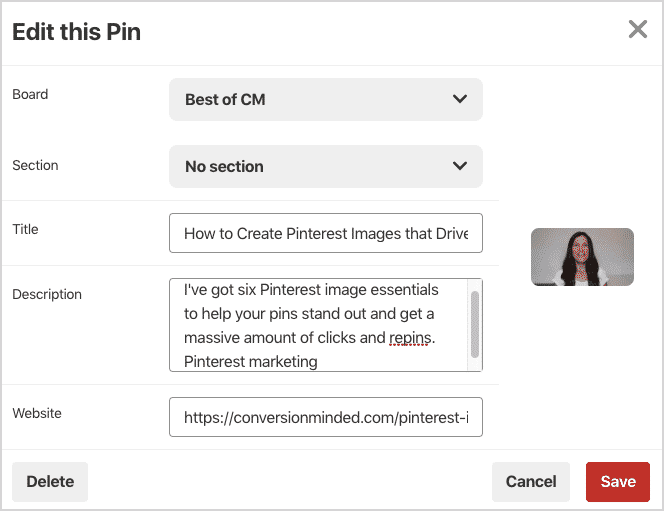
When someone clicks the pin to the expanded view, that’s when they’ll see the metadata and title:

Pinterest SEO | Meta Titles and Meta Descriptions

What the heck is metadata?

I’m so glad you asked! Sounds like a bunch of garblygook to me. 🙂

Basically, metadata is your meta title and your meta description. To break that down even more, it’s your SEO title and your SEO description. Which means they’re the title and description that show up on Google search results…

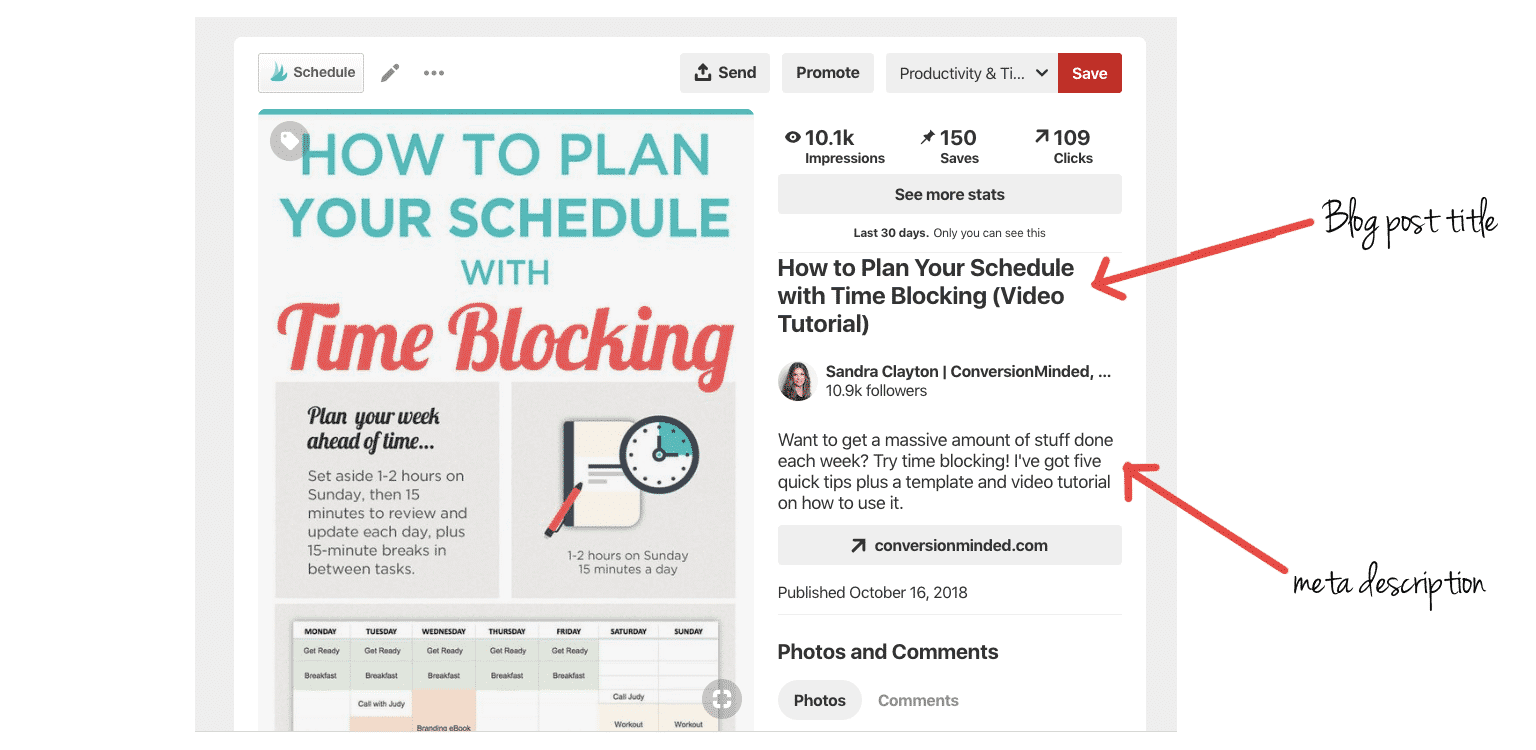
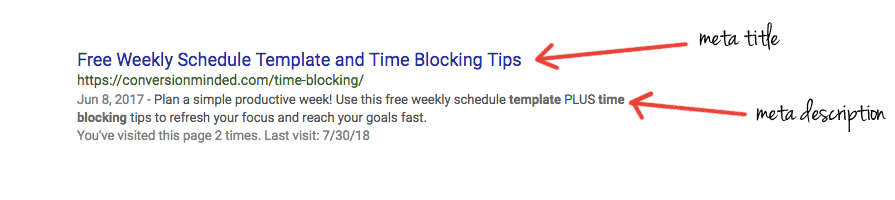
They’re also the title and description that Pinterest displays on your pin when you install rich pins on your website.

The big thing with rich pins is, the metadata from your post travels with the pin. When people repin your content, your metadata is repinned with it. If you update the meta description or title of your post, your pins and repins will also change (theoretically, it can take a while to update).

From Pinterest:
Use rich pins wherever possible so your brand and other useful details stay on the Pin as it gets saved.

Now that your account is set up for traffic and you have an overview of the SmartFeed, let’s dig into Pinterest SEO strategies that will help your pins get found.

PART two: GET FOUND ON PINTEREST

Step 5) Create a Pinterest Content Strategy

Want to really (REALLY) make the SmartFeed happy?

Share content your audience loves.

Hah! If only it were that simple…

First, you need to create jaw-dropping pins. Then you need to share them on the regular, e’erday.

And then…

You can’t just drop your pins, cross your fingers, and hope for the best! You have to be strategic about HOW and WHERE you share them so that people find them.

What you really need is a Pinterest content strategy. In the steps below, I’m going to show you exactly what to do.

First, share killer pins.

There’s this visual component that makes Pinterest incredibly powerful as a search engine, maybe even more so than Google. Because, let’s face it, Google search results are pretty meh. All people see are titles and descriptions with no pretty pictures to help them decide if they should click.

But over on Pinterest, whoa, there are tons of beautiful images that visually show people why they should click. Your job as a content creator is to design graphics that make people want to click on YOUR pins instead of others.

What does that mean?

It means you do things like check your pins on mobile (at least 65% of your traffic will come from phones), use bold fonts that are easy to read and use graphics and images that are on-brand and relevant to your post.

I drill down on all things graphic in these posts:

Next, get ready to blog your heart out!

If you’re a blogger, you already create content on the regular. High five!

Many of my students and clients have a hard time with blogging. They hope they can share a few *one-off* pins and still blow up on Pinterest. But, alas, that ain’t how it works, yo.

Blogging should be a core part of your Pinterest strategy.

Don’t get me wrong here, I’ve tried to fool myself on this too!

I spent the better part of last year creating two courses and couldn’t keep up with blogging every week. Instead, I posted once a MONTH.

Now, did I lose ALL traffic?

Let me just say, my pins were like workhorses keepin’ my traffic steady-*ish. So I didn’t lose it all but noticed a drop. My list growth also took a plunge…from ~1,500 subscribers a month to 1,000 or so.

The reason is that pins have a lifespan. Sure, they can last a looong time – six months, a year, even longer – but after people have seen them over and over, the engagement and traffic will drop.

I’ve experienced pin fatigue like this, and I know this is true. When you see the same pin in your feed every time you log in to Pinterest, you glaze over it.

No worries, though. Just know that when you stop blogging and sharing fresh pins, you WILL see diminishing returns at some point. Better to feed the beast.

#WORDTOTHEWISE If you’re pressed for time and can’t blog regularly, I recommend trying Pinterest, Facebook, or Instagram ads.

Step 6) Research keywords

There are a few ways to research keywords on Pinterest:

  • Pinterest’s Guided Search
  • Topic searches
  • The ads platform

Pinterest Guided Search

When you search for a keyword in the guided search, Pinterest will show you a list of ideas across the top.

For example, let’s say you want to create a board about traveling. Here’s what Pinterest shows:

All those pretty buttons beneath the search bar are suggested keywords. Just so you know, those extra words should be added to your original keyword, like this:

  • Travel Destination
  • Travel Tips
  • Travel Bucket List
  • Travel Packing
  • Travel in the USA
  • Travel Hacks
  • And so on…

Topic Searches

If you enter https://pinterest.com/topics/travel into your browser window, here’s what you’ll get:

At the top, you can see how popular the topic is, and if you scroll down a bit there will be “Topics Related to Travel.” Click through each of these topics to get more title ideas.

Notice how the topics are becoming more specific every time you click through? Beach Travel has about 400K followers vs 70.3 million for the broader topic Travel.

The Pinterest ads platform

The other way to find keywords is to set up an ad account, which really just means placing your credit card on file with Pinterest. Don’t worry! You won’t have to run a campaign. You just need it to access the keyword section.

Once you set up your ad account, click on Create Ad from the top menu and name your campaign.

Then scroll down to the keyword section and add a keyword. Here’s what comes back for “social media”:

The list of keyword ideas is endless!

Researching keywords this way is great because you can create a master list and keep them in a spreadsheet.

Speaking of…

A keyword worksheet will save you A TON of time! You probably pin about similar topics, and it will be waaay easier to optimize new pins if you have keywords on hand and ready to use (especially if you’re sharing six or seven a week).

Psst…The right keyword and hashtag strategy can skyrocket your Pinterest traffic! In The Pinterest Traffic Launchpad, you will become a keyword ninja. Discover little-known ways to find *power traffic* keywords, where to place them, and how to quickly index your boards and pins so that Pinterest knows how to rank them. Learn more about PT Launchpad.

Step 7) Add keywords everywhere

Here’s where the rubber meets the road. Once you have keyword lists, add them to your profile, boards, pins, blog posts, meta title, and more so there’s NO way Pinterest will be confused.

Here’s where they should go…

1. Your profile

Add keywords to your business name and the About You section.

I’m not sure how much the keywords truly matter in the About You, but any time Pinterest gives you the opportunity to use keywords, I say use them!

Keywords in your business name can help you get found when users search for people on Pinterest.

Pinterest SEO | Add keywords to your profile


2. Personal boards

I like to come up with ten keywords for my personal boards. I may not use them all, but it’s easier to start with more and narrow it down.

Oh, and don’t just throw every keyword you find in there! Try to use them organically in complete sentences. Here’s the description for my social media marketing board:

Using social media marketing to grow your business + blog? Here you’ll find tools to help you do it. Pinning about social media marketing tools, social media strategy templates, social media marketing tips, marketing plans, social media cheat sheets, and more.

It sounds pretty natural, but I have a lot of keywords in there.

Now, I get that sometimes it’ll be easy to add a lot of keywords and sometimes it won’t. You just want to strike a balance between “keyword stuffing” and writing in a natural, organic way. After all, real humans are reading your board descriptions, so they need to make sense.

3. Your pins

Of course, you need keywords in your pins!

Now, you probably share pins about similar topics and will wind up using similar keywords, which is perfectly okay.

Just make sure you don’t use the same exact keywords for every pin – vary it. You should have a list of keywords you use frequently. Go through it and pick new ones for different pins.

Oh, and watch out for keyword stuffing, yo.

Pinterest is likely headed in the direction of Google and may start to penalize pinners who spam their pins with keywords. Use them in sentences that sound organic, like you’ve written them for real people.

Use related keywords too (think “specific” and “broad.”)

For example:

If you blog about Travel and share a “travel itineraries” pin, you might use travel itinerary, backpack vacations, planning your trip on a budget, and best spots in Costa Rica as keywords.

Just so you know, keyword-rich pin descriptions appear at the bottom of a close-up:

Pinterest SEO | adding keywords to pins.

4. Blog titles + meta descriptions

In the image above, the blog title and meta description are pulled directly from your blog post.

The meta description is 140 characters long and appears below your meta title on Google, like this:

Pinterest SEO | meta description
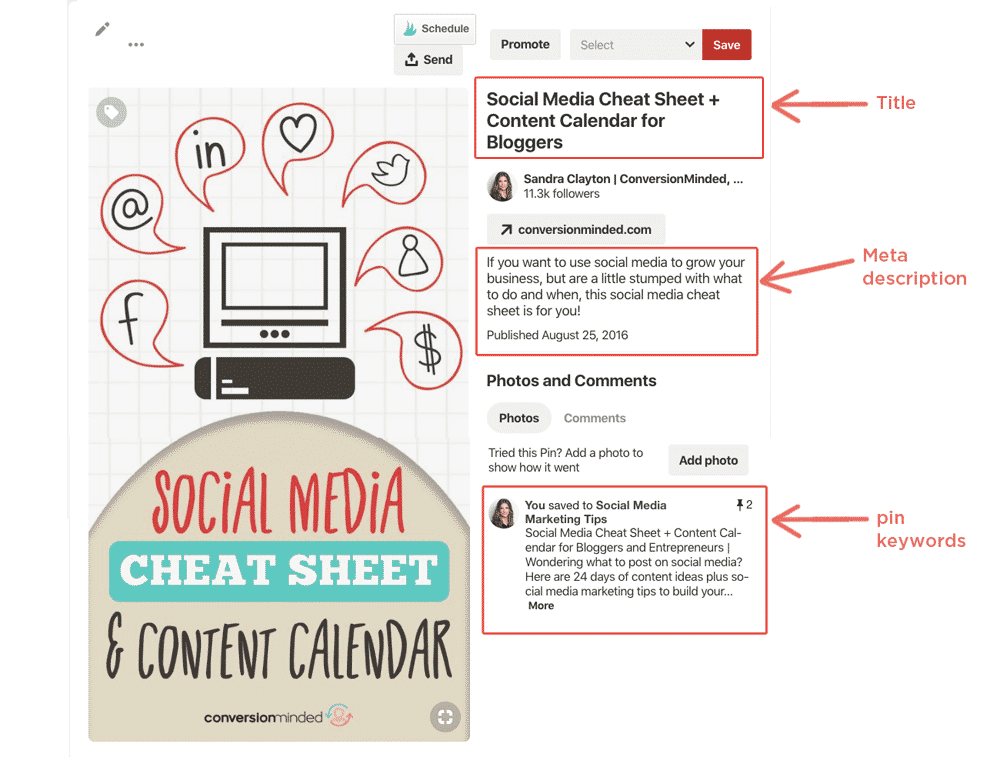
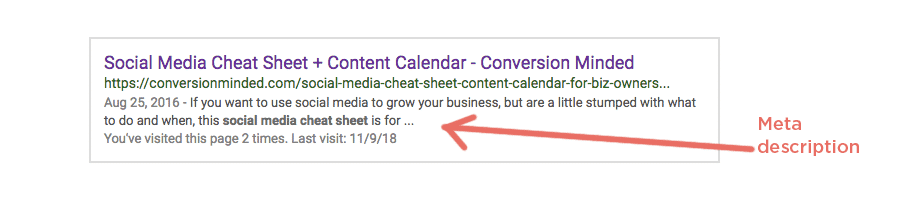
It’s important to add keywords to both places because Pinterest wants to ensure that the content on your pin matches the content on the page it links to.  The more your title and pin description match, the easier it will be for Pinterest to know what your pin is about.

5. Blog posts

I’m not entirely sure how much Pinterest is focusing on keywords in your blog post, but since they matter for Google, it just makes sense that they matter to Pinterest.

Think about it:

When your pin is linked to a landing page with the same keywords, you’re giving Pinterest one more signal that yes, this is the keyword I want to rank for.

Plus, this is another one of those cases where leveling up your Pinterest game can help you get found on Google.  Woop woop!

I cover Google SEO and Pinterest SEO in more detail (step #8 below).

6. Hashtags

Use at least two hashtags for each pin (one broad and one specific).

Broad hashtags will help your new pins get increased distribution when you first share them. Pinterest uses that hashtag to share your pin to the relevant hashtag feed.

Now, because hashtags are like keywords and broad terms are highly competitive, it’s likely that tons of other pins will be distributed along with yours. Which means your broad pin will be pushed down in the feed and people may not see it.

But the purpose of that broad term isn’t to rank in the hashtag feed. It’s to help Pinterest index your pin.

The specific hashtag is the one you’ll likely rank for. Narrower hashtags have less competition and better chances of showing up in relevant searches long term.

Just remember, you need both one of each.

Step 8) Pinterest SEO and Google SEO

I bet you’ve probably wondered at some point or another, Can I use the same SEO strategies for Google and Pinterest?

You are SOO on the right track, friend! I’m a huge fan of having multiple sources of traffic. Algorithms on any platform can change on a dime…and Pinterest is no different. You just never know if your account will be flagged for spam and (mistakenly) suspended. It’s happened to the best of us!

Since we’re already jammin’ on Pinterest SEO, why not work smarter and tackle Google right out of the gate, no?

Many strategies you would use to rank on Pinterest are the same for Google. Plus, as you research and apply keywords to pins and posts, you’ll get into a habit of SEO’ing everything.

Now, there ARE differences between Pinterest and Google SEO…

For starters, to rank on Google you need to write a post that *beats* others on the same topic (think longer, more detailed, better design, etc). But over on Pinterest, you can get by with 500 words if you create a great graphic with a killer headline and use the right keywords in your pin description.

In my Pinterest course, The Pinterest Traffic Bootcamp, I show you exactly how to find “traffic” keywords and create a year’s worth of content with ranking potential on Pinterest AND Google.

For example:

Example of a Pinterest pin ranking in Google Image Search SEO

This infographic is one of my top performing pins on Pinterest:

When you click through to the post, I show the infographic again with a short intro (maybe it’s 700 words).

I’ve been able to drive consistent traffic to the post since I published it over a year ago. In fact, it’s always in my top ten because of that pin. The post itself doesn’t rank on Google, and with only 700 words I don’t expect it too. But you know what?

It ranks on Google Image Search:

Example of a Pinterest pin ranking in Google Image Search SEO

So when it comes to Google and Pinterest SEO, just know that your pins can help you get traffic from Google, both directly from your posts and indirectly through your pins.

Wrapping it up!

Did I answer all your questions about Pinterest SEO? I hope so! Here’s a quick recap of everything we covered:

  • Recent Pinterest changes give you more ways to get found.
  • The SmartFeed uses four criteria to score your pins.
  • Set up a business account so that Pinterest knows you create content.
  • Create a content strategy that you can maintain consistently.
  • Research and add keywords following step #7.
  • Once you’re comfortable with Pinterest SEO, move on to Google SEO.

And remember to share pins that make people want to click, share to group boards and tribes, and SEO the heck out of everything!

More random thoughts and questions

Here are questions that the wonderful members of my Facebook group have asked:

Should you pin manually or use Tailwind?

According to Sarah at Pinterest, Pinterest will not penalize creators who pin via Tailwind.

It’s really a matter of preference.

I recommend that you pin manually for the first two months so that you can get a feel for how Pinterest works and use the platform as your audience does.

Is it better to share to tribes or group boards?

As I mentioned, group boards are getting pretty spammy. But all it takes is one good one, and you can reach hundreds of thousands of people.

Tribes have more accountability than groups because of their share-for-share rules. Having said that, there’s no guarantee that other tribe members will share your pins.

The best thing you can do with tribes and groups is monitor the activity and make sure you’re contributing to ones with high engagement and reciprocity.

What is the SmartLoop?

It’s a Tailwind tool that will save your sanity! Use it to create continuous loops of your pins (similar to the now-defunct campaigns in BoardBooster). Just specify which pins to share and to what boards, then let Tailwind do the pinning for you. It will even allow you to set group board rules and set specific time slots for your pins.

Should you delete pins?

If you mistakenly share the same pin to a personal board, delete it. Otherwise, leave them. You never know when your older pins will suddenly take off and go viral. It can be months and months later.

How do you add keywords to pins?

You add keywords to the pin description, which you can do when you upload the pin to Pinterest or when you edit the *alt text* of the image in your post. There are also plugins like Social Warfare (affiliate link) and Tasty Pins you can use.

Should you use board sections?

If you like them, go ahead and create them. Make sure you add keywords in the sections to give Pinterest more information about the contents. That said, I prefer niching down to sectioning. If you share to the same BROAD board over and over, instead of sectioning it create a few niche-specific boards. You’ll have more distribution options.

Does metadata matter for traffic?

Meta titles affect Google rankings, and I assume they affect Pinterest rankings too. Meta descriptions, on the other hand, aren’t a ranking factor on Pinterest or Google but they can help you get more traffic.

When people view a close-up of your pin, your meta title will appear first. Then your meta description, and THEN the pin description. All of these should make people want to take the next step and click through to your post. If you have a killer title and meta description in there, it helps.

How do you set up rich pins?

There are two steps involved and they’re really simple:

  • First – Add the metadata to your website.
  • Second – Apply for rich pins with Pinterest.

The first step is a 1,2,3. I’m going to show how to do it with Yoast SEO.

Select SEO > Social from the left sidebar in Yoast. Then select the Facebook tab and make sure that Add Open Graph metadata is enabled. It should be by default, but it’s a good idea to check before moving on.

Voila! You’re done. Now your posts are ready to display as article rich pins. The last step is to verify rich pins back in Pinterest, which you can do right here: Rich Pin Validator.

Should you write posts for Google, Pinterest, or both?

Once you master Pinterest SEO, start tackling Google SEO.

When you do, I recommend alternating between Google and Pinterest. Say, one week you write a post for Pinterest. You do keyword research upfront, look at popular pins and create an amazing graphic and killer headline for it – the post is about 800 words.

The next week you go all in on Google…keyword research, epic post, great design, long and detailed…all of it. That post is crazy long, like 3,00 words. (yep)

When you approach SEO this way, you will likely get traffic from Pinterest AND Google. And you won’t have to spend hours and hours writing a 3,000-word post every week. Give yourself a break on the *Pinterest* weeks.

This way you’ll have an SEO strategy for every post.

Can you use the same keyword research tools for Pinterest and Google?

You can. It’s easier to use Pinterest for Pinterest keywords and Google tools (Adwords Keyword Planner, Google Search, KWFinder) for Google keywords.

How many boards should you create?

Great question! As many as you need for your niche and as many as you can share to consistently. Engagement is a biggie. If you have a lot of personal boards with little or no engagement, you run the risk of Pinterest ignoring your pins altogether.

Should I use a keywords worksheet?

I think it’s helpful to brain-dump keywords onto a worksheet. Since you’ll likely be blogging about similar topics, some of the same keywords will pop up again and again…if you have them handy you can save a ton of time.

Next Steps

Pin, pin, pin!

Set up your account, start blogging, create pins, join group boards and tribes, track what you share and when, and don’t forget about Pinterest and Google Analytics. Check them each month, so you know what’s working and what you need to change for consistent results.

I’ve got answers to ALL of your questions about Pinterest SEO in my new mini-course, The Pinterest Traffic Launchpad. Click the image below to learn more about it.

The Pinterest Traffic Launchpad

by

Want to ramp up your Pinterest marketing? Uses video pins! Here’s how to upload videos to Pinterest (plus why you should do it vs. share videos from YouTube). Part of my Pinterest Growth series. Click through to start uploading videos and doubling your reach on Pinterest! 
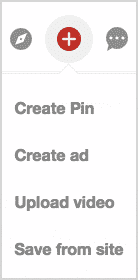
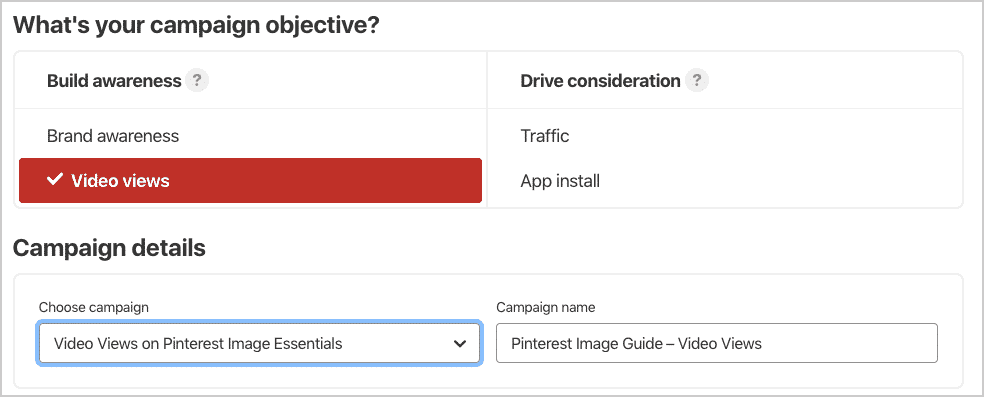
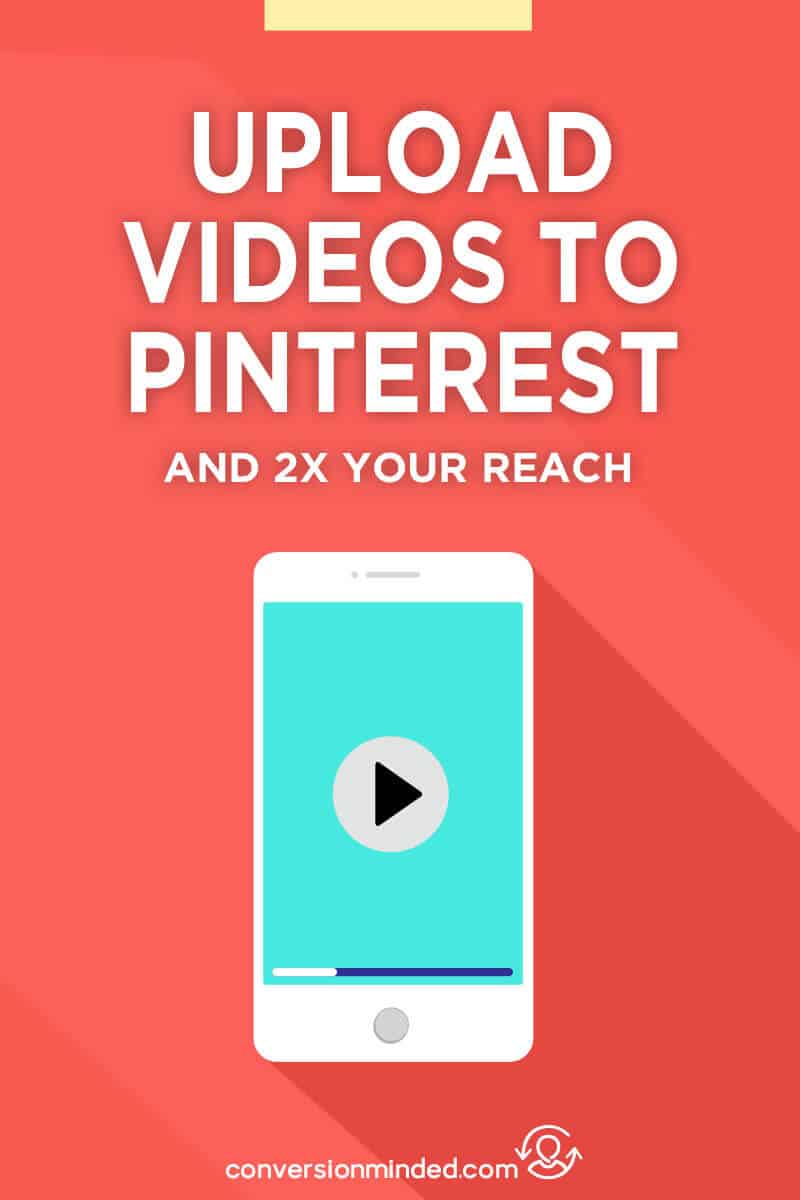
Did you know that you can upload videos to Pinterest?

Video pins have been around for some time so I may be late to the party here. Still, I’m intrigued by autoplay video pins and like the idea of repurposing content I’m already creating for YouTube to share on Pinterest.

Here’s why I recommend uploading videos on Pinterest rather than sharing them from YouTube:

  • Pinterest recommends a vertical or square format (not horizontal).
  • You’ll be driving traffic to your website rather than a social channel.
  • You’ll see the player icon on your pins.

Ready for the details? Let’s dive in.

This post contains affiliate links, which means that I may receive a commission if you click a link and purchase something. No worries, I only recommend products that I love and use in my business, and that I think you’ll find helpful as well.

Updated: May 15, 2019.

1) First, who can upload video pins?

If you want to squeeze the juice out of any pin, you’ll need a business account. Video pins are no different here. Make sure you switch to a business account to access the video upload option.

Next, create a billing profile. According to Pinterest:

Only advertisers can add their own videos directly to Pinterest. You might see these as promoted Pins, or on their boards. You can still save your favorite videos from YouTube, Vimeo, and TED, but they’ll only play if you view them close up.

Note: You may not need to create a billing profile. If you follow the steps below and see a video option when you create a new pin, you’re all set. If you don’t see that option, go ahead and set up a billing profile and enter a credit card. The good news is, you won’t need to set up an ad campaign or pay for organic video pins. A billing profile is simply a requirement to upload videos.

2) Next, what format + size works best?

Most of the specs for uploading video are straightforward, and you’ll see them on the right side of the upload window:

Pinterest specs for promoted autoplay video pins

Here are those specs:

File type: .mp4 or .mov
Max size: 2GB
Length: Min 4 sec up to 30 minutes
Resolution: Minimum 240ppi
Frame rate: Minimum of 25fps
Recommended aspect ratio: Square (1:1) or vertical (9:16)
Recommended length: 6-20 sec. video length

Now, about that recommended aspect ratio.

My first video on Pinterest was horizontal (the same video I posted on YouTube) and my pin looks perfectly fine. But since Pinterest encourages vertical pins, I’ll use a 9:16 aspect ratio next time.

#PERK The 9:16 aspect ratio also works for Instagram.

Now I’m wondering…can I promote my horizontal video pin with autoplay? I’ll have to check on that. If you’re curious, you can advertise your video pin fo’real with an active campaign. See more on that in the next step.

Side note: This 360-degree tripod mount makes it easy to switch between vertical and horizontal mode on your smartphone:

3) Upload your video on Pinterest.

This part is easy peasy.

First, select the “+” button, same as you would to upload any pin. Then, Upload video.


Upload a video pin to Pinterest.


While Pinterest is uploading the video, you can select a thumbnail image.

Edit your video pin thumbnail for Pinterest.


As with YouTube, you can use a captured thumbnail image or upload a custom image. I recommend going the custom route and adding a title and/or graphic to the image, so it really pops.

Whew! Almost there. Only two steps left:

  1. Choose your board
  2. Edit the pin

That first step is straightforward. It’s the last one that most people forget.

Make sure you edit your new pin so that people can find it. Include a title, website, and keyword-rich description (always, always!).

The Edit Pin window in Pinterest

#PROTIP Upload the video to YouTube also. Then, embed the YT video in your blog post and link your video pin to the post.

Here’s what the uploaded video will look like on your board:

uploaded video pin with the player icon

See that cool player icon? That’s what you get when you upload directly to Pinterest. 🙂

4) What about promoting your video pin?

Absolutely! To do that, you would create an ad from the top left menu, then select Awareness > Video Views.

Pinterest Video Awareness Campaign

Give your campaign a name and set a daily budget for it. This will help you control ad expenses.

On the next page, you’ll see Ad Group details.

As a general rule of thumb, you want to name ad groups according to the audiences you’re targeting. This will help you determine which audiences give you the best results at the lowest cost. (You can create custom audiences based on website visits, engagement, subscribers, and more).

Even though you set a daily budget for the campaign, it’s important to set a budget for the ad group. This way, you can test multiple audience/targeting combos within the campaign.

Another thing you can do here is to add keywords. Enter a keyword and Pinterest will suggest related keywords, along with their monthly search volume. Just click the plus sign to add them to your targeting.

Pinterest keyword targeting for ads

Next up, choose the video you want to advertise, give it a title and a website destination, and select Promote pin. You just created a video pin. Woo hoo!

5) Repurpose Instagram Stories.

If you’ve been recording Instagram Stories, why not pin them on Pinterest?

Since Pinterest prefers videos under 20 seconds and stories are 15 seconds, you can easily pin a snippet from your story.

Next time you record a video, keep both Instagram and Pinterest in mind…

Maybe you record a quick tip from a blog post…

Or, you record a soundbite from your free offer and drive people to a landing page…

Is your head spinning with ideas yet?

When you pair Instagram with Pinterest, the possibilities for video are endless (especially now that Pinterest supports square images). Just remember to claim your Instagram account on Pinterest, step #7 below.

6) What types of Pinterest videos perform best?

Off the top of my head I’m thinking short videos (2-3 minutes, tops). Long enough to grab people’s attention and make them curious to find out more.

If you already share pins that are tutorials, use those as jumping off points. Your goal should be to entice your audience to take the next step (click!).

7) Work backward from your end goal.

The big question with video pins is, Where do you want to drive traffic?

? Want more website traffic? Upload the video to Pinterest and link to a post or page that is relevant to the video. I recommend linking to a blog post with the embedded video. This is called “repurposing” and is a powerful way to leverage content you’re already creating to boost traffic to blog posts, landing pages, sales pages, and more. High five!

? If you want to grow your YouTube channel, select “Save from site” and enter the YouTube link. You can also upload the video to Pinterest first, then edit the pin and add the link.

? If you want to grow your Instagram following, no problem. Pin the Instagram post to Pinterest. Make sure you update the pin description with Pinterest-perfect keywords and hashtags (Pinterest will use the Instagram comment by default).

#PROTIP Claim your YouTube channel and Instagram account to ensure that all video pins from these platforms are attributed to you. You’ll also gain access to Pinterest stats on any video pin you save from these accounts (including repins).

That’s a wrap! Have you tried video pins yet? I’d love to hear your thoughts!


by

How to Grow Instagram Followers Organically
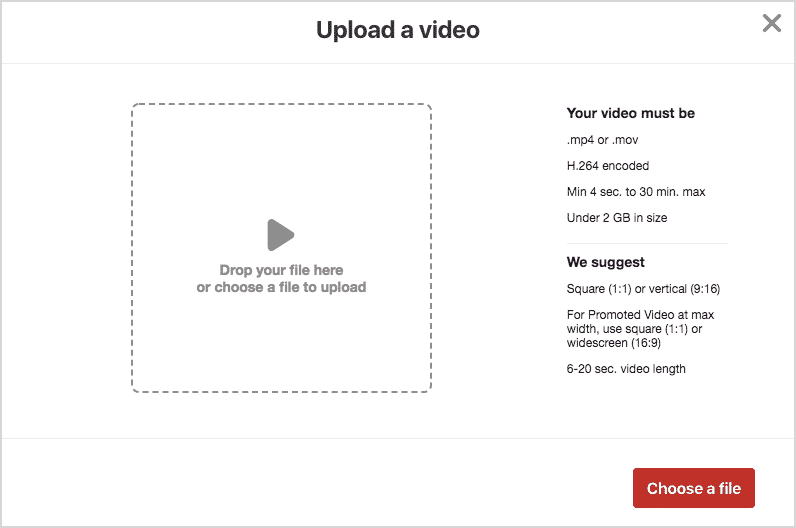
Ever have one of those days where you can’t POSSIBLY squeeze another thing in, then you remember a blog post you have to write?

Today is one of those days for me.

I’ve been dropping the ball on blogging lately and it’s time to pick it back up, so I’m hustling to get it done. The good news is, I repurposed this post from a video and it practically wrote itself!

If you’ve been wondering how to turn videos into blog posts, it’s actually very easy. I recorded a video, uploaded to YouTube, transcribed it at Rev.com, edited it, and hit publish.

But I digress! This post is about Instagram.

I’ve been getting a lot of questions about how to organically grow Instagram. So today, I’m sharing five tips that will help you do just that.

Let’s dig in.

#1) Make sure your Instagram looks gorgeous.

This one’s a no-brainer but worth mentioning because Grammers are all about eye-candy. 🙂

Make sure your Instagram account is beautiful and reflects your brand the same way that your website does.

Your colors, fonts, and images should communicate a cohesive look, feel, and personality. Think about ways you can use your posts to tell a cohesive and consistent brand story that draws people in.

Whether you’re framing your account around a niche, interest, or personality, all of your images should support each other and work together harmoniously to tell that same story.

The same thing goes for your profile:

Make it descriptive and tell people what they can expect when they follow you. Bonus if you include a call to action!

The reason this step is important is that people will visit your account. And they’ll be more likely to follow you if you can wow them with stunning visuals, colors, and images that tell a rock-solid story.

#2) Next up: follow, comment, and like.

One way to pull people into your account is to follow the followers of brands related to your niche.

Now, please don’t go crazy and follow 200 people a day or anything like that. Keep it low key. Follow people, here and there, who might want to follow you back.

#INSTATIP  You can also comment on posts, but don’t drop lame comments like “nice” or “great post.” Bleck. Comment like you mean it. Write something thoughtful that will inspire people to visit your account.

You can also look for hashtags related to your niche. Now, I’m not talking about hashtags to use in your posts (I’ll get to that, step #5 below).

Right now, I’m talking about finding posts that use hashtags related to your niche, and commenting/liking their posts.

#3) Create stories and highlights.

Have you noticed that Instagram’s organic reach has taken a nosedive (the same way that Facebook organic reach is down)?

Stories are a way to get some of that reach back. Have you created one yet?

I’ve noticed a bump in traffic when I post a new story. Plus, they’re fun to make!

And if you change the settings to “Save to Archive” on your phone, you can save stories to your profile. That means they’ll won’t disappear after 24 hours and people will see them when they visit your account.

Just one more way to engage people and increase your visibility, friends.

Here’s another:

Use hashtags and location tags.

Hashtags and location tags help people (beyond your followers) find your stories.

There’s even a way to show up on Instagram’s Explorer page (if you’re strategic with hashtags – step #5 below).

Let’s say you’re at an event and create a story using the event’s location tag. You’ll likely appear for searches that include that location.

You can even create a cool “About You” story. Maybe it’s the first story people see when they view your account so they can find out more about you.

Here’s the idea with all of these tips:

While you’re working to increase your visibility on Instagram, you do anything you can to make people want to stick around, see what else you have to post, and get to know you.

So these are working hand in hand…

#4) Post consistently + frequently

Next up, post consistently, and try to increase the frequency if you can.

Now, if all you can manage is once a day, that’s perfectly okay. But if you can post a bit more frequently, you’ll likely see a boost in all things Insta! I see a noticeable increase in both followers and engagement when I post three times a day vs just one.

Before you share your post, spend some time writing a description that will start a conversation.

Maybe you write something really thought-provoking and end it with a question. If you can toss the ball back to your audience for their thoughts, it will work in your favor, with me?

The reason is that Instagram is watching your account. And it’s giving you a score based on your number of followers and level of engagement.

Higher scores = Higher hashtag rankings = Get more Instagram followers organically

Curious about what that means? Read on to step #5, friend.

#5) Create a hashtag strategy

When you think of hashtags, think of SEO and keywords. That’s the way hashtags work on Instagram.

And they have A LOT to do with your Instagram score.

For example:

Let’s say you’re a big account with a huge number of followers and crazy engagement on your posts. Instagram gives you a high score for all your hard work, and you easily rank for highly-competitive hashtags.

(Highly-competitive hashtags are ones used by 200K+ posts.)

Buut, if you’re a smaller account, you’re out of luck because you can’t compete. You have about ZERO chance of ranking for those same keywords.

So what should you do?

Great question! You still need to use hashtags so that people can find your posts.

You just can’t use any ol’ hashtag. It’s time to get strategic, which I’m going to show you how to do right now!

First off, make a list of your hashtags.

The first step with hashtags is to collect data about your account. You want to find your current level of competition, so you know where you stand today, make sense?

You want to find out what hashtags you actually have the potential to rank for on Instagram, so you can focus on those.

Start by writing down hashtags related to your niche and interests (I recommend using Google Sheets). If it helps you to brainstorm, think of hashtags you commonly use in your posts.

Next, look for related hashtags that have a range of competition levels. For example, if a common hashtag for you is “plannerprintables”, look for related hashtags with:

  • 1,000 posts
  • 5,000 posts
  • 10,000 posts
  • 20,000 posts
  • And so on

Can you see what we’re aiming for here? You want to create a list of hashtags with different levels of competition.

Then start testing them. Use them in your posts for a day. Then later that same day, search for those same hashtags.

Find your current hashtag level.

Let’s say you have a new account. You do the hashtag test above and appear for hashtags with 5,000 posts.

Can you see the magic here? High five! You’ve just found your hashtag level!

Which means that 5,000 is your current Instagram score.

Knowing this, you can look for other hashtags at 5,000 and start using them in your posts (make sure the hashtags are related to your niche and interests).

Next, test your hashtags again.

I recommend using your 5,000 hashtags for a month, and then rinse and repeat.

Only this time, search for and test hashtags with 10,000 posts.

Use your newly-found 10,000 hashtags and wait a bit. Later in the day, search for them and see if your overall Instagram score is higher.

THIS is how you can get more visibility on Instagram, friends!

Last thing, give your posts a chance to be found!

Now, you may be thinking I’m a new account, so I’m only going to look for hashtags with 500-1000 posts.

I know it’s tempting to aim for hashtags with very little competition when you’re starting out, but please don’t limit it to just that!

The reason is that hashtag competition = hashtag popularity.

More competitive hashtags mean that more people are searching for them. AND less competitive hashtags mean fewer people are searching for them.

So if you lowball your hashtags all the time, you will likely only be seen by a handful of people. This will have the same effect as using only highly-competitive hashtags:

You won’t get the results you need.

But if you test your hashtags incrementally following the steps here, more and more people will start finding your posts.

That’s a wrap! If you create a 100% on-brand experience, engage with your audience, share stories, and get hyper-focused with your hashtag strategy, you’ll have no problem getting more Instagram followers organically.

Have more IG questions? Let me know in the comments!

by

#Pinterest Template Guide: Create Pinterest-Friendly Images that Drive Traffic | One of the fastest ways to get traffic from Pinterest is to create Pinterest perfect pins. In this post, I’ve got 6 easy social media design and Pinterest tips that will help you create pins people want to click! Pinterest marketing / Pinterest Fundamentals #PinterestmarketingYou want to know the #1 question people ask me?

How do I get more traffic?

And when I hear that question, what I really hear you saying is How do I get more traffic so that I can build my business?

Now, you may not think of images when it comes to getting more traffic.

Me? Images are the FIRST thing I think of…specifically, Pinterest images.

So today, I’m sharing six Pinterest image tips to help you create pins that boomerang your traffic and get more people to your website.

1) Start with the right image sizes.

When it comes to Pinterest image sizes and dimensions, the image width is a breeze: anything from 600-800px wide will work.

The pin height is where things can get tricky because Pinterest is trying to squash those super long pins that hog up the feed.

First, what hasn’t changed?

The standard Pinterest image size is still a vertical pin at a 2:3 ratio (2x width : 3x height). Here are some examples of these dimensions:

  • 600 x 900px (Pinterest recommends)
  • 735 x 1102px (Canva’s preset size)
  • 800 x 1200px (my preferred size)

Don’t worry if you’re using a design tool with a preset size that’s different. Just make sure the ratio is 2:3.

Next, what HAS changed?

Pinterest likes square pins now.  This is one of those changes I’m excited about because it means that we can share Instagram posts to Pinterest.

Want to know how?

Tap the three dots at the top right of your Instagram post, then select Share > Copy Link and head over to Pinterest. Choose the board you want, and you’re done.

Share Instagram posts to Pinterest.

#HEADSUP Pinterest will use the first few (130 or so) characters from your comment as the pin description. You may need to modify or optimize the pin description after you share it.

Also, the pin URL will link back to Instagram, which is wonderful if you want to grow your Instagram following and engagement. If you’re like me and share blog posts on Instagram, make sure you redirect the URL to your blog post.

What about infographics?

I say keep using them! My longer pins drive waaay more traffic than the standard size. The only thing I’m changing moving forward is the height, which leads me too…

Recommended pin sizes

Here are the pin sizes I’m experimenting with right now:

  • Square – 1:1 ratio
  • 800 x 1,200px — 2:3 ratio
  • 800 x 1,600px — 1:2 ratio
  • 800 x 2,160px – 1:2.7 ratio

And here’s what those sizes look like in comparison:

Pinterest image sizes 2018

Just so you know, those last two are arbitrary.

Even though the SmartFeed is working hard to squash longer pins, my longer infographics still drive the most traffic to my blog. I’ll keep creating them, but I’ll be watching my analytics…

Pins longer than a 1:2.1 ratio will be cropped in the feed (for a 800px pin, that means 1,680px). What this means is that the bottom of your pin, including your branding and URL, will only show when someone clicks to a close-up.

If you want to create viral Pinterest pins rapidly, without starting from scratch every time, you may want to try Viral Pin Templates. These pre-made pin graphics are easy to customize and ready for you to add your content and share. Click the image below to learn more about Viral Pin Templates.

Done-for-You Pin Templates

Learn more about Viral Pin Templates

2) Use color purposefully.

For the most part, yellows, reds, and oranges tend to stand out and get more clicks than blues and greens.

Now, if your brand colors are blue or green, you can still make your pins pop. The trick is to “train” people to click on certain colors, which I cover in detail in this post: How to Choose Colors That Will Make Your Brand Stand Out.

When I started designing pins, I chose dark background colors with white text on top, like this:

find free images for your blog Pinterest images

Once I changed my color palette to peach and cream, my pins performed much better. Looking back, I think those darker pins looked depressing and got lost in the feed.

Same thing happens with blue: it just gets lost.

Not sure which colors to use?

Here’s an idea: Look at pins and boards outside your niche.

Let’s say you’re a fitness coach. Instead of looking at fitness boards, look at travel boards. If you’re a life coach, look at sewing boards.

The reason is that if you look at pins within your industry, you may be drawn to a pin simply because you have an attachment to the title or image.

But if you look at pins that you have ZERO interest in, you can be more objective. For example, these are pins from a parenting board:

Pinterest image colors that stand out


Since I’m not interested in this topic, I’m able to separate pin colors from pin titles. The colors in the middle jump out at me, how about you?

Even if your brand colors are green or blue, be creative and find a way to add contrast colors that pop.

Heck, you may even fall in love with those contrast colors and decide to rebrand! If that’s the case, make sure you learn more about The Build My Brand Toolkit. It may be just what you’re looking for!

3) Limit the number of fonts.

Here’s the deal with fonts…

Don’t go crazy with them, choose just two. I recommend a sans-serif font for your main font and one other contrast font.

Pro tip: Use your contrast font strategically.

It’s tempting to want to use every cool font you find, but please don’t! The whole point of fonts is to give readers a visual hierarchy of elements. You want to make sure that they know what to focus on.

Your contrast font should help people make sense of the text.

For example, I created a pin a while back with the title 100 ways to market your business. I used a contrast font for the word “market” because it’s a verb and I wanted people to visualize themselves marketing their business.

Just try not to waste your contrast font on throw-away words like how, and, or in.

Other pro font tips:

  • Make sure your pin is easy to read on mobile devices.
  • Choose simple, bold fonts that stand out.
  • Choose a font family with multiple weights for variety. Open Sans and Roboto are both good choices.
  • Grab my Font Inspiration Kit with over 94 free fonts and font pairings!


Psst… I break down all these steps in detail in this video:

4) Use text overlays.

This one’s a biggie. I still see many people posting pins without text overlays, which is a newbie thing to do and not a big deal. That said, it’s something you want to move away from.

Use a tool like Canva, PicMonkey or Photoshop (step #6 below) to add text to your pins so that people immediately know what they’re about.

Pinterest is different than Instagram.

Grammers love to get lost in beautiful images that paint a picture and tell a story. For this reason, getting clicks on Instagram largely comes down to the image.

Pinterest is different.

People look for ideas on Pinterest…they either want to know how to do something or where to buy something.

So if you have a “how-to” blog post about growing a garden, make sure you add text to your pin so that people know why they should click. Try to use only words that will make people want to click (if you need to, shorten the title).

Here’s why this matters:

When you create text overlays that are **designed for clicks**, you can lead people to action.

Let’s say I’m a crafty girl and want to make a wreath. I search for “wreath diy” and right there I see this gorgeous pin:

Pin image for a do-it-yourself wreath project.


And I like this pin because I’m ready to make a wreath and this one looks stunning. Plus, I know it’s a tutorial and I can picture myself following the steps to create a beautiful wreath.

The more you can tease people with tips or advice like this, the more you can draw them into your content and over to your website. Click To Tweet

The more you can tease people with tips or advice like this, the more you can draw them into your content and over to your website. If you’re stumped here, ask yourself:

What text would make ME want to click?

If you follow only one step in this post, make it this one! It’s a game-changer.

5) Use images that reflect your brand.

A good image can make the difference between clicks and crickets. There’s no room for so-so on Pinterest.

Make sure your pin image reflects your brand and helps people understand how it fits in with their lives.

For example, let’s say you sell handmade belts.

Instead of putting your belt on a dress form, put it on a live model and be creative. Add accessories and other props so that when people see your Pinterest image, they can’t help but click.

Of course, you don’t have to use images in your pins. If you’re a blogger, coach, or consultant, a simple pin with text and graphics may be all you need.

Whatever you do, make sure the photos you use don’t compete with your text. I used to try to squish my text on the left or right of a photo and get it to fit just right.

Examples of a pin template that's hard to edit.


Big waste of time! I finally gave up on this style after I couldn’t find photos that worked well. Plus, it took hours of fudging to make everything fit.

(I also stopped using pics with full-on faces because they get fewer clicks.)

Looking for stock photo sources?

My favorites these days are Thinkstock and Stocksy (both premium); and Pixabay, Unsplash and Picjumbo for free photos. If you want to save some time, head over to thestocks.im. You can find tons of free and paid photo sites, all there in one place.

In terms of style, I’m all about styled stock photos and flatlays these days. I’ve even been experimenting with taking my own styled stock photos!

Pro tip: Check the license when using free images. You want CCO or  CC1 images that don’t require attribution.

Related: 6 Sources of Free Images for Bloggers

Use relevant images

I learned this one the hard way…

One of my first pins had an image of an adorable puppy holding a sign between his teeth. I thought it was SO cute and decided to add this text to the sign:

How to create call to action buttons that get clicked

Oops! Pinterest thought my pin was about pets. With that image, I had no chance of ranking for my target keyword.

Pinterest tries to “see” your pin, so make sure you use images relevant to your brand, pin, or product.

6) Use the right design tools.

Even if you’re not a designer, there are tools to help you create beautiful designs that stand out above the others. A few of my favorites are:

Canva

You can create so much with it…ebooks, call to action buttons, social media graphics…just about anything. Plus, you can edit and publish designs right from the dashboard.

You can even choose from their library of templates, including share images, cover photos, and infographics (that last one is a HUGE plus). When you’re starting a new design, you can select one from your dashboard to use as a template:

Canva custom image designs


The best part is, you don’t have to be a designer to create beautiful designs with Canva. Just choose one of their templates, play with colors and text, and upload an image (or choose one from Canva’s huge image library). Save your new design as a pdf, png or jpg – or share it directly to social media.

PicMonkey

I haven’t used PicMonkey much, but from what I’ve seen it has similar editing features, minus the Ebook template.

PicMonkey is known for photo editing. Want to add effects to your photo to make it your own? You can do it! You can even change the color of an image:

PicMonkey Pinterest Image Templates


I’ve got a complete PicMonkey tutorial for you here: How to Use Free Styled Stock Photos to Build Your Brand

Photoshop

If you’re ready to design like a pro, Photoshop is your tool.

With Photoshop you can customize photos and images in a way that you can’t with Canva or PicMonkey. You can even make old photos look entirely new using the mask and rubber stamp tools (great for repurposing your stock photos).

For this pin I used four stock photos – one for the top and three for the body:

Custom branded Pinterest template

To create the top image, I spliced, cut, cropped, and rotated the color wheels until I was happy with their placement.

To create the background image, I cloned sections from a stock photo (using the rubber stamp tool) to create a wooden texture. Then I ghosted two other photos on top to add more dimension.

See how creative you can get with Photoshop? You can use the same photos over and over to create pins that are unique and original.

Want to start using Photoshop? I’ve got a killer graphics tutorial for you right here –> How to Use Photoshop to Create Branded Social Media Graphics

7) Bonus! Use templates.

When you frequently share fresh content, Pinterest will reward you by showing your pins higher in the feed – and to more people.

One of the easiest ways to kick out fresh pins on the regular is to use templates.

Ideally, you’ll create three or four pins for every post you share (some bloggers share up to eight). Templates allow you to kick out as many as you want quickly and easily.

At a minimum, templates should include your brand colors, fonts, and logo and/or website. I recommend creating a variety of styles. For example:

  • Light background
  • Bright background
  • With images
  • Without images
  • Longer – 1:2 ratio
  • Shorter – standard 2:3 ratio
  • And so on…

This way you won’t be staring at a blank screen every time you create a new pin.

Get Viral Pin Templates!

Click here to learn more about The Pinterest Traffic Launchpad


That’s a wrap! Let me know how you make out with this Pinterest Image Guide. I’d love to hear!

by

Have you been wanting to start a Facebook Group but not sure where to start? This post is for you! I share my best tips for growing an engaged Facebook Group to build an incredible community and increase sales!Hi friends!

If you’re a member of Facebook Groups, you already know what sanity-savers they can be.

Now, I’m not talking about the kind of sanity-savers that drive incredible amounts of traffic or help you grow your business.

Yes, they can do that, but I’m talking about the kind of sanity-savers that make you feel connected to the universe again.

When you’re sitting at your kitchen table in sweats and a t-shirt bangin’ away at your laptop, it’s easy to feel disconnected. And being able to pop into your favorite group, get feedback, share tips, ask questions, and partner up with other members makes you feel like part of something bigger.

(Fo’sure, there’s the dark side of Facebook groups. But that’s for another day!)

Many of you have asked me how to create and grow a Facebook Group, and today, I’m sharing the strategies that have worked for me to help you do the same.

I’ll be drilling down on the art side of creating and promoting a group. For the techie side of how to create a Facebook Group, Neil Patel has a step by step guide for you.

Ready? Let’s dig in.

First, why should you start a Facebook Group?

Well, for starters, you’ll have the opportunity to meet amazing individuals with similar interests and goals. Just like you can in other groups.

But here’s the difference:

In your own group, you have center stage. It’s much easier to be visible as a group owner vs a member because people HAVE to notice you. It’s like networking on steroids.

Here are some other perks:

  • You can reach a broader audience with your posts – you’ll likely get more traffic than other groups
  • More comments on your posts – you can use these to fuel other posts and threads
  • Draw attention to your freebies – pin them to your group for all to see
  • Announce your courses and programs – increased sales
  • Showcase your expertise and build trust – hold Q&A sessions and challenges

Of course, I wouldn’t write about building a Facebook group without pimpin’ my own. 🙂

If you want to network with other professionals and have multiple opportunities to promote your business, I’d love for you to join my Facebook community!

Before you create a Facebook Group

You’ll want to spend some time researching, taking notes, and creating brand assets before you set up your group.

I recommend creating a Google Spreadsheet (or Word doc, Evernote, Excel) so you can keep your ideas in one place. Here’s what mine looks like:
The first step on how to grow a Facebook group is to start with a worksheet to keep track of daily threads.

I create multiple variations to keep my daily threads fresh and new. Then all I have to do is put them in rotation in SmarterQueue. No last-minute wondering what to post. It’s all ready to go!

1) Decide what type of group you want to create.

Here’s where it pays to “think it forward.”

What level of engagement do you want your group to have?

Do you want it to be a promo group where people can sell their products, a group for sharing ideas and tips only, or a mix of both?

And what types of daily threads will you have?

For example:

If you have a wedding planning group, your thread may include the wedding planning highs and lows, best wedding plans, tips, budgeting, and finding photographers, bands, florists, invitations, caterers, and so on.

What about location? Will it be a local, regional or global group where members can buy and sell old wedding items and advertise their services?

As a rule of thumb, sharing groups have higher engagement than promo groups. Buut, it may be easier to get members if you mix it up. Just sayin’.

2) Create a group description.

Take the ideas you have from the previous step and create a group description.

Make sure you include the purpose of your group, who it’s for, and any group rules you have so that everyone can see.

For example, here’s my description:

Promote Facebook Group

See how I include a link to my free resources and my website? Boom.

3) Create a cover photo.

Doesn’t have to be anything fancy. Just a photo of you or a graphic image with the group name.

If you want, you can take it up a notch and brand your cover photo with colors, a logo, and other elements. It’s really up to you.

What size should your cover photo be?

Great question! I’ve got Facebook group cover dimensions and a free template for you.

4) Create daily thread images.

If you plan to run the same threads each week, creating images and scheduling them in advance will save tons of time and headache. This way you can have your group running on semi-autopilot.

Here’s a 1020 x 800 template I use:

Facebook Group daily thread image example


Related: How to Use Photoshop to Create Branded Social Media Images

The last thing you’ll want to do before you create your group is to gather up some Facebook friends and invite them to join. You need to add at least one person (besides you) in order to create the group.

Remember, you can always remove them later!

how to grow a facebook group

Next, it’s time to promote your Facebook Group and get some members!

5) Invite Twitter followers to join.

I send new Twitter followers a message to thank them for following me. In that message, I include an invitation to download a freebie or join my group.

When you do this, make sure you frame your invitation around what’s in it for them. Don’t just ask people to join your group!

Be authentic and human, strike up a conversation. Then let them know about the group and why they should join. What’s in it for them? More sales, networking, support, encouragement? Whatever it is, put it out there!

Whatever you do, don’t send people messages like this:
Grow your Facebook Group using Twitter direct messages.

Ick. What a buzz-kill.

Make sure you make it about them and not you. With me?

6) Invite email subscribers to join.

Don’t forget to email your subscribers! They’re your biggest fast and will likely get the most benefit from joining.

I always include a shout-out at the bottom of my emails, like this:

-P.S. Want your marketing questions answered? I’d love for you to join my Facebook Community where you can network with other professionals, share tips, join forces, and have multiple opportunities to promote your business. Join Online Biz Superheroes.

You can mention your group wherever you prefer – at the beginning, middle, or end of the email.

I like to keep the focus of my email on-topic and close with the group link. Too many buttons and links in the body of the email can be overwhelming, in my book.

7) Include a link on your website.

I just added my Facebook Group to my site navigation. So every time people visit my site, they’ll see the link which will redirect them to the group.

The way I see it, it’s just one more way to make the group visible.

More visibility = more people who know about it = faster growth.

Hmm…sounds like the formula for anything we want to promote, no?

Anyway, we’ll see what happens with it!

8) Mention the group in autoresponders.

When people opt-in to your list or sign up for a freebie, include a link to your group in the Welcome sequence.

Something like:

Hey there! Here’s the link to download the Guide to Wall-Hanging Art.

If you’d like more free resources like this, plus tips to design and sell your wall hangings, join my Facebook community [link].

If you include this extra line in all of your welcome sequences, everyone who signs up for your free offers will have an opportunity to join. And it’s all happening behind the scenes.

The best part is, the more opt-ins you have on your website, the more members you’ll likely get.

9) Add to social profiles

This one sounds like a no-brainer, but it’s easy to overlook. And really, it’s not hard to add a link to your group in your social profiles.

What IS hard is deciding how many calls to action (CTAs) you should include. After all, Instagram, Twitter, and even Pinterest don’t give us much real estate to work with, friend. It’s up to us to choose our primary CTAs.

My picks? My free resources and Facebook Group. Here’s how I include both in my Twitter profile:

Promote a Facebook Group from your Twitter profile.

What about you?

Are you looking to promote a new course or program? Get more subscribers? Or are you all about your group right now?

Psst…Curious about that fancy URL for the group?

You can do it too! Just create a branded domain (through GoDaddy) and have them forward the domain to your group.

I came up with the idea when I started my YouTube channel. There’s no way to create pretty links in YouTube descriptions, and this is my workaround.

#SHAMELESSPLUG Subscribe to my channel! It’s brand new and I can really use your support to help grow it. ✨ You’re the best!

10) Invite members of other Facebook Groups

This one has worked well for me. If you’re in a number of groups, you can direct message people who seem like they may be a good fit.

#WORDOFCAUTION You have to be careful with this strategy. Make sure you follow the group rules. If they don’t allow direct messaging or promoting groups, don’t do it.

And don’t go crazy inviting 100 people a day or anything like that. Maybe ten people every other day, you get the gist.

As long as you mention the benefits of your group (and follow through with your promise), people should be receptive to your invite. Most people have thanked me for inviting them…

11) Invite people who sign up for webinars.

This one I haven’t tried and am so excited to test for my upcoming webinar:

When people register for the webinar, instead of redirecting them to a Thank You page, send them to your Facebook Group. Simple.

I’m going to try this one soon and will keep you posted on my results. If you get to it before me, please let me know in the comments. I’d love to hear all about it!

12) Pin a post or a tweet to your timeline.

This is another one of those things you can put into rotation with other promotions.

Create a post/tweet about your group, then pin it to your Facebook and Twitter timeline. It will be the first post people see when they land on your page.

Pin a group post to your Facebook Page.

Pinning a post is super easy. See those three dots in the upper right of the post?

You can boost the pinned post and reach a bigger audience.

(I’d keep the budget small, say $5-10 a day for a week, and see what happens.)

Even if you boost another post and people visit your page, they’ll see the pinned post first. Woo!

13) Create an Instagram Story about it.

Instagram Stories work! I easily 2x my Instagram traffic every time I create a story.

The best part is, they’re fun and easy to create. Record a quick video or create a graphic about your group and use Instagram’s editing tools to add colors, text, hashtags, and more.

If you enable Save to Archive in your settings, the story will appear on your profile until you remove it, so new followers have a chance to see it.


Create an Instagram Story about your Facebook group.


14) Share your Facebook Group on social media.

You know what? I ALWAYS forget to promote my offers.

It’s terrible! I had to create a product promo worksheet to force myself to get into a routine of promoting offers in the same way I promote blog posts.

And to this day, I haven’t shared a single post about my group on social media (except for the pinned post, step #8 above).

So, friends, I’m off to start sharing!

Here’s my plan:

  • Create three Facebook/Twitter images
  • Create three IG posts
  • Create one pin

Hook those bad boys up in SmarterQueue, post them to my “freebies” category, and let them loop.

Curious about how to schedule posts with SmarterQueue? I’ve got a full guide for you right here.

That’s a wrap! Those are my tips on how to create a Facebook Group (and how to grow it to get more customers). What tips do you have to share?

by

Looking for Tailwind Tribes to join? I’ve got a step by step guide to exploding your Pinterest marketing and traffic with Tailwind Tribes. Tribes are my new secret traffic weapon, and the best way to skyrocket your Pinterest growth. Grab my free printable list of Tailwind tribes for mom bloggers, travel bloggers, food bloggers, DIY/craft bloggers, and more. #pinterestmarketing #pinterest #bloggingforbeginners

Do you use Tailwind tribes for your blog or business?

I started using it when it was still in beta, back when my traffic was tanking, and I was desperate to get it back.

I wanted my pageviews back up, and quick, so I pounced on tribes hard.

At first, I’d stare at the dashboard wondering What the heck do I do? Which tribes should I join? How do I even submit pins, and which ones should I share?

Sound familiar?

If you’re itching to explode your reach through Tailwind tribes but feel a bit stumped with where to start, this post will help. I’m sharing everything I’ve learned to help you get maximum results.

And if you’re curious, tribes did help me recoup some of my lost pageviews. While it didn’t solve my bigger issue (not posting consistently), it sure gave me the bump I needed.

Now, about that bigger issue:

A huge lesson I’ve learned is that there are NO SHORTCUTS!! We absofreakin’lutely must create content on the regular if we want to see steady, organic growth.

You need to create and share content on the regular if you want to see steady, organic growth in your blog or business.Click To Tweet

But I digress, back to tribes. I can’t think of a better time to jump on the bandwagon. If you haven’t already, you’re just in time to join the party. Tribes have seen massive growth in the last few months, and new ones are popping up every day.

More tribes = more reach = more people exposed to your content.

Alrightie, let’s dig in.

Bonus: I created a tribes cheat sheet with a list of the most active tribes for many niches. It includes the activity and visibility of the best performing tribes, plus invitation links, member counts, and rules so you can easily join the ones you want. A complete life-saver! Just click the image below to download.

Use the Tailwind Tribes Cheat Sheet to start driving tons of traffic from Pinterest with Tribes

This post contains affiliate links, which means I may receive a small commission, at no cost to you, if you make a purchase through a link.

1) First, what is a tribe?

Tribes are a group of professionals who come together to share each other’s pins and give each other a boost in traffic, similar to share-for-share Facebook Groups – with a twist. Tribes are created around specific niches, industries, or interests, which means you’ll have a pool of content to share this is specific to your audience.

When you add your pins to a tribe, other tribe members can view, schedule, and repin it to their boards. This means you have access to the collective audience of your peers and can drive massive traffic to your posts, just by participating.

And you can hand-pick content you want to share with the tribe (and in turn, with your audience). Other tribe members can do the same. You end up with a continuous stream of hand-picked content as everyone contributes.

For example:

Let’s say you join a food tribe.

On Monday morning, you submit your avocado chocolate pudding pin and repin Mary’s eggplant lasagna to your Paleo board. Later that day, Harry, another tribe member, shares your avocado pin to his Delicious Desserts group board. On Tuesday, someone in Harry’s group repins it, which leads to 500 repins and 50 pageviews, just like that.

Can you see the snowball effect happening here? It’s that easy to get more traffic, reach, and repins through tribes.

Now, let’s drill down even more.

If you want, you can watch this video to see tribes in action:

How Do Tailwind Tribes Work?

2) How can tribes help improve your Pinterest rankings?

Now, I bet you’re thinking Curating content is nothing new. Been there done that!

You’re so right! Networking and sharing content is not a new strategy. There are sites like Feedly, Quuu, JustRetweet, Zest (my new favorite), plus engagement pods, share-for-share groups, and more.

Here’s the thing about Pinterest:

Both pin AND domain quality are huge ranking factors. When Pinterest sees you as sharing quality content that adds value, your pins will likely rank higher in search results.

Bottom line, the SmartFeed is watching everything we share, yo. ????

The more pins we can share (both original and curated) with a high number of repins, comments, and clicks, the better chance we have of getting traffic from Pinterest.

That’s where Tailwind tribes come in.

Remember back in the day, how easy it was to keep the SmartFeed happy? When we could tell which pins were popular by the number of repins? With Tribes, we get repin counts back, baby!

3) How much do Tailwind Tribes cost?

Tribes are add-ons (called PowerUps), and you don’t have to pay Tailwind to use them. You can access them directly from your dashboard, even with a free account. The best part is, you can also join tribes for free. #DOUBLEFREE

With Tribes Free, you can join five tribes and share 30 pins a month. And if you’re curious, that’s an aggregate number of pins across all tribes. I didn’t know that at first! Once you’re comfortable, you can power up to Tribes Pro and get access to ten tribes (80 total submissions) for just under $60 a year.

Pricing scales up from there. Here’s a breakdown:

Tailwind Tribes PowerUps Pricing

Ready to join Tailwind and start using tribes? Use the link below to get started:

Tailwind Visual Marketing Suite

I was so excited about tribes at first that I joined every single one I could find relevant to my niche.

Fast forward months later and it turns out that tribes are much like groups: Not all are created equal, friend.

Whatever you do, take advantage of the Tribes Free and start with five tribes. Track the performance for a month and use that data to weed out the good from the bad. Then power up from there.

4) How are tribes different from Pinterest groups?

Great question! As I mentioned, tribes are similar to groups in that some will perform better than others.

The point of participating in both groups and tribes is to:

  • Curate and share high-quality content
  • Drive traffic to your website and business
  • Stay on the good side of the Pinterest SmartFeed

The difference is that many groups are lame in terms of moderation. Group boards can easily turn into a moshpit of pins, with collaborators who neglect the board and rarely repin content. Because of this, groups have lost a bit of their mojo. There’s only a handful in any niche that will perform well.

Tailwind tribes come with a measure of accountability, so you can get some of that mojo back. What I mean by this is that every tribe member has to “share for share” according to the group rules or risk getting banned.

Why do I say “measure of accountability”?

Because it’s not absolute.

Tribe members don’t have to share your content at all. The only thing they HAVE to do is share pin for pin. They can choose other pins  and ignore your content entirely (which can and does happen!).

That’s why it’s crucial to track the performance of every tribe you join to make sure it’s working for you. More on that in step #6 below.

How do you join the right tribes?

This is a bigger question than you might think!

First of all, it should be a no-brainer to join tribes in your niche. You want the right audiences to see your content.

Next, since we know that some tribes will be rock stars and others will be total duds, joining the right tribes has less to do with finding them and more to do with evaluating them.

Let’s start by finding them.

Psst…You can save a ton of time by downloading this handy cheat sheet of the best-performing tribes in your niche:

Use the Tailwind Tribes Cheat Sheet to start driving tons of traffic from Pinterest with Tribes

5) How do you find the right tribes to join?

You can either join through an invitation or from the Tribes tab within Tailwind.

How to find tribes to join


From there, enter a keyword related to your niche.

Enter a keyword to find tribes

6) How do you evaluate tribes?

This is the thing that took me a while to get, and it’s a biggie.

You want to evaluate the quality of tribes in much the same waythat  the SmartFeed evaluates your domain. I recommend evaluating tribes before you join, and then monthly once you’re an active member (step #9 below).

  • Activity – how active are the tribe members?
  • Quality + relevance – are the pins high quality?
  • Rules – how many pins can you submit, what’s the share-for-share ratio?
  • Number of members – how many people have joined?
  • Visibility – what’s the process to join?

Activity

Once you enter a keyword, you’ll see a list of tribes along with the member count and overall activity.

(Activity is tribe-speak for engagement.)

The more bars the better.

From my experience, 3 bars or fewer means the tribe is a dud. You’ll wind up dumping a zillion tribe pins on your boards with little return. More bars, on the other hand, means the tribe has rock-star potential.

Check the tribe activity before you join.

Quality and relevance

On the left side of the search results is a Preview Tribe button (pictured above). Select that to preview the tribe’s members, pins, topics, and visibility.

Before you join, make sure the content is relevant to your audience and appears to be high quality. Some of the tribes I’ve joined have delivered poor results because they covered many different topics. While large tribes can be appealing, your pins can easily get lost in the shuffle if the topics covered are not specific to your audience.

This is where bigger tribes may not mean bigger results. I’ve found the more you niche down with tribes, the more likely your pins will be reshared and repinned.

Tailwind is the best Free Pinterest Scheduler

Tribe rules

Rules cover things like:

  • Maximum pins – the number of pins you can submit daily
  • Reposting – how frequently you can post the same content
  • Pin quality – image orientation and other deets
  • Blog topics – topics covered in the tribe
  • Types of posts – most are blog post only, meaning no pins to affiliates, products, or pages
  • Share ratio – number of tribe pins you have to share for every pin you submit

That last one is the one you want to pay close attention to.

I aim for tribes with a 1:1 share ratio. The reason is that I have enough of my own content to share and prefer to feature my pins more than others.

Now, if you’re just starting a blog and don’t have many original pins yet, a 1:2 or even 1:3 ratio may suit your needs perfectly.

Here’s what those ratios mean:

  • 1:2 = You share two tribe pins for every pin you submit
  • 1:3 = Share three tribe pins for every pin you submit
  • And so on…

Higher ratios mean you’ll have plenty of content to add to your Pinterest boards while you build up a content library of your own. Once you do, you’ll want to drop the ratio back down to 1:1. The reason is that if you create and share high-quality pins (which I’m sure you do!), you’ll likely find that your pins will get the most engagement.

Remember, the SmartFeed’s watchin’. ????

Number of members

These days, I’m all about fewer members. Smaller tribes rock for a number of reasons:

  • Your pins are more likely to be shared because they’ll stand out more.
  • You’ll have less competition.
  • The tribe content will likely be relevant to your audience, which means you won’t have to scroll through ten recipe pins to find one self-help pin.

To be fair, I haven’t formally tracked member size to performance. I just prefer smaller tribes and highly recommend them.

Visibility (aka Access)

This is a fancy word for “how to join the tribe.”

If you’re curious, you can view a tribe’s visibility by selecting that Preview Tribe button I showed you above. Visibility is right there under the description:

Check the visibility settings of tribes so you know how to join.

There are three levels of visibility:

  • Public – This one’s the easiest. You can join without approval.
  • By Request – Send the owner a request to join (which you can bypass with an invitation)
  • Secret – The only way to join is by invitation. Secret tribes are not searchable in Tribes.

There you go! With the five metrics listed above, you can evaluate tribes before you join to see which ones may be a good fit.

On to #7!

Don’t forget to download the Tailwind tribes cheat sheet below.

Use the Tailwind Tribes Cheat Sheet to start driving tons of traffic from Pinterest with Tribes

7) How many tribes should you join?

I’d say between five and ten to start. Again, make sure you track the performance after your first month, and monthly after that.

I joined a ton at first and had loads of fun sharing and submitting, but I sobered up quickly when I saw my boards carpet-bombed with literally hundreds of tribe pins. Say whaa?

A much better approach is to start small, track them all, and scale up from there.

8) How do you share to tribes?

The same way you schedule pins. Find a pin in your Pinterest feed and select the Tailwind logo. Then, instead of entering a board name, scroll down until you see the Add to Tribes button.

How to save Pinterest pins to tribes

Once you select it, you’ll get a pop-up window with a list of tribes. Select the tribes to which you want to submit the pin. Tip: Use those checkboxes on the left to select multiple tribes.

Choose which tribes you want to submit your pin.

If you’ve already submitted the same pin to a tribe, Tailwind will flag it and let you know. Easy peasy.

#PROTIP: If you’re like me, you’re a member of many tribes and active in only a handful (those high-performing ones!). You can zip through this step by keeping a spreadsheet of active tribes so you can easily see which ones to select.

Don’t forget! You still have to go back to Tailwind and manually share from each tribe according to the rules.

Ready to join Tailwind and start using tribes? Use the link below to get started:

Tailwind Visual Marketing Suite

9) How do you keep track of the pins you share?

Easy! That spreadsheet I mentioned in step #8 doubles as a tribe tracker. Use it to organize your pin and post URLs and keep track of the dates you share each pin.

If you’re curious, here’s what my tracker looks like:

The Tailwind Tribes Tracker by ConversionMinded

The tracker even triples as a reposting scheduler. Boom. You’ll know exactly when to recycle your pins, following the rules of your tribes.

Speaking of tracking, time to drill down on stats…

How do you track a tribe’s performance?

We’ve talked about how to evaluate a tribe before you join it based on the overall activity, rules, members, and so on.

Once you’re an active member, you’ll want to drill down on the tribe’s performance as it relates to your pins.

The way to do that is to create your OWN share ratio. And I’m going to show you how to do that right now!

10) How do you create your own share ratio?

Beneath the rules for each tribe, you’ll see stats for reshares, repins and reach:

Track a tribe's performance of your pins to see if you should continue participating.

Just so you know, those are aggregate numbers across all of your submitted pins.

To calculate a tribe’s performance, divide the number of repins by the number of reshares.

For example:

In the Digital Marketing tribe above, my pins have received 49 repins and 259 reshares. That means the tribe members have shared my pins with their audience 259 times, and I’ve received 49 repins from those reshares.

49 / 259 = .189 or 18.9%

This means that my average number of repins to reshares for this tribe is roughly 19%.

Anything over 10% is a high-performing tribe, in my book, so that’s the yardstick I use to size up other tribes. I either leave or stop contributing to tribes that perform lower.

What should your ratio be? You’ll have to decide based on your tolerance level AND the average performance of your collective tribes. If most of your tribes perform at 5%, you may want to use that as a benchmark for other tribes. Or, maybe you search for tribes with better potential.

That’s a wrap! How about you? Have you used Tailwind Tribes to skyrocket your Pinterest traffic? I’d love to hear your feedback!

Don’t forget to grab the tribes cheat sheet with the most active tribes for each niche. It’s so easy to measure the performance of tribes when you have all your stats in one place.

Use the Tailwind Tribes Cheat Sheet to start driving tons of traffic from Pinterest with Tribes
by

6 Social Media Tools to Help Promote New Blog Posts | Want to increase blog traffic? Here is a step-by-step guide to six social media tools and tips for bloggers / social media marketing plan / social media marketing #socialmedia #blogging

Want to streamline your social media PLUS get more traffic to new blog posts? I’ve got six of my favorite social media management tools to help more people find your content. This post also includes my best social media tips for bloggers and social media optimization tips. Social Media Tools / Social Media Tips for Business

Want to know which social media tools will help you get more traffic so more people will find your blog posts?

You’re in luck! Today, I’m sharing six of my favorite social media scheduling tools to help you get more pageviews, likes, and shares.

#1: Schedule posts to SmarterQueue.

SmarterQueue is an evergreen scheduling tool that allows you to reshare existing blog posts to new followers.

You can also create categories dedicated to new blog posts and set them to post one time only.

I recommend creating multiple “new post” categories and assigning each to its own platform. For instance, you may want to schedule tweets using the “new blog post 2” category and LinkedIn posts using “new blog post 3”.

You can track the number of time slots for each post beneath the calendar.

Use a Word doc to create multiple content snippets using variations of the title, quotes from the post, highlights, tips, or engaging questions. Each content snippet should be unique.

For every new post, I share 15 tweets, 6 Facebook posts, and 2 LinkedIn posts. Make sure you check the analytics and reschedule top performing content as recurring posts.

UPDATE 3/23/18: Twitter changed their tweet policies regarding duplicate posts (can’t reshare the same post anymore). To work within the new guidelines, SmarterQueue will share any duplicate tweets you schedule as a retweet of the original tweet. According to SmarterQueue, Twitter wants you to do it this way, so it may even boost your tweet in the algorithm.

It also looks like SmarterQueue is working on an update similar to SocialOomph’s spinning text (#4 below).

From SmarterQueue:

We’ll be releasing another big update in the coming weeks to help you even further – you’ll be able to create multiple text and image versions of each evergreen post, and each time the post is recycled it will use a different version. This will be available for all platforms, so you can easily test different content to see which gets more engagement.

Love that they’re making it available for all platforms. Woo!

#2: Use Buffer.

While SmarterQueue’s time slots are fully automated, Buffer lets you customize the content in your queue, which makes it a perfect tool for sharing new content.

With Buffer, you can easily control what you share and when by rearranging your queue. For instance, you may want to share 8 tweets the first week your post is published, 4 tweets the second week, and 3 tweets the third.

There are 3 ways to customize your queue in Buffer:

  • Randomly shuffle posts using the Shuffle button.
  • Select the Move icon and drag your post to a new time slot.
  • Use the automated Move to Top button, and then adjust time slots from
  • there.

Posts that get the most clicks, likes, and shares should be added to an evergreen scheduling tool like SmarterQueue.

#3: Promote Content using Quuu Promote.

Quuu is a social sharing platform that takes content curation to a whole new level.

Instead of creating custom source libraries and handpicking each post you want to share, you select interests and categories and let Quuu do the heavy lifting for you. It will curate random articles and share them to your social profiles via Buffer or Hubspot.

The articles are sourced from its partner platform: Quuu Promote.

Before you submit for approval, choose a relevant category for your post.

Once you submit a post, the Quuu Promote team will review it to make sure it meets their quality criteria.

Don’t be alarmed if your post is rejected. Quuu Promote has strict guidelines and holds their content to high standards. One of my posts was once rejected because it focused on a single tool and could be interpreted as a sponsorship or promotion in disguise.

Monthly fees start at $40, and each promotion runs for 30 days, after which you can rerun if your campaign was successful.

In my experience, Quuu Promotions out-performed Pinterest and Twitter ads.

#4: Schedule tweets using SocialOomph.

SocialOomph is an advanced Twitter scheduling tool with a number of attractive features, including tweet intervals and spinning text.

Tweet intervals

Tweet intervals help you create a consistent flow of content and give you maximum control over your posting schedule.

With most evergreen scheduling tools, uploaded posts go to the bottom of the queue and are shared in sequence, which means you have little control over when your content is shared.

With SocialOomph, you can share the same tweet every 3 hours, or every 3 days, by setting tweet intervals.

Select the date and time you want to share the first tweet. Then select Recurringly Publish, and choose how long SocialOomph should wait between tweets.

Spinning text

Spinning text is a feature that allows you to enter multiple text variations for every tweet. When it comes time to share, SocialOomph will randomly select one of the alternatives.

To create spinning text, start with { and add your first tweet text, including your link and hashtags. Follow that with a prompt and enter a variation of the text.

Repeat for as many tweets as you want, ending with }.

Here’s an example:

{ Tweet Title URL #hashtag | Title Variation URL #hashtag }

Another thing that makes spinning text so handy is that you can enter all your text in one window using the rotating text validator tool.

Below the compose window of the validator tool, you can preview your tweets before scheduling.

Set a maximum number of shares or let your tweet run continuously, and SmarterQueue will drip-feed it into your Twitter feed on autopilot.

#5: Exchange share credits with JustRetweet.

JustRetweet is a social sharing platform where members share each other’s posts to Facebook, Twitter, and Google Plus in exchange for credits.

The idea is that you earn credits by sharing other people’s content and spend credits by giving them to members who share your content.

The more you share, the more credits you will earn. You can also purchase credits if you’d rather bypass their credit-for-credit system and share original content only.

In my experience, JustRetweet has active members who are happy to share your content.

When you log in to JustRetweet, you’ll see a list of posts with a prompt to retweet or like.

Most members offer 10–50 credits for a tweet or a share. Once you’ve accumulated about 2,500 credits, you can submit a tweet for other members to share. Set the number of times you want it shared and the number of credits you’re willing to offer per share. I generally set a limit of 75 shares.

You can also choose which social networks to include and specify a minimum number of Twitter followers to weed out inactive users.

Once you’ve shared your post, you can view the number of shares in the activity dashboard.

Overall, JustRetweet members are active, engaged, and more than willing to share your tweets.

#6: Use Google Calendar with IFTTT.

Google Calendar is a free tool that you can integrate with IFTTT to schedule posts to Twitter, Facebook, and LinkedIn.

To get started, log in to Google Calendar, and create a new calendar. Then, click on the time slot that you want to share your post to create a new event.

Make sure you select your new calendar from the drop-down menu.

Before you enter a title, select More Options. In the next window, fill out the following fields according to this guide:

  • Title: Start with #twitter, followed by your blog post title
  • Location: The URL of your blog post
  • Description: Your tweet text

If you want to share the tweet just once, make sure you select “Does not repeat” beneath the date. If you want to create a recurring tweet, use the drop-down menu to set your preferred frequency.

Save the new event, and then head over to IFTTT to create an applet that will share the tweet event from your calendar to your Twitter profile.

First, connect Google Calendar to IFTTT and create a new applet.

For your applet, choose Google Calendar as the first service, and select New Event from Search as the trigger.

Be sure to select your new calendar, enter #twitter as the keyword, and then select Create Trigger.

Next, select Twitter for the second service, and choose Post a Tweet with an Image as the action.

In the next window, set the Tweet text ingredient to {{Description}} and the Image URL ingredient to {{Where}}.

This action will use the description from your calendar event as the tweet text and pull your blog post image from the URL you entered in the location field.

You can create similar applets for Facebook and LinkedIn. For a complete tutorial on how to batch and schedule posts using IFTTT and Google Calendar, click here.

That’s a wrap!

When you put so much time and effort into writing valuable blog posts, it makes sense to put equal time into promoting them. Use these 6 promotion tools and strategies to increase the visibility of your content and give your blog posts the exposure they deserve.


by

Hey there, friends!

Are you having trouble figuring out the Facebook group cover photo size ? Looks much different than before, right?

Here’s how I discovered the update:

I started a Facebook group, uploaded my group cover photo, and went to work on prepping the images, prompts, rules, descriptions, and so on.

The cover photo looked perfect – until it didn’t.

One morning, I popped into the group and out of nowhere my cover photo looked like The Hulk. It was cut off on all sides and looked twice the original size.

Has the same thing happened to you?

If so, don’t freak! It’s not you. It’s just Facebook changing things again.

Luckily, I’ve managed to get Bruce Danner back, and today, I’m sharing the updated dimensions (plus a free Photoshop template) so you can create a Facebook group cover photo that looks beautiful.

Keep reading to access the template.

Facebook’s new group cover photo size

Here’s what’s happening with the Facebook group cover photo size.

And yes, it doesn’t look anything like the Facebook group cover photo size before Facebook announced the update.

Today, the ideal size recommended by Facebook is 1,640 by 859px.

That’s NOT the size I recommend, and here’s why:

1,640 by 859px will work fine for phones and tablets…

Except that Facebook adds a text overlay to cover photos. If you leave your height at 859px, any text and images in your cover photo will likely be covered by Facebook’s text.

So you need to leave extra vertical space in two places…

1) At the bottom

This is for your group name and description, which Facebook will overlay on MOBILE.

2) At the top and bottom (again)

In addition to the text overlay, you should leave extra space at the top and bottom on DESKTOP because, get this, Facebook will crop it. You’ll need breathing room here, because repositioning your cover photo after it’s uploaded is tricky.

In fact, you’ll need a LOT of breathing room, especially on the bottom.

How much? Minimum 250px, I’d say. And if your group name breaks onto two lines like mine, you’ll want to leave an additional 150px on the bottom, for a total of 400px.

One line: 250px
Two lines: 400px

Your background image will be fine. Any text you add to the top and bottom will likely be cut off.

Because of this, and after some experimenting, I’m going with Louise M.’s recommendation of 1,640 x 921px. This size should give you the real estate you need on desktop, tablet and mobile.

Why did Facebook change the group cover photo size?

The cover photo size is a 16:9 format, which works well for photos and videos. Given that Facebook is becoming a video-first platform, these dimensions make sense.

Yes, you WILL lose height on both mobile and desktop. The good news is, finding preset 16:9 templates in Canva, Adobe Spark, or PicMonkey should be easy.

If you want, you can download my Photoshop template below and/or use it as reference for your design.

If you do decide to use Facebook’s recommended 1,640px, make sure you extend the height to 921px to allow for the text overlay.

How much of your cover photo will be covered by text?

It really depends on the length of your group name and how it wraps (if you include a location in your description, you’ll need even more space). As an example, here’s what my text overlay looks like on my iPhone 6S:

Facebook cover photo size mobile | Fall 2017

That overlay is tricky, no? I created multiple variations, trying to get it just right, and finally settled on some overlap. It was either that or pull my hair out, *wink.

Here’s what my Facebook group cover photo looks like on desktop:

Facebook group cover photo size desktop - Fall 2017

See how there’s less vertical space on desktop than on mobile?

Again, the top 100px is invisible. Be sure to leave it empty so that your title and image won’t get cut off.

I tried like crazy to reposition the photo without the extra 100px and could only move it up (not down). Just sayin’, we need some wiggle room.

This is the final cover photo I uploaded:

Facebook group cover photo template

Notice how the text on desktop appears higher than the original photo? That’s the extra space I mentioned. I can never get cover photos 100% where I want them! If you have other template ideas, I’d love to hear. Please let me know…

UPDATE: Looks like Facebook resolved the overlay on mobile and it’s no longer an issue. Feel free to use the entire cover photo for text and images without without it being obscured or covered up with the group title/description. Thanks for the head’s up, Danae!

If you’d like, you can download the Photoshop template I created (no email required). To edit the template:

  • Use the top overlay layer as a guide.
  • Replace the image placeholder and group name with your text and images.
  • Click the eye icon to the left of the guide layer to hide it before you save.
  • Save twice: once as a master PSD file, then again as a png to upload.

Click the image below to download the template:

Facebook group cover photo template

I recommend keeping the guide layer so you can go back and reposition your graphics and text as needed. If you’re like me, you will test many different options before you settle on one that works for both mobile and desktop.

Group cover photo info from Facebook:

Keep in mind that the recommended size for group cover photos is 1,640px by 856px (or 1.91:1 ratio). To change an existing cover photo, hover over the photo and click Change Group Photo.

Note: If the cover photo has never been set, group members may also be able to add a cover photo. If a group member sets the cover photo for a group, and later decides they would like to remove it, they will need to delete the photo in order to remove it as the group cover photo. source

how do i upload a cover photo to my facebook group

#FORTHERECORD  1,640 x 856px is NOT a 1.91:1 ratio (should be 859px), so I don’t know what that’s about! Stick with 1,640 x 921px and your Facebook group cover photo will be perfect. Promise.

by