- It drives massive traffic to my site, easily OVER 60% of my total traffic
- It’s fun to look through all the beautiful images
- I find great content to share
- Pins can take on a life of their own and drive traffic for months
So let’s jump in and start driving traffic with Pinterest.
SETTING UP YOUR PINTEREST PLATFORM
There are some things you want to do before you get going, such as set up your account, boards and pins the right way.
Updated: June 27, 2019
1) Create a business account
If you have a personal account, turn it into a business account. This will give you access to analytics so you can see which pins are getting the most repins, comments and likes. You’ll also be able to run ads and claim your website so that Pinterest can verify that the content shared from your website is, in fact, yours.
2) Tailor your profile to attract your target audience
Whether you have 100 followers or 5,000, there are likely tons of people who will view your profile each month. You want to make sure it attracts the right people so they stick around once they find you, right?
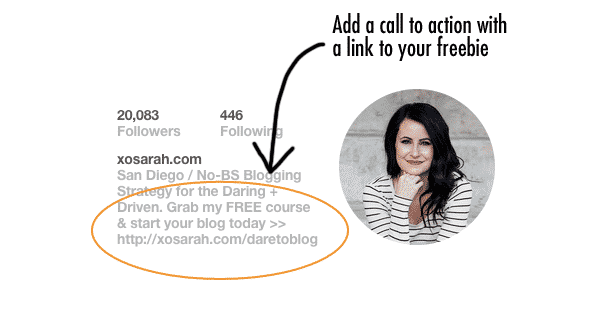
Include a friendly photo that reflects your brand and a brief bio that explains what you do and how you help. Keep the focus of your description on your target audience and not you! Check out this post if you need help crafting a killer description.
If you’re featuring a course or a freebie, this is a great place to include it. Take a look at Sarah Morgan’s Pinterest bio:
 3) Create boards that are relevant to your audience
To rock this strategy, you want to have at least 10 boards that your readers would be looking for.
You probably have categories for your blog, right? Start there. Create different boards for each category that you write about. This makes it easy for people to find the boards that interest them without having to sift through irrelevant pins and boards.
I like to give my boards “active” titles (e.g., Start a Blog, Grow a Blog).
While you’re here, you may want to delete boards that don’t fit with your brand, personality or niche.
When you delete a board, you will lose the people who are only following that one specific board. Don’t worry, though! It’s perfectly okay to lose followers who aren’t interested in your main message. By narrowing your focus, you’re going to attract more of the right followers, and that’s what you want. Having said that, if you prefer NOT to lose followers, don’t delete the board. Instead, archive it. You won’t lose any followers this way.
Note: It’s okay to keep other boards if you want. Just make sure that your relevant boards appear first. Let people scroll down to see your other interests if they want to. Hey, you never know, you may make a wonderful connection in the process!
4) Create a brand board
Out of the 10 boards you create, one of them should be a featured board where you only pin your branded content. Set this up as the very first board people see when they find you. On this board you’ll pin only your pins.
Take a look at how I set up my boards:
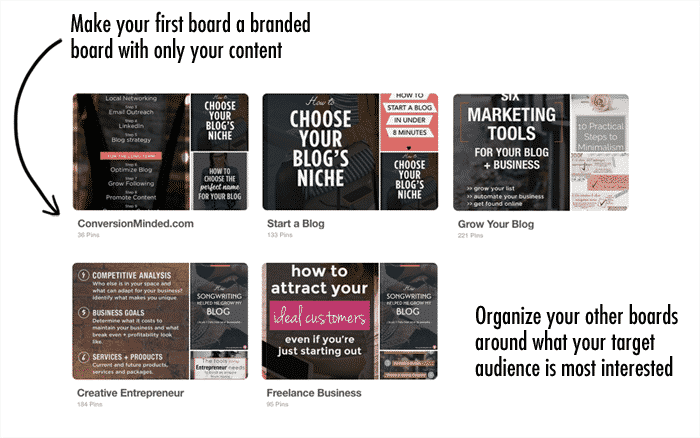
UPDATE: Brand boards are not a must today. If you already have one, keep it! Most of my repins still come from my brand board. But if you’re just starting out on Pinterest, it’s more important that your first pin is shared to the most relevant board. This will help Pinterest quickly index it so that you get more search traffic. Personally, I like brand boards because they make it easy for people to find your best pins in one place. For more on Pinterest SEO strategies like this, read this post.
5) Add some pins
Nobody wants to visit a blank board, right? The next thing to do is to fill up your boards with pins that your audience would find interesting.
Here are some random thoughts about pinning:
- To share other pins, repin the best content in your feed, or search for a specific topic (or brand in your niche). If you find something that your readers would love, share it!
- The more you pin, the better. I pin 13x a day. I know others pin 30x a day.
- Make sure you pin some of your own content as well as curated content. When I first started, I didn’t have original content so I shared other people’s pins. This is fine at first, just keep in mind that ultimately you want to share a mix of both.
- Shoot for 30% your own content and 70% other people’s content. When you have more of your own content, flip that ratio.
PINTEREST TRAFFIC-BOOSTING TIPS!
6) Join Group Boards
Group boards give you access to audiences beyond your followers. So if you have 1,000 followers and you join a group board with 10,000 followers, you’ve just 10x’d your ability to get eyes on your pins and drive traffic to your blog.
There are two ways to find group boards:
- Search on Pingroupie for group boards around your blog topics
- Join group boards that other bloggers and brand in your niche are in
It may take a while to get invited to boards, but it’s well worth it! You may find that some that you want to join are not accepting collaborators, and that’s okay. There are plenty of others to choose from. Follow the board description for instructions on joining. In most cases, you’ll need to follow the board and moderator, then send an email with your Pinterest profile asking for an invite.
Try to join board that have more followers than you and a high engagement rate (lots of pins, repins, and likes).
Another thing: Pay attention to the board rules. Some will allow you to pin 1x a day, others allow 4-5 pins a day, and still others have no limits. You don’t spam your high-performing boards and run the risk of getting banned. I know this. I’ve been banned from boards simply because I didn’t pay attention to the rules.
7) SEO your pins and boards
Pinterest is a little different than Facebook or Twitter. It’s not really a social media platform. It’s a visual search engine, much like Google. When you log in to Pinterest, most of the pins in your feed are the result of the Pinterest search algorithm.
Pinterest ranks pins according to relevance. And relevance is based on the keywords you include in your profile description, pin descriptions and board descriptions.
If you want Pinterest to rank your content in their feed (and I know you do!), you have to implement search engine optimization (SEO) strategies. What this really means is that you should optimize your pins and boards so that they show up first in search results, the same way you would optimize a blog post to make it rank higher on Google.
1) Optimize your board descriptions
Now that you have your boards don’t leave the descriptions blank! This is valuable space to add in important terms that your readers would be searching for.
Go back and add in some keywords to your boards. This is the best way to help them rank high on Pinterest, PLUS your boards can actually rank on Google too. When people search on Google, your Pinterest board can show up on the first page!
If you’re like me, you filter your Pinterest searches by people, pins, or boards. Having the right keywords in your board will help them show up for relevant searches.
Here’s what you want in your board descriptions:
- The topics you’ll be pinning about
- Any keywords related to your niche (not limited to just one keyword). Include any relevant terms so that Pinterest knows when to show your board. For instance, my “Start a Blog” board includes these keywords: entrepreneur, solopreneur, small business, blogging tips, blogging tools, driving traffic, epic content, social media, content strategies, content marketing, startup tips, online business strategies, SEO tools.
2) Optimize pin descriptions
We are on a keyword roll! Every pin you save from your website should have keywords. This is what’s really going to give your brand the biggest boost. It pays to put the effort into your descriptions. You want them to appeal to people AND Pinterest.
You don’t have to add unique descriptions when you repin someone else’s content. But you certainly can if you want to. This adds extra work so be sure you’re not doing this at the sake of your own descriptions!
What you want in your descriptions:
- A friendly recap of your post
- Some relevant keywords that people would use to search for you
- Two to three hashtags
- A call to action, such as “Click through to see all the tips.”
Tip: If you have a self-hosted WordPress blog, you can amplify your SEO and save a few steps by adding a pin description to the alt text in your featured image, or by using Tasty Pins. When people share the pin from your site, the description will automatically appear. For more on how to set this up, check out this post.
8) Create pin-worthy titles
You can have the best content with brilliant images, but if your headline falls flat, people will likely miss it. You want your titles to be actionable or inspire some kind of curiosity or urgency. Words like the best, secrets of and ultimate guide to make people want to click through to learn more.
Just remember, there are good titles, bad titles, and so-so titles. You want yours to be pin-worthy!
Some general thoughts here:
- Benefit-rich titles will grab people’s attention right away. Will your post save people time, money, show them how to do something? Include your audience in the title too so that readers know it’s for them (e.g., 25 Ways for Entrepreneurs to Grow your Blog Audience)
- How-to post titles tend to catch people’s attention quickly because they provide a solution to a problem or answer questions your peeps have
- Titles like 5 ways to are powerful because they’re simple and actionable. Plus, they let people know exactly what they can expect.
- Don’t be vague or generic. This is what will kill your post title more than anything else. If people don’t know what your post is about or who it’s for, why would they read it?
9) Make pins that stand out
I can spend hours devouring all the beautiful images on Pinterest! Your images need to grab people’s attention too. Here are some ways to do that:
1) Use images with nondescript people (aka no faces)
Images of people (but not faces) get more clicks than images with just graphics or a background color. Why no faces? Pictures tell a story, and people want to see themselves (not others) in your story.
2) Use whitespace
When I created my first pins, I made the text super big so that it would jump out at people. Turns out, larger text isn’t always better. Leaving some whitespace will actually help your images stand out from all the others.
3) Create contrast between elements
Take a look at your feed real quick. Which pins really stand out to you? If you look closer, you’ll see that the text on those pins is easy to read, and clearly differentiated from the background. Make sure you play with the contrast between your background and headline so that it jumps out.
QUICK TIP: Look at your feed from your phone. That’s where 80% of people will see your content.
4) Use strategic color combinations
I’ve experimented with everything from dark backgrounds, to light backgrounds, to reds, oranges, blacks, and even blues. Overall, lighter background colors seem to jump out more and get more clicks and saves. Reds and oranges catch my eye more than blues and blacks. What do you think?
5) Longer pins are better
Yep, it’s true. I get more clicks on longer pins. They give you more room to play and be creative. For instance, I could create a long pin for the post you’re reading, and include each step to give a peek at what’s inside.
UPDATE: Be careful with longer pins now. Pinterest no longer favors super long pins that hog up the feed. Read this post for more on Pinterest image sizes.
10) Brand your pins
When you find something that works, don’t change it! It’s okay to play around with the look of your pins at first, but when you find a style that you love and can recreate easily, stick with it. Lock it down in a template with the exact colors, fonts and other brand elements you will use over and over again.
I’ve seen many people (including me) use different fonts and colors on every pin image. Your boards can start to look a bit all over the place if you do this. Aim for consistency and harmony so that people instantly recognize your pins. People who know and trust your brand will tend to click through, regardless of how captivating (or not) your headline is!
Note: Make sure you include your logo and/or website in your pins. Check out this post for more brand and style guide tips.
11) Apply for rich pins
Speaking of branding, before you start loading up your boards with pins, set up rich pins.
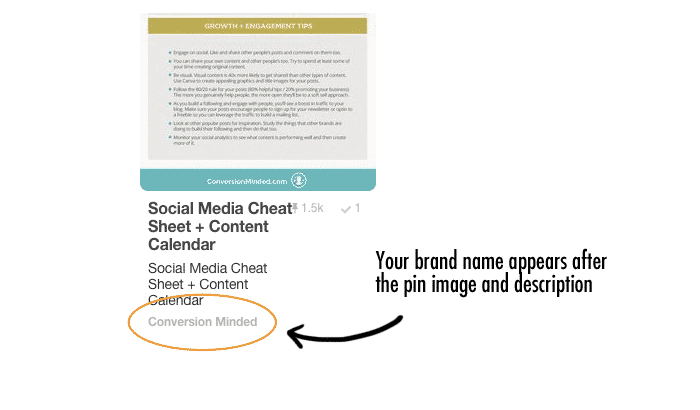
Sounds techie, right? Really, they’re easy to set up and will give your pins a major boost. Once you have claimed your website, rich pins will display your brand name below your pin image.
Take a look at one of my pins to see what I mean:
12) Clean up your boards
Every once in a while, take a look at your boards and get rid of pins with low engagement (aka repins). Pins that don’t get repinned and clicked won’t show up. They just kind of clutter your boards. Repin counts are relative to each board, so if most of your pins on a particular board have 100 repins, delete pins with fewer than 10 or 20. Make sense?
13) Display share buttons only on posts and strategic images
If you use SumoMe image sharer icons, the default setting applies to all images. What that means is that people will be able to share any image from any page on your site, including your logo, background images, header images, and more. But you want control here. If people pin random images from your site, they will likely share images you don’t want shared.
You can easily tweak the setting so that the share buttons display only on your blog posts. PLUS you can control which images display on your posts.
Let’s say you have secondary images to help readers digest your message, but those images aren’t pin-worthy. Just add <rel=”noshare”> to the image you don’t want people to pin and the share buttons will disappear. This way, you will only display share buttons on primary images (featured images, vertical images, etc).
14) Schedule your pins
I use Tailwind to schedule my pins and love it.
The Tailwind dashboard is super user-friendly, and it’s easy to find what you’re looking for. For the most part, you’ll live in the Publish > Drafts or Publish > Scheduled sections on the left. On the right is where the scheduling magic happens! That’s where the virtual calendar lives and where you create time slots. Then schedule away!
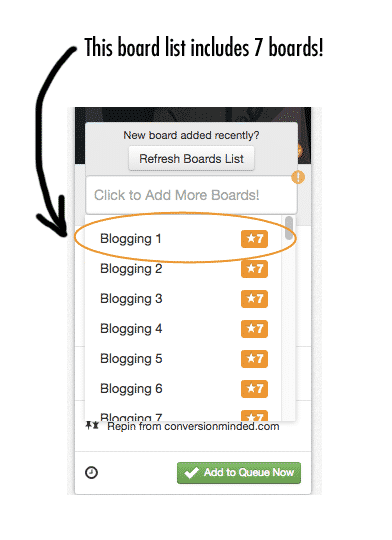
You can even create board lists (groups of boards) to save time. I love board lists, especially since I discovered how to loop my pins with them, which you can do too! Pins you share to lists will be distributed to all boards in the list (make sure you set intervals between each pin).

This is a very informative guide and I added it to my resource page that contains 200 articles on how to create a profitable sales funnel.
I would be interested to know though how you do your keywords for your pins – do you use long-tail keywords?
Hey Peter. Thanks so much for including the post in your resource page. I use the suggested keywords in Pinterest, plus one or 2 long tail keywords from Keyword Planner. I’ve also started using hashtags since Pinterest added them recently.
Very helpful and thorough article! I definitely will be saving this to my Pinterest Board!