
 Do you want more customers?
Want to know how to format your blog posts for more subscribers and sales?
Blogging is a powerful way to build your business when you have a strategy in place that goes beyond putting words on a page and getting people to read them.
Today, I’m sharing how to excel at blogging as a way to grow your audience, increase sales, and convert readers into customers.
BONUS: Before we dig in, I created this high-converting blog post cheat sheet to help you put what you learn into action.

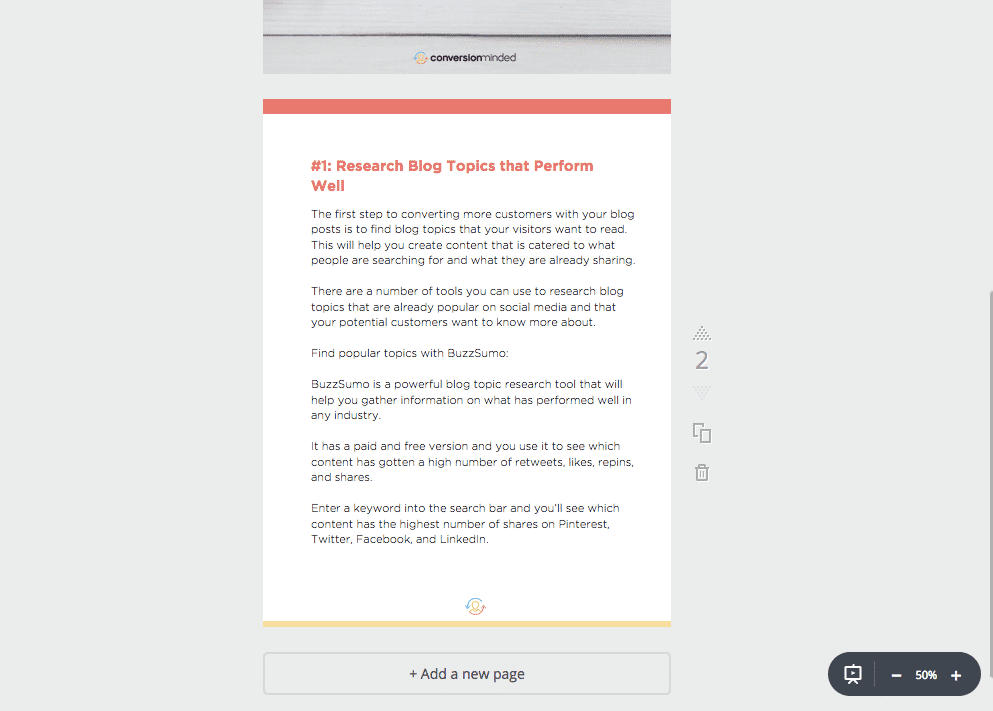
Step #1: Research blog topics that perform well
The first step to converting more customers through blogging is to write about topics that your audience wants to read.
If you’re struggling with this step, use these tools to discover topics with a high number of social media shares and Google searches.
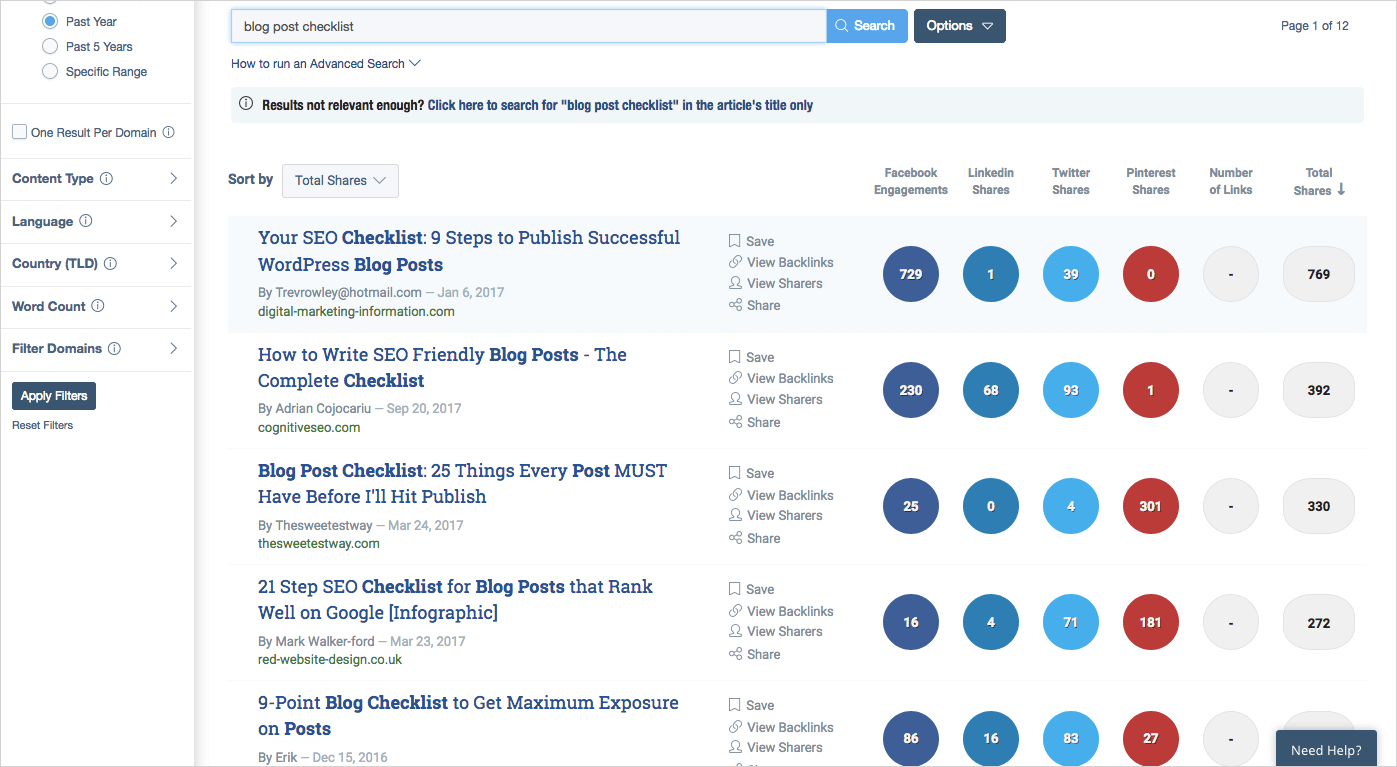
BuzzSumo
BuzzSumo is a powerful content research tool that will help you gather information on what has performed well on social media in any industry. Both paid and free versions are available, and you can use it to discover viral content with a high number of retweets, likes, repins, and shares.
Enter a keyword into the search bar and you’ll see which content has the highest number of shares on Pinterest, Twitter, Facebook, and LinkedIn.
Keyword Planner
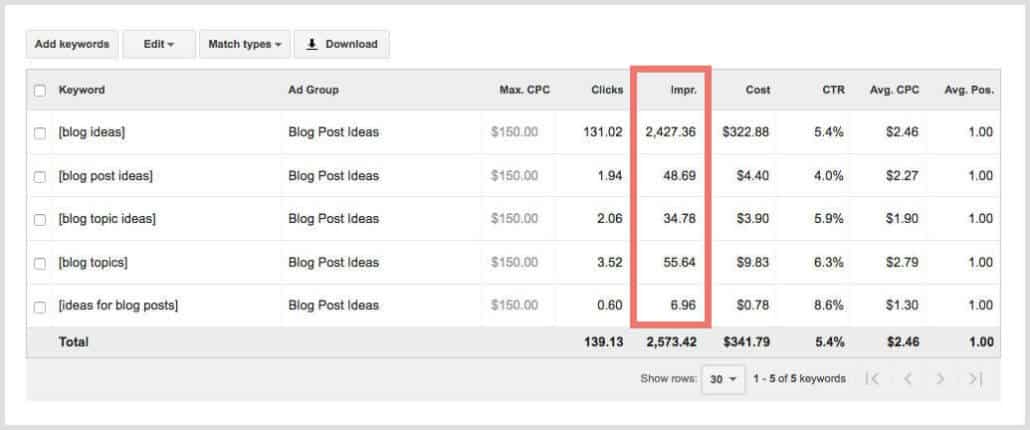
The Google Keyword Planner is my first stop when I’m out of blog ideas. It’s a free tool that will show you the important terms people are searching for on Google.
To get started with the keyword planner, enter your keyword. Then, enter your targeting and use the keywords filters to refine your search. I recommend filtering your results for low competition.
You’ll see search results for your original keyword plus a list of related keywords.

When you have all the keywords you want, click Review Plan. On the next screen, click the Keyword tab, choose a date range, and enter a high bid to make sure you see all the results.
Now, you can see the actual monthly search volume in the Impressions column, which will give you an accurate view of how many people are searching for your blog topic. I aim for at least 1,500 searches.
Facebook Groups
I’m in a number of Facebook Groups related to blogging and entrepreneurship and have discovered interesting blog ideas from questions members ask. When I see a question that has been asked many times, it goes on my worksheet as a potential blog topic.
To get started with Facebook Groups, select Groups on the left-hand side of your dashboard. Then select Discover from the top menu to see a list of suggested groups based on the pages, posts, and groups that you’ve already liked, shared, or joined. You can also use the top search bar to find groups relevant to any keyword or niche.
If you manage your own Facebook group, why not ask your group members what they’re struggling with related to your niche? Then use their answers as inspiration for future blog posts.
Psst…I would love for you join my Facebook group! You’ll have multiple opportunities to promote your business and be part of an inclusive network of encouraging, supportive people.
Quora
Quora is the hub of questions and answers and an excellent way to find out what people are asking around your niche.
To get started with Quora, log in with your Gmail.
Enter terms or keywords related to your niche and you’ll see discussions and questions appear in your feed. Note the questions where you can provide value, look at what others have answered and make notes on how you can improve upon their answers.
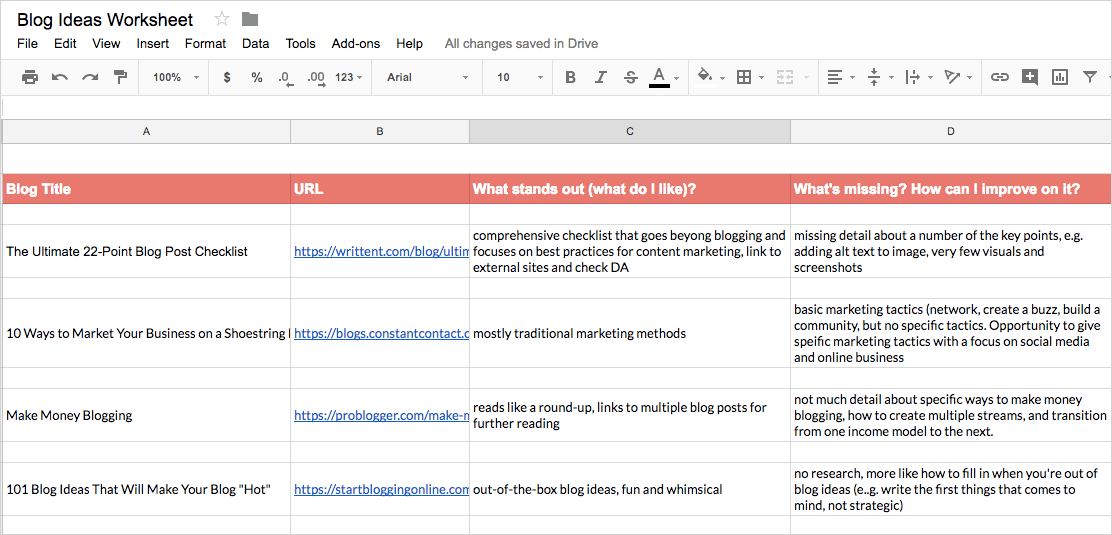
#2: Pick the Winning Blog Ideas
It’s time to document your research and decide which blog topics will make it on to your editorial calendar.
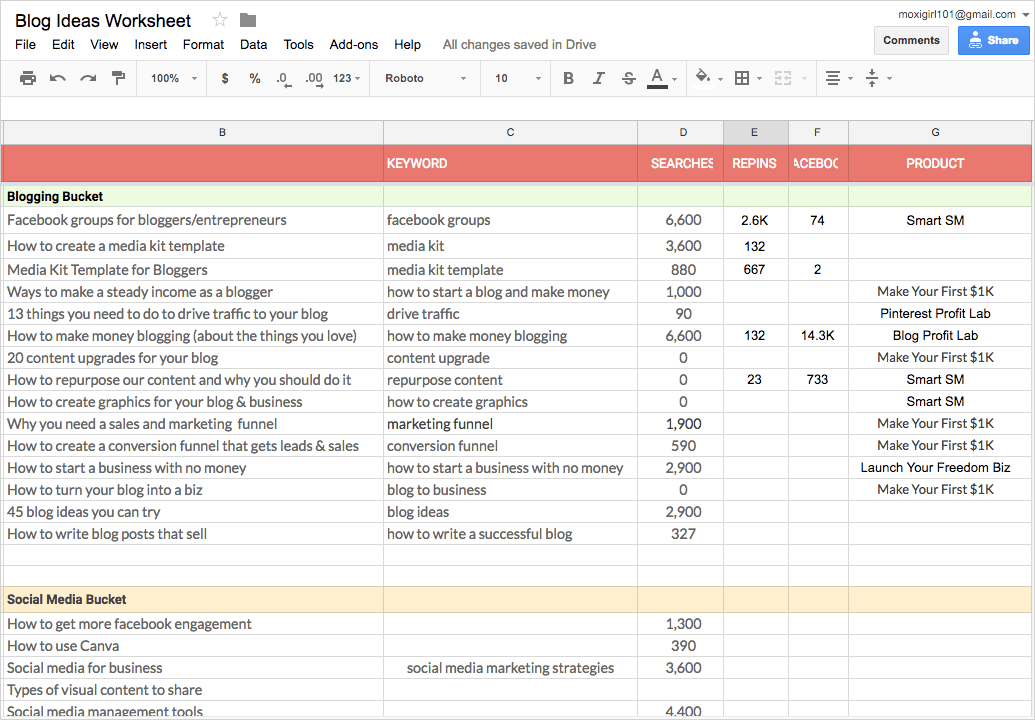
I use a simple Google doc spreadsheet to track the topics and questions that seem to be popular:
- Original blog idea
- Target keyword
- Number of monthly shares
- Number of repins and FB shares
- Some notes about the problem the topic solves for my audience
- Some notes about a product the topic idea could lead to: Does it lead to a sales funnel opt-in? Will it help me make more sales?
The goal at this stage is to narrow down your ideas to those that are both popular with your audience and align with your business goals. There’s no shame in sharing something supervaluable that helps your readers and grows your business. In fact, that’s why you’re blogging in the first place!
Once I’ve picked topics that I think are winners, I’ll make additional notes about content pieces that I think are particularly interesting so that I can start to frame an angle for my own content. For each piece I’ll note the following:
- Title/headline
- Blog post URL
- Some notes about the piece itself: why it’s helpful and what I like about it
- Any gaps in the content: where I can improve upon it
Step #3: Format your post for easy reading
When I first started blogging, I’d jump right in and start writing. Before I knew it, I’d go rambling on and on and forget the original points I wanted to make.
The solution to this problem is to create an outline to help you stay on track and to give your post an easy-to-follow structure. When people read your blog post, you want them to be able to spot sections that interest them right away.
Follow these steps to format your blog posts:
Make your post highly valuable. Look through your notes and pinpoint where you can provide more value for your readers. Can you make your article more visually descriptive? More detailed? Longer? How will you fill in the gaps in other people’s content? Be sure to aim for more than 1,000 words for each blog post.
Divide your post into smaller chunks. Long paragraphs and blocks of text can make your post seem like hard work and scare people away. Instead, divide your blog content into smaller sections to make it easy for people to spot what they want to read. Use headings, bullets, short paragraphs, and even short words (“hard” vs. “difficult”).
Show people how to do something. Instead of telling people what to do, show them how they can do it. Dive deep and give people easy-to-follow and actionable steps. Include screenshots and other images to help your audience understand what you’re saying.
Step #4: Add a content upgrade with a clear call to action
Now that you’ve set the foundation for your post, it’s time to build your audience and get more subscribers.
Remember that having someone simply read your blog post is not your end goal with blogging. You want your blog content to be the first step in his or her journey to becoming a customer.
That’s where content upgrades come in.
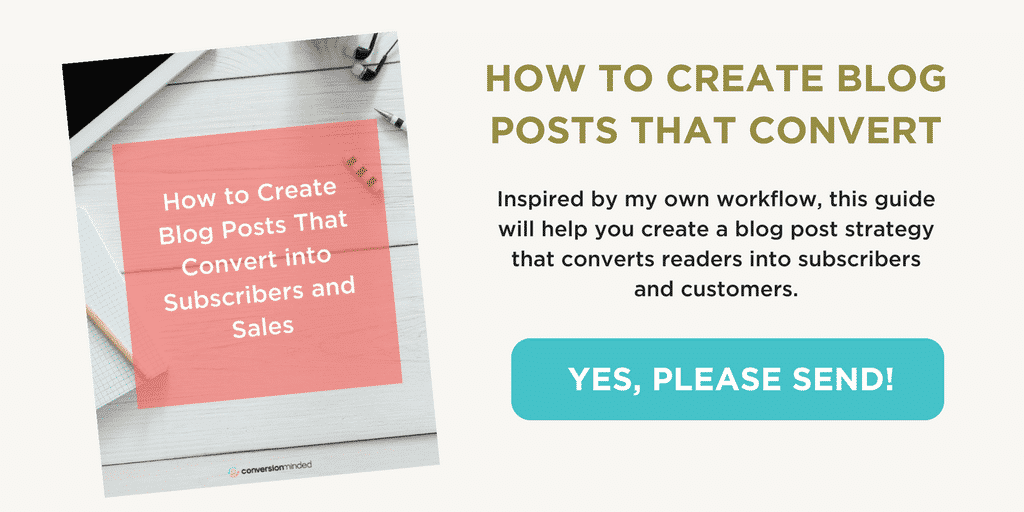
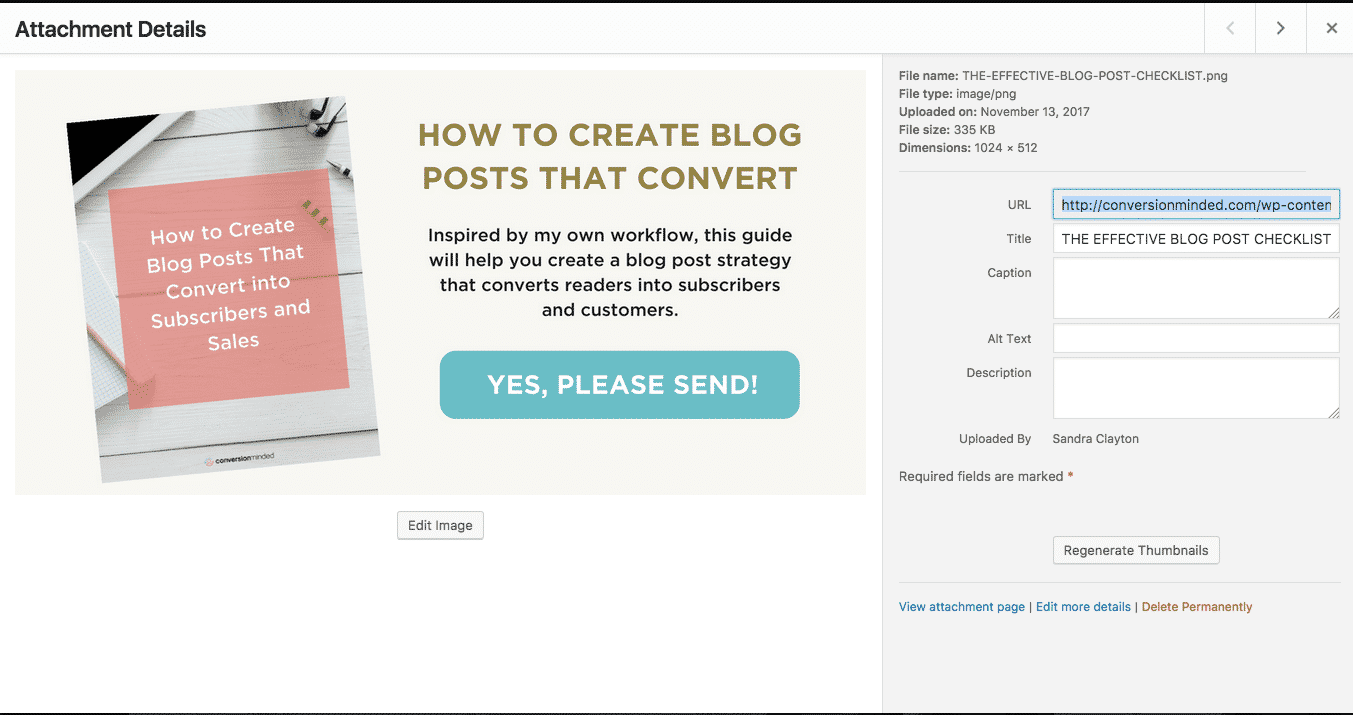
What is a content upgrade?
A content upgrade is bonus content that your readers can receive in exchange for their email address.
Content upgrades are similar to lead magnets in that you encourage people to opt in. What makes them so powerful is their contextual relevance both to your article and to the intent of your readers.
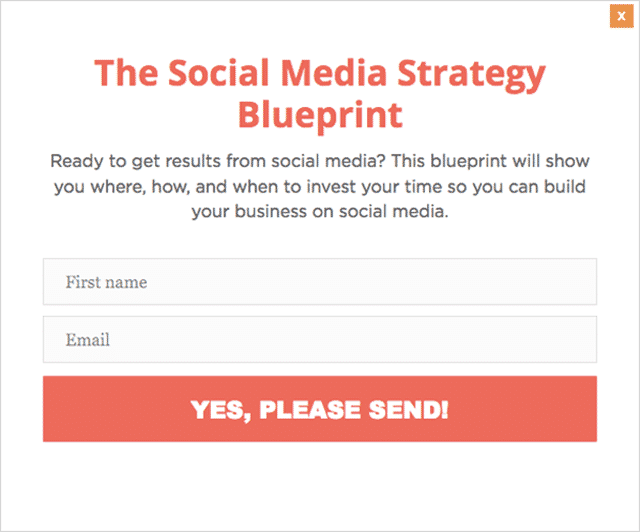
Here’s an example:
In my social media strategy blog post, I include a button that readers can click to download a blueprint so that they can put what they learn into action.
A box will then appear that asks them to opt in to receive the blueprint:
By using unique content upgrades for every blog post, I’ve been able to build my email list to more than 11,000 subscribers and sell my digital products. In fact, content upgrades are the main focus of my list building right now.
Think of it like this:
Visitors land on your blog post because they have a problem, your post educates them about the solution and your content upgrade helps them take the next step.
Can you see how content upgrades can convert at amazingly high rates?
The way I see it is that the more content upgrades we can create the faster we’ll increase conversions and grow our email list.
Here’s how to create your content upgrade.
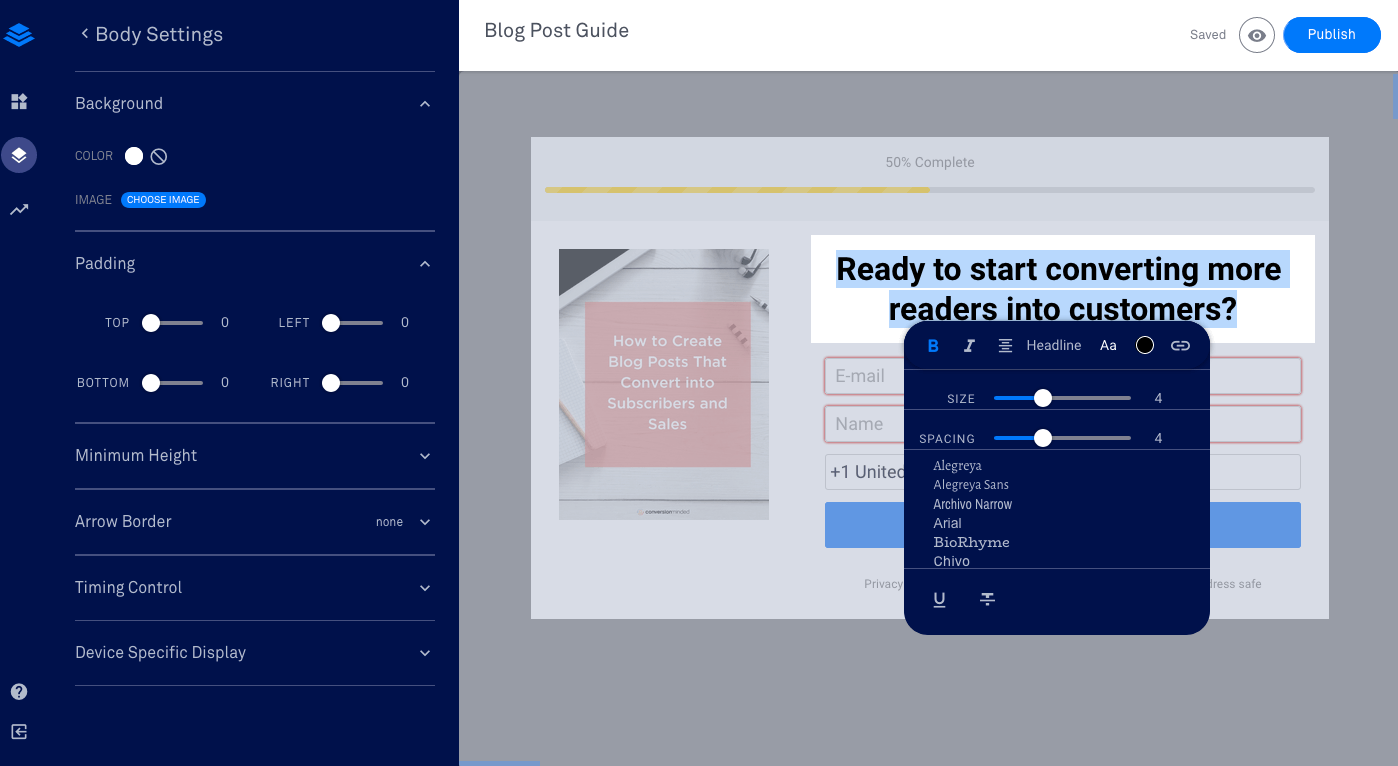
You can create any type of content upgrade with Canva. For the purposes of this article, I’m going to assume that you’re offering a free Ebook.
First, create an account with Canva. Next, use the Blog Graphic as a template and resize it to US letter size, which you can do here:
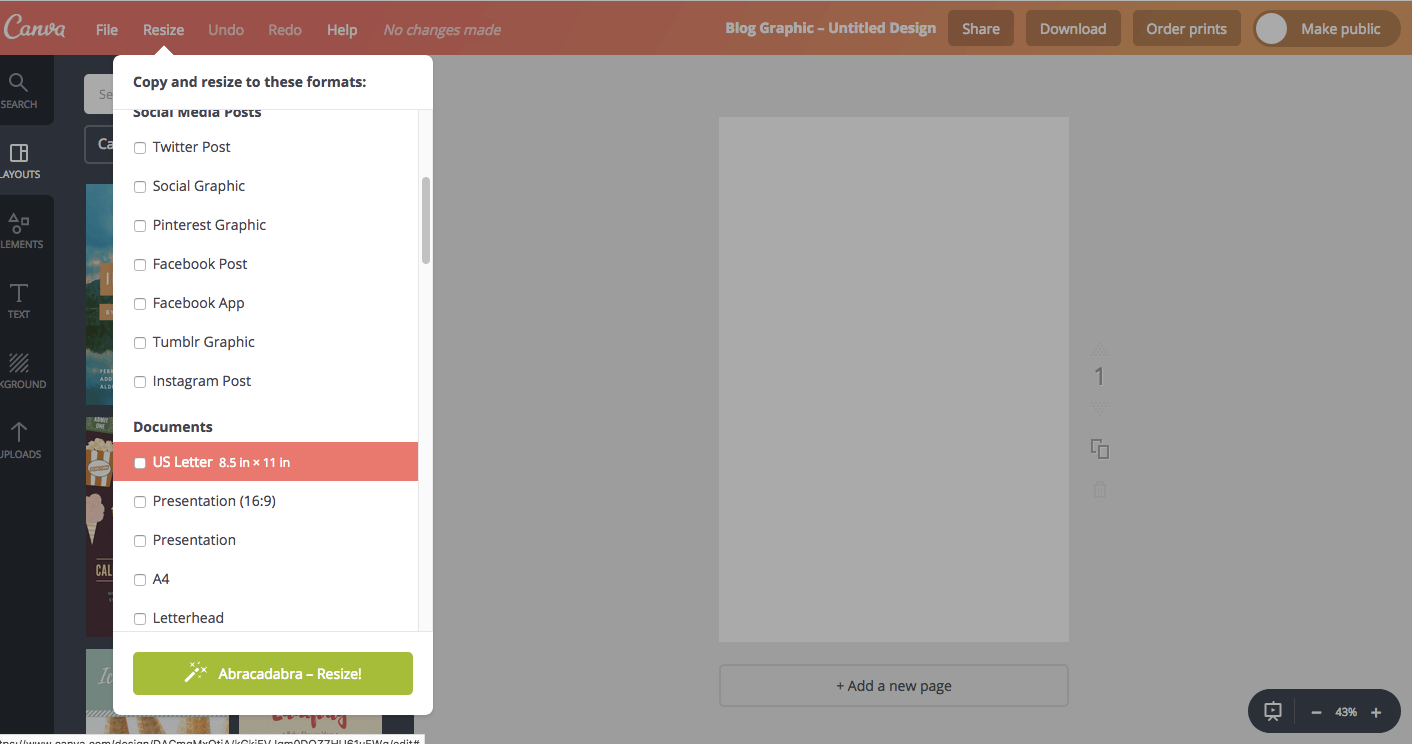
This first page will be your Ebook cover. We’ll create the interior pages later.
To customize your cover design, select a background color from the left-hand menu or choose a free photo through Elements –> Photos.
The free version will give you access to everything you need to create and download your Ebook. If you want access to premium images and vector elements at a discount, the paid subscription starts at $12.95 a month.
To find free images specific to your industry or blog topic, enter a keyword into the search bar. Be prepared to scroll through dozens of premium images that you can purchase for $10 (free accounts) or $1 (paid accounts). Purchasing the image will also remove the Canva watermark.

You can also upload stock photos or images from your own library using the Uploads tab.
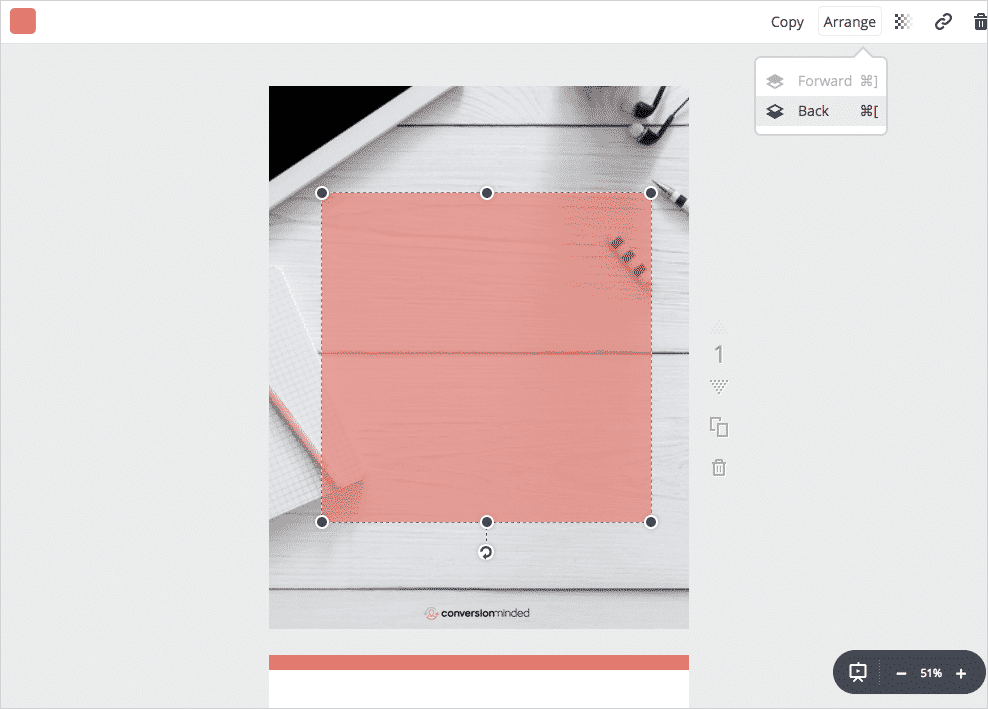
Once you’ve selected your background image, drag the corner edges, and resize it to fill the canvas. I like to add an overlay to my background to help my title text stand out.
To do this, select Elements –> Shapes and click on the top left square to place the shape onto your canvas. This will automatically position the graphic on top of your background image. You can rearrange the order if you need to by clicking on Arrange in the top menu.
Next, select the text tool, add your title, and choose the styles you want to use. With a paid account, you have the option of saving brand elements, colors, and fonts to streamline your image creation process.
The last thing to add is your logo, which you can do by selecting Uploads –> Logo and uploading a png or jpg version.
Once you’re happy with the cover, it’s time to populate your pages with copy.
Add a new blank page, paste your copy into a text box and customize the design of your interior page.
When you’re finished, save your Ebook design and download it twice:
- as a PDF
- as a PNG
You’re done!
Now it’s time to add the content upgrade to your post.
We’re back in Canva to create a graphic button that grabs people’s attention and inspires them to click.
Create a new design using any template. Then resize it as a Twitter Post, and upload the PNG of your Ebook cover.

Next, change the background color so that your graphic button stands out in your post. Add lead-in copy and a square shape to use as the background for your call to action copy (“Yes, Please Send!”).
Your new graphic button will look something like this:
We’re almost there! The last step is to download the button as a PNG and upload it to your WordPress Media Library.
Finally, add the opt-in form.
The opt-in form is what people will see when they click on your button.
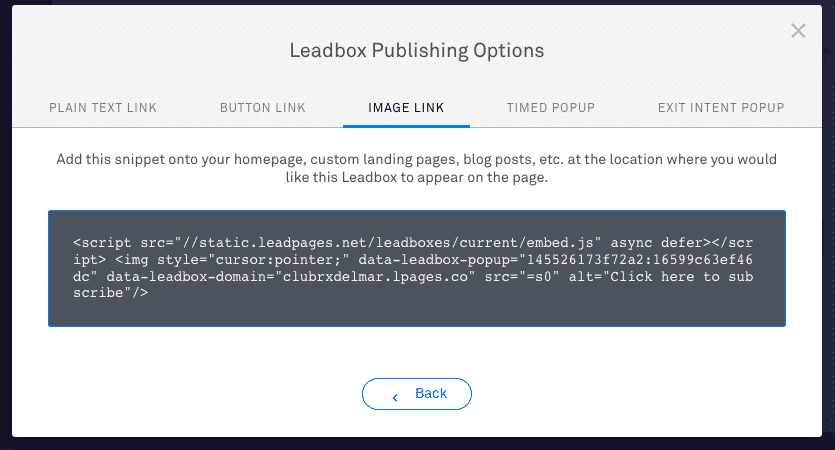
Follow these steps to create a leadbox with LeadPages (you can also use Sumo or Thrive Leads for the opt-in form).
Log in to LeadPages, select Leadbox, and give your new leadbox a name. Next, replace the template image with the image of your Ebook cover. Add a heading, and customize the design of your text and button.
The standard template includes a phone field, which you can easily remove by selecting the integration button in the left sidebar. While you’re there, make sure you integrate the form with your email marketing service and test that it’s working correctly.
When you’re ready, publish your leadbox, and copy the image link code.
Next, in your blog post, switch to the text editor, and paste the code where you want your graphic button to appear. The last step is to replace the image source in the code (src=”=s0″) with your button image. To do this, copy the URL from the image in your Media Library, and paste it in between the quotation marks.
That’s it! Now when people click on your button, they will see your pop-up and can opt in.
Where should you place your content upgrade?
Ideally, you want to give readers several reminders to download your content upgrade. I recommend placing it directly after your introduction, in the middle of your post, and again at the end of your post.
Remember that the more you scale this process, the more email subscribers you can get. You can even include different content upgrades to give people many different options, assuming that each free offer is relevant to your post.
Once you have ten or more content upgrades, you can combine them into a resource library or welcome pack to give people an even bigger bonus. The benefit to subscribers is that they will have all your free content in one place rather than having to download each free resource individually.
Resource libraries are easier to create than you may think. You can use the WordPress Portfolio Plugin or a similar portfolio plugin. Make sure you password-protect your resource page so that only your most engaged readers have access to it.

The free resource library is one of my highest converting opt-ins. I add a CTA button at the top of my homepage and blog pages as well as at the end of every post.
Step #5: Create the Right Type of Offer
While there’s no right or wrong content upgrade, not all content upgrades are equal.
The trick lies in knowing which ones to create. When you offer your readers something that’s a perfect fit for why they visited your website, they’re much more likely to opt in.
The best content upgrades are:
- Targeted—Speak to one specific audience, addressing their most pressing pain point.
- Relevant to your post—You’ll see the highest conversion rates when your content upgrades fulfill the intent your readers had when they came to your blog post.
- Time-saving—Give people the option to save long-form articles for later if they’re too busy to read them right now.
- Actionable—Provide your readers with easy-to-follow next steps that they can implement to see results right away.
- Open-ended—Create a path to future products by inspiring curiosity without giving away the farm.
- High value—It goes without saying that your content upgrade should provide real value. It’s important to reward the people who have opted in to your email list with something that casual readers don’t get. If your content upgrade is something that people would actually consider paying for, you’re on the right track.
What type of content upgrade should you use?
The first step in choosing the right type of offer is to identify a resource that will extend the value of your blog content.
Here’s a list of content upgrades and the types of content they work well with.
Checklists. Checklists are usually one-pagers that are perfect for how-to and long-form articles. You can outline specific steps people need to take to achieve something. For instance, I know that search engine optimization has a lot of moving parts and that my readers, like me, will have a hard time keeping track of them all. So I offer an SEO checklist upgrade that they can keep on hand for every blog post.
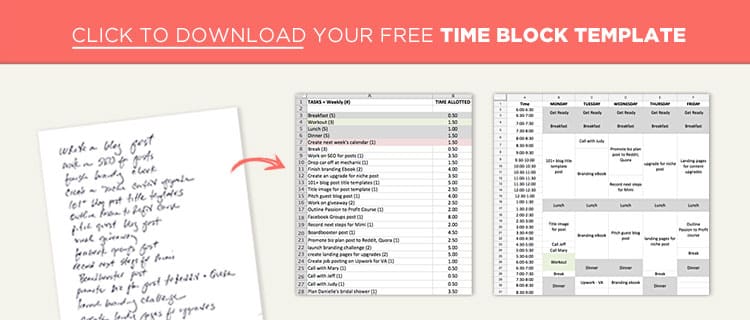
Templates. Examples of templates include social media templates, business plan templates…even productivity templates. In many of my posts related to productivity, I offer readers a time-blocking template they can use to schedule their week effectively.
Cheat sheets and blueprints. Cheat sheets are like a shortcut to the finish line. They work well for detailed articles and give your readers a high-level view of the milestones involved in getting from point A to point Z.
Ebooks. If your blog posts are part of a series or related to a theme that takes readers on a journey, an Ebook is an easy way to create a content upgrade. For instance, I have a three-part Grow Your Audience series where I show readers how to accelerate their online business growth. Because the blog post are related, each one can serve as a separate chapter in an Ebook and lead seamlessly to the next.
Spreadsheets. Spreadsheets provide a level of organization that makes it easy for people to research, brainstorm, plan, or manage systems and processes. I create Google Doc spreadsheets for many of my blog posts related to planning and workflows so that my readers have something to refer back to and share with their team.
Workbooks. Workbooks help your audience go beyond learning a concept and start putting what they learn into action.
The Blog Post as PDF. A straight PDF of your article may be the easiest route to take. With that said, offering long-form blog posts as a PDF (3,000 words and up) can provide great value for readers who are pressed for time and want to read your content later.
That’s a wrap!
If you’re thinking that content upgrades seem like a lot of work, I get it! Creating high-converting content upgrades takes time and effort, but that time is well spent. Content upgrades can have exponential effects on building your email list and should be seen as an investment in acquiring future customers.
From here, it’s all about engaging with your new subscribers, providing value, value, value, and creating sales funnels that lead people to your products and services.
If you’ve taken the steps above and created your free content around topics popular with your audience and the products and services that you offer, leading people to a sale will be a natural, organic process because you’ll know that your audience truly wants your products.

You and your blog is just awesome!! Thank you for always providing great and valuable content !
This is a very helpful article. I found your website on pinterest! I really like your website, I am getting a lot of information especially that I am a newbie blogger. I downloaded every thing on your Free resources!
This is so helpful. Thank you. I’ll bookmark for future reference
Wow, such an extensive article. This is a great help for me, because I’ve been struggling with finding the right subjects to write about. I’ve never heard of BuzzSumo before, sounds super useful.
You are so intelligent, Sandra! Thank you for sharing that with us!
Love your Google sheet idea to flesh out the topic before beginning to write. I will give this a try.
This was such a comprehensive post with necessary ideas on how to write the best blog post. Thanks for the insights.
This blog post is so helpful and valuable. Thank you!
You’re so welcome, Sukayna!
Great blog Sandra. Great ideas. We spoke on the phone probably a year ago. Can you remind me what you charge? It’s probably out of my budget but then how can a small business owner like me not afford to have what you offer?
Hey Doug, it’s great to hear from you. Would love to catch up and find out what you’re up to these days – I’ll shoot you an email.
Thanks for sharing the tips.
Great read, Sandra! This is a comprehensive and helpful list.
Excellent share. Loved your content plan template and I’ll use a similar from now on… Thanks.
You’re so welcome, Shafi. Glad it helped!
Thanks for the information, I was just getting started with blogging and this was one of me biggest fears.
Great to hear, Danny. If you follow this blog post structure, you’ll be on right track from the start.
Hey Sandra,
This is a fantastic list and learned a lot. However, as a newbie blogger sometimes it feels like too much work for a single blog post. I had to write, create graphics, I handle everything on WordPress, Keyword search, SEO, Social media marketing……………….. and so many other small things to do.
Did you feel the same while you were working alone in the early days or you started with a team?
Need help ma’am.
However, thank you very much for sharing this with us.
Totally with you, Nirodha. It’s a lot. But you don’t have to do everything at once. Think of it as more of a “goal to aim for” type thing. The main thing when you’re starting out is to focus on blog themes and categories that resonate with your audience. Then move on to SEO’ing your posts and adding content upgrades, and finally, products. I took a look at your blog and it’s fabulous so you’re on the right track! Wish you the best of success with it. 🙂
Thank you very much for the tips, ma’am. I’ll do that.