It’s become my #1 source of traffic – over Stumbleupon, Twitter and Reddit. So for the next few months my goal is to double down and see if I can boost my traffic even more.
I’ve been a bit of a slacker when it comes to scheduling my own content. I just don’t have the time! Yes, you say, but it only takes 15 minutes or so each day. That’s what you think until you go on Pinterest and see all the beautiful content, and then it’s 2 hours later and you haven’t started the blog post that’s due, like, today. I know this is true. It’s happened to me. Alot.
So I decided to stay away from Pinterest and all those addictive pins. But alas, that didn’t work either! My traffic dipped and – bottom line, I needed to get better at scheduling my own pins.
If you’re experiencing the same thing, today I’m sharing a tip that will help reduce your social media time and boost your traffic significantly using Tailwind’s scheduling and looping feature.
USING TAILWIND TO SCHEDULE YOUR PINS
With Tailwind’s regular scheduling, the pins you share will be sent in sequence. So let’s say you pin something to five of your group boards. It will go out to each board, one after the other, according to the timeslots you have set up there.
But if you pin them this way, you might start to look a little spammy. Your peeps may be following you on more than one board and you don’t want it to look like you sent out your pin to all of them on the same day. Plus, your preset time slots may conflict with the rules of a particular group board and have you pinning more than once per day in the same group. This could put you over the daily pin limit on a specific board and get you banned (which is what happened in my case).
Yes, you can go in to Tailwind’s queue and manually shuffle your pins to avoid looking spammy. Trust me, this takes a huge amount of time. I’ve done it, I know.
With looping, you can automate your pins without making it look like you’re automating them, if that makes sense. Setting up board lists with interval delays lets you stagger your pins so that one goes out to each of your boards in a day, then the next pin goes out to your boards the next day, and so on.
It’s not exactly like looping your pins in Board Booster, but it still saves you tons of time because you can loop your pins for an entire week and then you’re done. And with your pins going out to all of your boards like clockwork, you’re going to see a huge increase in traffic.
LOOPING YOUR PINS IN TAILWIND
Step 1: Set up board lists
To set up board lists, the first thing you want to do is to identify your high performing boards. These are the ones with the most repins and engagement. These are the boards you’ll include in your board lists.
To find your high performing boards:
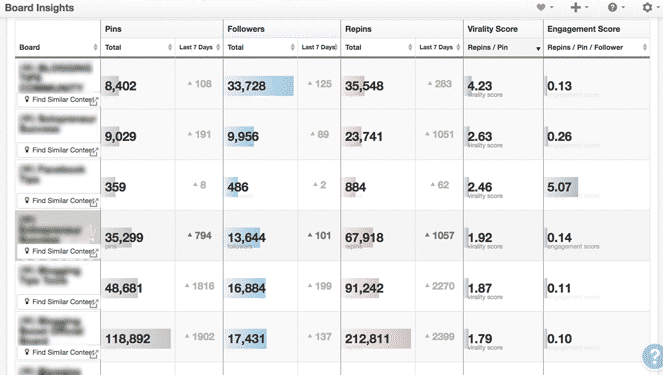
Login to Tailwind and from the left sidebar go to Track Your Brand Page > Board Insights. This will show your analytics for the past week for all of your boards, including your own boards, group boards and secret boards.
In the top you want to uncheck regular boards and secret boards so you’re just viewing group boards. What you want to look at is the second column from the right, the Virality Score. This will show you which boards are most active in terms of repins. Go ahead and sort this in descending order.
Make a note of your top seven performing boards that have the same theme. You’ll need these for the next step, which is to create board lists.
It’s best if you keep these all within one specific niche. I’m in a lot of blogging boards, so I created a list for blogging boards. A few of my high performing boards are related to other niche topics, so I leave those out.
You want to be sure that all of your boards are right for the particular content you want to share, because you’ll be batching your pins to go out to these boards and you want to make sure they’re relevant. Even if you have high virality scores in other subtopics, only include ones that are similar.
Now it’s time to create your boards lists:
Select Publish > Board Lists from the left sidebar. What you’re going to do is to create seven board lists. Then add your high virality boards to each. Make sure you stagger them as shown below. This is how you will set up intervals and looping:
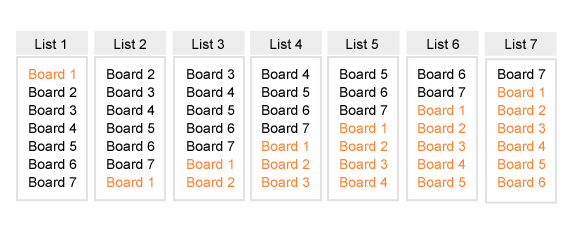
You’ll wind up with 7 different board lists with each of your boards staggered like above.
Got it? Great, next we can start looping.
Step 2: Schedule your pins
Go to Pinterest, select the pin you want to share from your branded board, and then select the Tailwind schedule button (the button with the blue icon). A separate box will pop-up where you can choose your board list, like this:
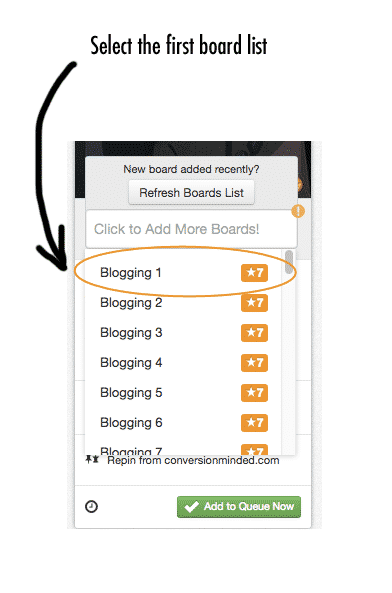
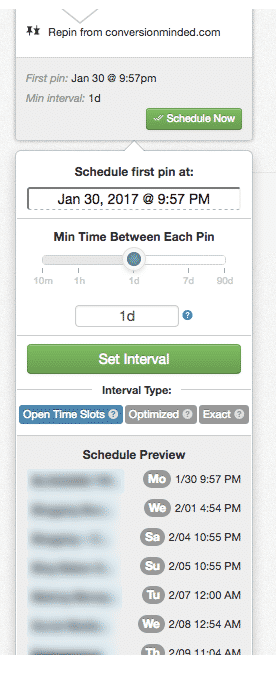
Repeat this process for seven pins, selecting the next board list in the chain. So for instance, you’d share pin #2 to board list #2, pin #3 to board list #3, you get the gist.
What will happen is that each of your pins will be shared to your boards throughout the week. Pin 1 will go to the first board in list #1 on Monday, then on Tuesday it will pin to the second board, Wednesday to the third board, and so on. This will give you one pin each day so it doesn’t look like you’re spamming your boards, plus like I said it’s a good way to make sure you don’t pin too frequently to any one board.
That’s it, you did it! You’re set for the week. You can set up more board lists too. Make sure you check your scheduled pins in Tailwind to make sure everything is working. When I first set up mine, I forgot to add the last board to my lists and only had six, not seven, so everything was thrown off and I was pinning to the same boards twice in one day. So definitely check that they’re set up right and everything’s working the way it should.
And then once a week or so check your group boards to make sure they look okay too.


Thanks for the looping tip. I just set it up. Super easy!
I pinned this post on Pinterest too 🙂
You’re so welcome, Stacy. Thanks for sharing it!
I just love the feature of Tailwind which is categorizing your boards!! It’s a game-changer for me since I’ve tried both Tailwind and BoardBooster. Both work great and save you from staying awake all night pinning ????
I have used a few of the tools available online for managing my Pins but still, I had to be there online and onsite all the time watching out and frankly, I did not have that much liberty at the time. So I decided to look for the permanent fix and checked at http://PinPinterest.com and believe you me, I have not worried a bit about my schedules and pins after that as it does the work for me by crawling in my webpage and automatically detecting the content to be pinned thereby adding more followers to my page.
It allows me to add as many Pinterest account as I want. So I can manage any number of acocunts and transfer days between them. Another amazing feature of this web service is that it is totally running on the cloud and even accessible through my mobile phone and that is exactly what makes it so quick and easy to access and use…