
 Ever wonder what the fuss is all about with Pinterest Rich Pins? Or why you even need them?
Rich pins are organic Pinterest pins that display your profile name, image, title and description on the pin image. I liken them to meta descriptions, and here’s why:
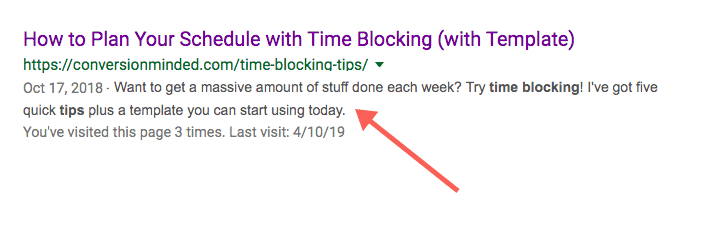
Both rich pins and meta descriptions are not direct ranking signals, meaning that they won’t help your content appear high on Pinterest or Google. But a compelling meta description can entice people to click on your post over someone else’s. Here’s an example of a meta description:
 When you install rich pins, that meta description will appear on your pin (and it will stay with it). If you change the title or meta description of your blog post, the details on the rich pin will change too.
From Pinterest:
Rich Pins add extra details to Pins and update important information from the websites they came from. If something changes on the original website, the Rich Pin updates to reflect that change.
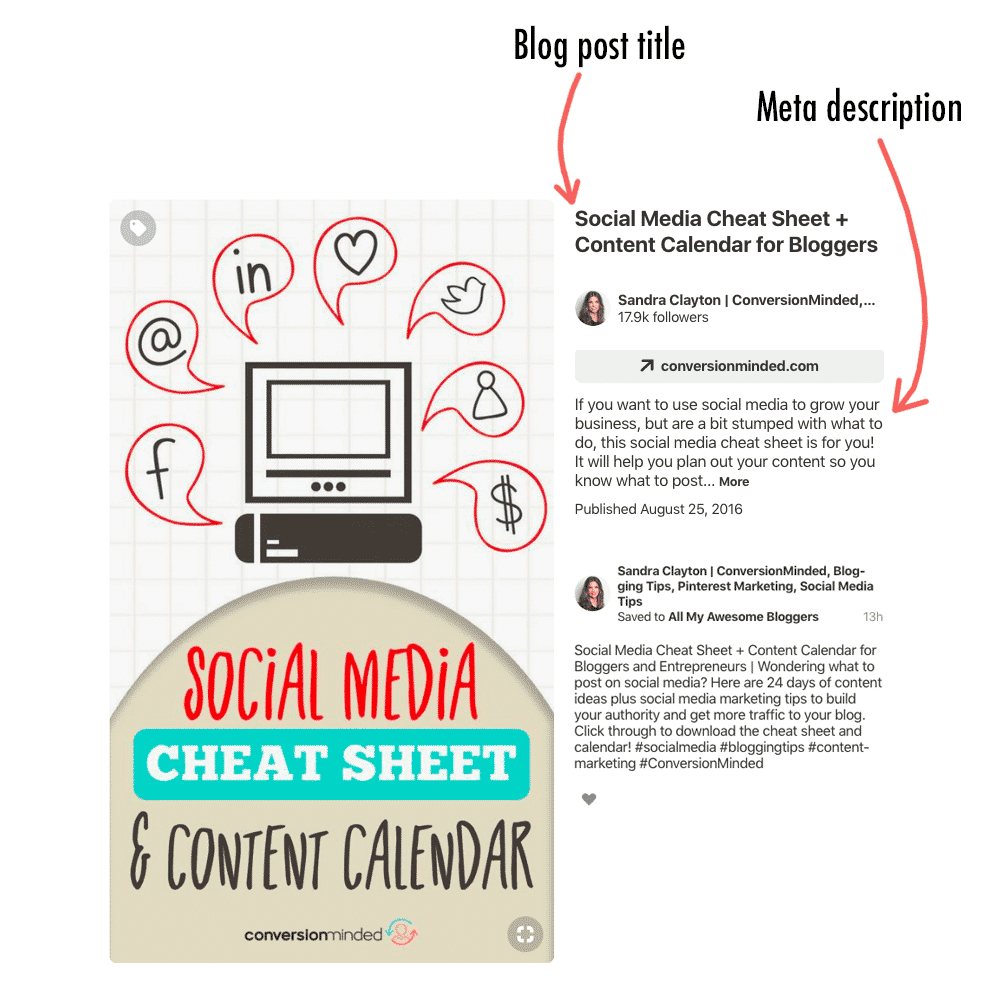
You can spot a rich pin by the extra information above and/or below the image on a closeup, and by the bold title in the grid. They can help you get more traffic, profile views and followers because they show people the original pin source. And by pulling in details from your post, people will know what your pin is about and be more likely to click on it.
What do Pinterest rich pins look like?
They can be hard to detect at first, but once you recognize them, you’ll spot them right away. Here’s an example of a rich pin (desktop, closeup view):
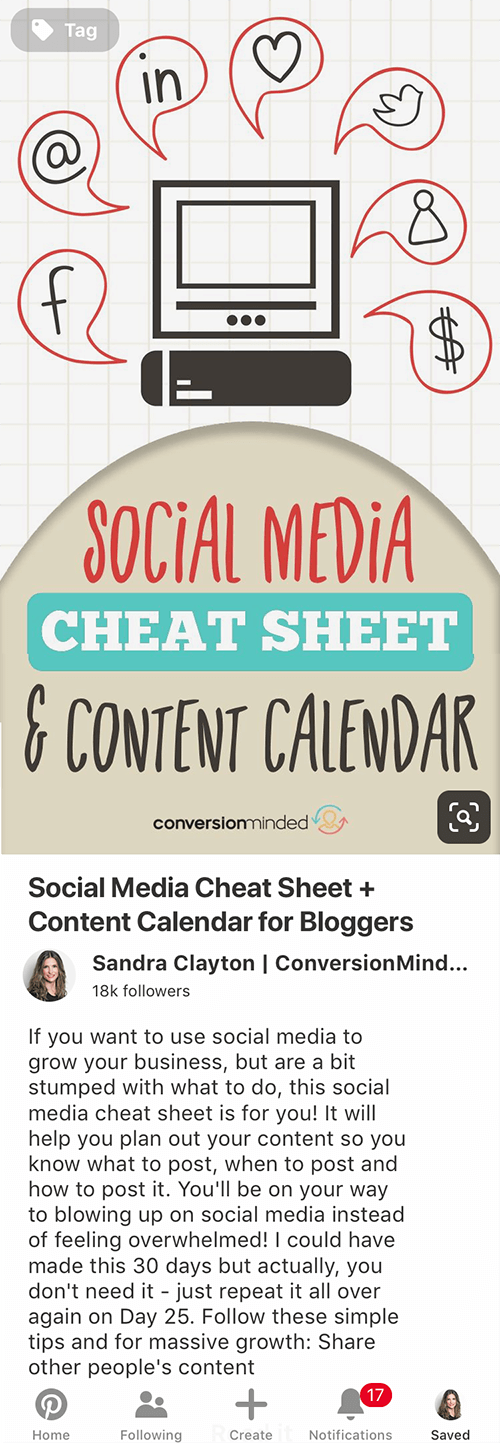
And here’s that same closeup on mobile:
At the end of the day, rich pins are one of those “best practice” things to do. Since they take about 5 minutes to set up, why not do it? Let’s dig in.
First, what types of rich pins are available?
There are four major types of rich pins you can use:
- Recipe rich pins add details such as cooking time, ingredients list, and other special recipe instructions.
- Article rich pins display the meta title, meta description and author of your blog post (these are the ones most bloggers use).
- Product rich pins are the updated version of buyable pins and display pricing and product details, along with where people can buy and how many you stock.
- App install rich pins direct iOS users to the app store so they can download your app.
Why should you set up rich pins?
Not convinced you need ’em just yet? I get it! In addition to what I mentioned above, consider this:
- Pinterest rich pins give people the information they need to take action.
- They help your content get discovered by more people who will likely click and repin.
- The bold title helps them stand out in the feed.
#HEADSUP – If you been using Pinterest at all, you know they like to change things up! The same is true with rich pins. Check their website real quick before you start (but don’t freak…Pinterest instructions can be overly technical). The method I’m sharing here is super easy and non-techie.
Note: This method is for WordPress websites. If you use SquareSpace or another platform, ask a developer for help. Don’t let the tech stuff trip you up!
1. First, install Yoast SEO
Yoast is an SEO tool that helps you optimize your blog posts so they appear in Google for important search terms.
(It’s also great for Facebook. The OpenGraph will pull in metadata from your post, including site name and blog title, description, and link image.)
But I digress! We’ll be using that metadata for Pinterest.
If you don’t already have the plugin installed, head over to your WordPress dashboard and select plugins (left sidebar), then add new (at the top). Search for Yoast, install and activate it.
Once it’s installed, SEO will appear in your left sidebar. Hover over it and hit social.
From there, use the Accounts tab to add links to all your social media platforms. Then toggle over to the Facebook tab and double check that Facebook OpenGraph is enabled.
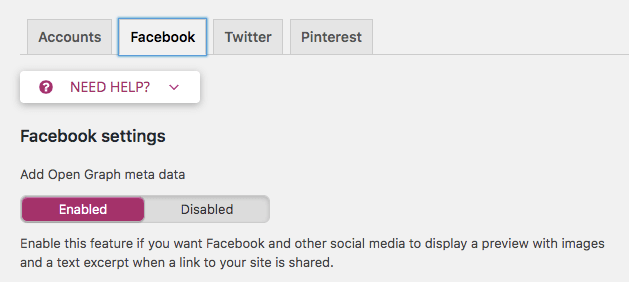
It should be enabled by default. If it isn’t already, enable it.
That’s all there is to it! Your blog posts are ready to display as article rich pins. ?
2. Create a business account
You probably already have a business account, right? If so, you can skip this step.
If you have a personal account, head over to settings (top right) and click account settings.
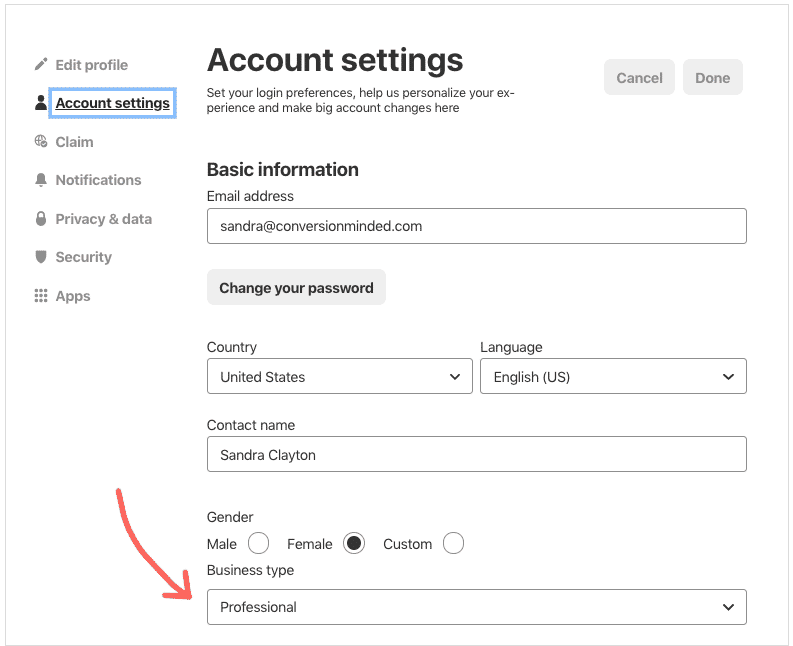
See the business type section at the bottom? Personal accounts will say something like change to a business account.
Now, I bet you’re probably wondering, I want to keep my personal account! Can’t I just create a new one for my business?
The answer is that it really depends. If you’ve been sharing loads of personal pins to your account, it may be better to start a new one. When you’re using Pinterest for business, you want people to see boards that are relevant to your niche and target audience.
If you don’t have many boards and pins already, you can switch it over.
Make sure you set up your business account and boards correctly so that Pinterest can rapidly index your pins. This post covers everything you need to know about Pinterest SEO.
3. Claim your website
All you’re doing here is verifying with Pinterest that the pins you share are yours. It’s a simple step. And it’s a prerequisite for Pinterest analytics, ads, and yep, rich pins. Once your website is claimed, your profile image and link will appear beneath the meta title on all pins you share from your website.
Here’s an example:
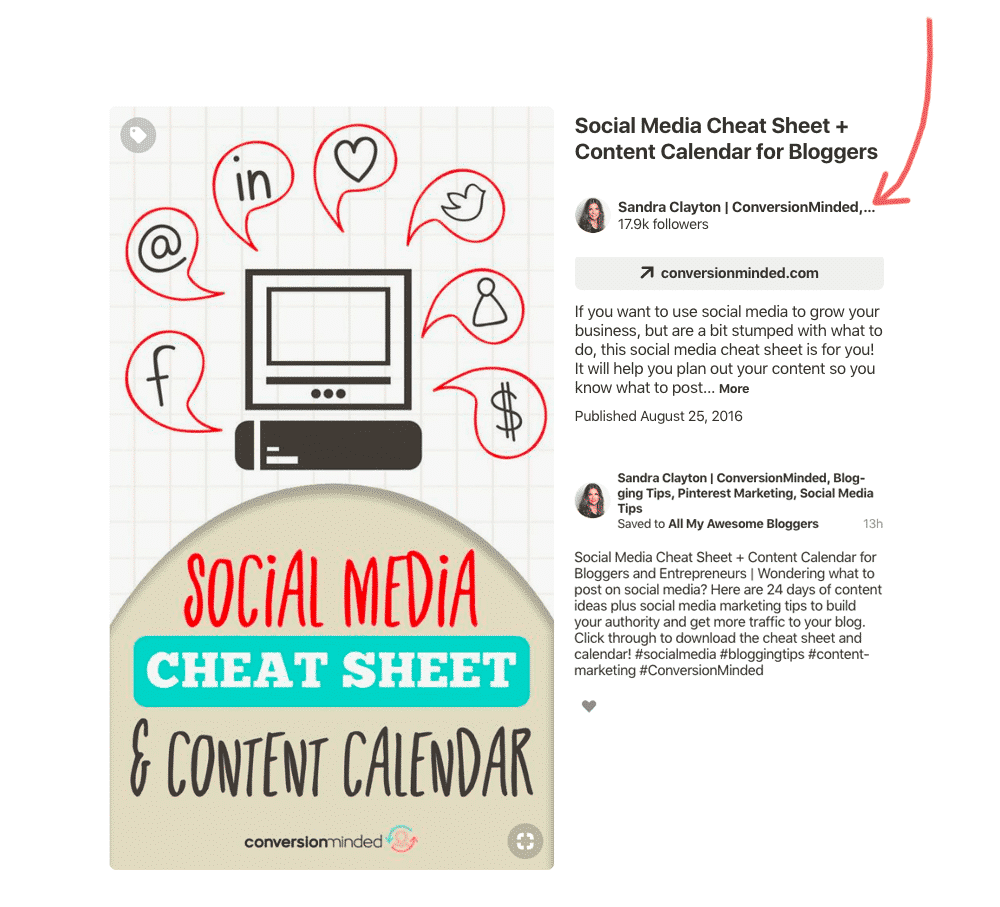
Can you see how this step will help you build a strong Pinterest brand? People will start to click on your pins simply because they know and like your content, even if your blog post titles and graphics are less than brilliant, *wink.
To claim your website, head back over to settings, then claim:
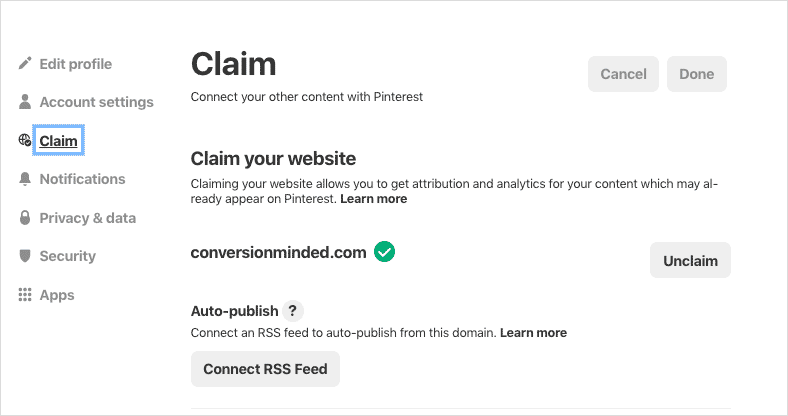
Since my website is already verified, the green checkmark is there. You’ll want to enter your website URL and hit claim website.
On the next screen, select add HTML tag and copy the code (we’re going to enter this into Yoast next).
Go to your WordPress dashboard and select seo > social from the left sidebar. Then click the Pinterest tab. Paste the HTML code you just copied into the Pinterest confirmation field, right here:
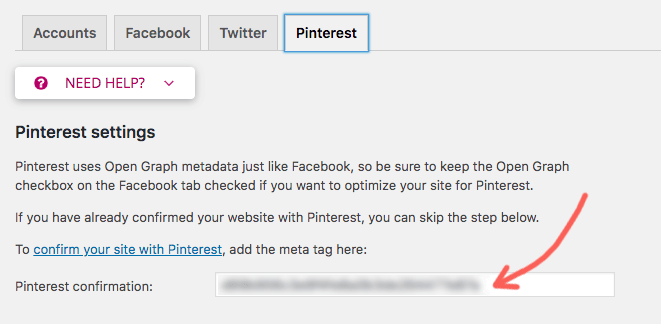
Hit save, and you’re done!
Well…almost.
The last step is to go back to Pinterest and hit the red finish button. Then you’re good.
4. Finally, validate and apply for rich pins.
Head over to the Rich Pins Validator and enter the URL for a blog post (any one will do). Just know that the validator tool won’t work if you enter your root domain instead of a post.
To clarify, your URL should have at least three forward slashes in it. For example:
Use ? https://conversionminded.com/pinterest-seo
Not ? http://conversionminded.com
When you’re ready, hit the blue validate button. Once you get the green check and the Your Pin’s have been validated! message, you can apply.

Pinterest should validate your pins right away. Be patient though! It can take a few days. If you see this message…
We’ll review it and email you with any questions or next steps.
…check your pins over the next few days to see if your profile image and link show up. That’s when you’ll know they’re rich pins!
5. So, you’re a rich pinner, now what?
Now that Pinterest is adding metadata to your pins, it’s time to get serious about optimization. Many standard SEO strategies apply to Pinterest SEO, and rich pins in particular.
Every time you write a new blog post, make sure you:
1. Write great meta titles and descriptions!
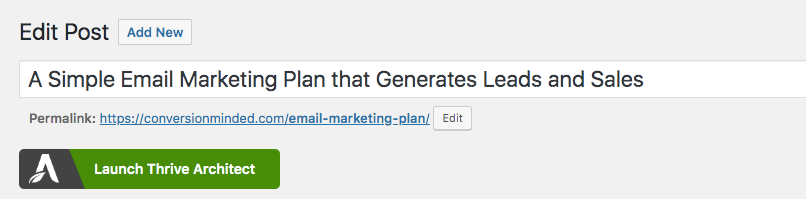
Wondering what the heck a meta title is? It’s your SEO title, and it’s usually the same as your WordPress blog title.
That’s the one at the top of the edit window, right here:
Scroll down to the Yoast SEO section and you’ll see the SEO title. Here’s where you can enter important SEO details and your target keyword. In our case, we’re looking at the SEO title and meta description.
(If you don’t see the SEO title, toggle open snippet preview.)
Here’s an example:
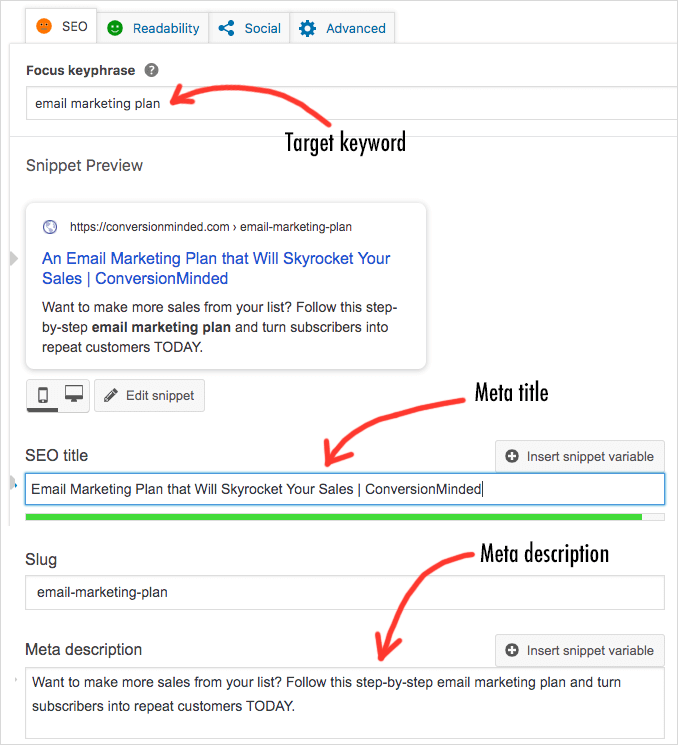
Notice how my SEO title is different than the blog title?
There are a few reasons you might do this:
First off, Yoast will prompt you to add your target keyword to the beginning of your SEO title. Now, if I can make that happen in a way that sounds natural and organic, I’ll do it (in this case, it worked).
(In the grand scheme of SEO ranking signals, I’m not sure it really matters.)
Second, Yoast will display a preview of your post in search results. I usually tool around with the title and description until I like the way they look.
And depending on how the new SEO title looks on pin images, I may update the blog title. Otherwise, I’ll leave it alone. I’d rather match the blog title to my pins, but hey, that’s just my personal preference. 🙂
So play around with those a bit.
Part of it comes down to priorities, in my book. How important is this keyword to your business? Do you REALLY need to rank for it? If so, be super geeky about SEO.
Last thing I’ll say here is:
Some *experts* say that the two titles should match. Others say they should be different. And still others say it doesn’t matter. Go figure…
What I do know for sure is…
Blog titles and meta descriptions carry serious weight when it comes to click through rates.
Huffington Post, Digg, and Mashable are great for headline inspiration. Try to mimic the headline formats they use (don’t copy the actual titles!), and make a list of power words that grab your attention, e.g., brilliant, shocking, undeniable, and so on. See if you can work them into your titles.
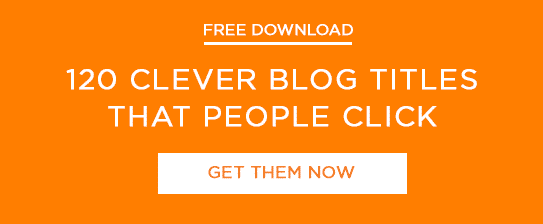
Want done-for-you blog titles? You’re in luck! I created this list of over 120 blog title templates you can use. All you have to do is fill in the blanks, and you’re done. Click the image below to download it.
2. Next, create brilliant pins.
Nothing will help you stand out and get engagement like a brilliant pin image!
If you’re wondering where to start here, check your Pinterest feed. Search for topics completely unrelated to your brand (e.g., meal plans, gardening, pattern making). See what jumps out at you.
Use your laptop first, then check the app. Notice a difference? Many times the pins that jump out on desktop are completely different than your phone.
Still, there are design “best practices” you need for each. For example:
- Bright colors
- Bold, sans-serif fonts
- The use of text overlays
- Lifestyle images that reflect your brand
- And more…
Want an in-depth guide on pin design? Read this post!
#CREATEANDGO Templates will help speed things up with Pinterest graphics. A style guide will help too. Make sure you define the fonts, colors and images you want to use so you, and your team, can create them on the fly. And you’ll know that your Pinterest brand will always be consistent and cohesive.
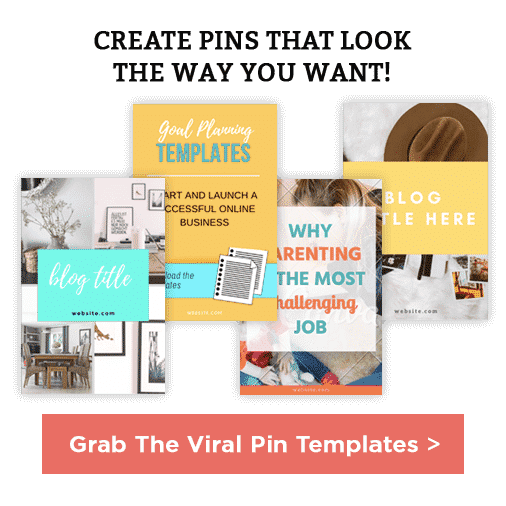
If you need help creating templates, or just want a jump start, my Viral Pin Templates may be just what you’re looking for! There are over 23 pre-made templates inside. You’ll have my best pin designs that have gotten thousands of page views and clicks! Click the image below to learn more about the Viral Pin Templates.
3. Add descriptions to your pins.
Back in the day, you’d see descriptions beneath the pin images in your feed. And we’d all write super elaborate text to encourage people to click through.
Now they’ve lost their *engagement juice* because you have to view close-ups to see them. But they still pack a big punch for keywords!
Every time you share a new pin, include a keyword-rich description (1-3 keywords, 1-3 hashtags).
There are two ways you can do this:
One. Upload the pin from your computer and add the description manually.
Two. Add text to the pin in WordPress, and click save from website in Pinterest.
I won’t go into too much detail here. Just know that if you choose #2, both the image and the text will be shared when someone saves the pin from your website.
The way to make this happen is to install Tasty Pins or Social Warfare. When you upload a new image, you’ll see a custom field for Pinterest text. Here’s what it looks like using Tasty Pins:

That’s where your pin description goes. Don’t worry if you forget to add it at first, you can always edit it later.
Oh, and…see the alternative text field below it? That’s where your SEO keyword goes, just so ya know.
You’re done! Now, every time someone shares the pin from your site, the description will travel with it.
Whatever you do, please don’t leave the description blank! You’ll miss out on traffic.
4. SEO your blog post.
Last but not least, SEO the hell out of your post. Now, there are a lot of on-page SEO things you need to do (in addition to steps #1 and #3 above). And I cover them all right here. There’s even an SEO checklist you can keep handy. (I like to check things off right before I hit publish, which I’m about to do right now!)

Hi Sandra, nice post you have in-here. I now know how to create Pinterest rich pin, thanks
Hi Sandra, thank you for this great tutorial on Pinterest. I have pinning on Pinterest for a while without understanding the all the hows. Thank you for clearing up some misconceptions for me. Great post!
You’re so welcome, Ruthlyn.
Well-informed, nicely done post. I like the step-by-step way you presented how to set it all up. The #HEADSUP was a nice touch.
I have heard of rich pins but didn’t completely understand what they are or why they are important. You did a great job of explaining both in addition to explaining how to make sure they are set up! Thank you so much for sharing this post! 🙂