
5 Surprisingly Easy Ways to Create Instagram Shoppable Posts
 If you sell physical products, Instagram shoppable posts are your new best friend. So you probably want to know everything you can about how to get approved for them, right?
Because Instagram is the fastest-growing channel out there. Just look at these stats from Hootsuite and Omnicore:
- 1 billion users (and counting)
- 500 million daily active users
- 68% of users are female
- 38% of users check Instagram multiple times a day
- 72% of users have bought a product they saw on Instagram
Luckily, my friend Yandy Zuo is here to share her steps for enabling Instagram Shopping. And believe me, she had to wrestle with Instagram’s guidelines for a looong time before she got approved.
If you’ve been wondering how to create shoppable posts, or if you’ve been struggling to get the thumb’s up from Instagram, this post will help.
First off, here’s what a shoppable post looks like:
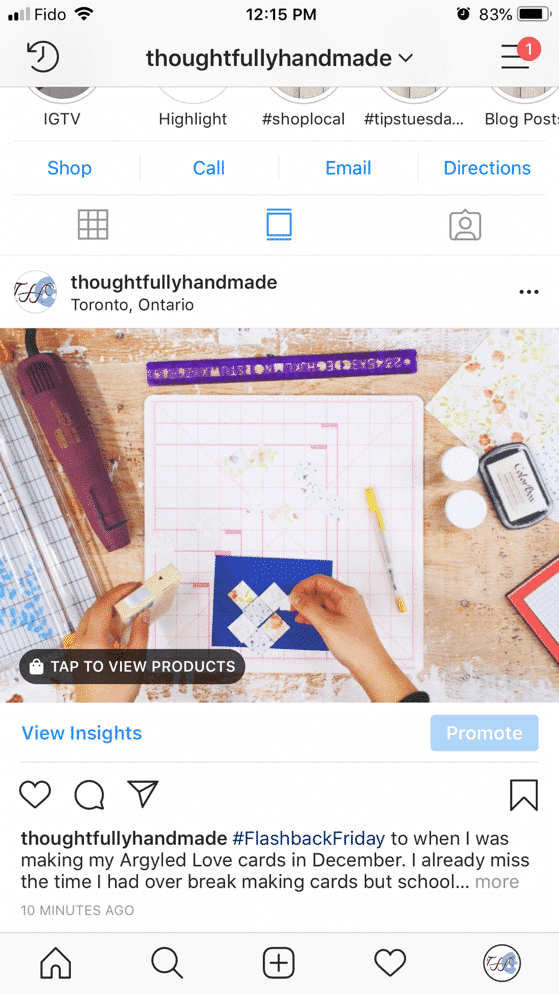
See that “Tap to View Products” button? Click on it, and you can buy right from within Instagram, which is HUGE. A total game-changer and worth going through the steps to get this set up, in my book. 🙂
Read on for Yandy’s best tips on setting up Instagram shoppable posts…
––––––––––––––
I’ve never felt happier than when I finally got approved for Instagram Shopping.
Now I can tag my products in my Instagram posts. When a customer sees one of my handmade cards or bookmarks in a post, they can click on the product and buy it right inside the app without having to go to my website.
My social media marketing is *next level* now.
If you sell products and use Instagram to market your products, shoppable posts are essential to increasing sales.
Think about it. Shoppers want to do the least amount of work possible. They don’t want to go to the trouble of heading to your website and manually finding the product. If they’re going to buy something, they want to buy it immediately.
That’s why Instagram Shopping made headlines when it was introduced. It’s also why I spent months trying to get approved. Before I set up shoppable posts, I had to direct people to my website and try to get them to buy. Basically impossible! Especially since Instagram gives you just one place to put a link…in your profile.
Now that I’m approved, I’m loving this feature! Not only can I tag my products in posts, but I can tag them in stories. Wow.
If you don’t yet have this Instagram shopping designation, you may be missing out on a lot of potential sales. But don’t worry. Three months ago, I didn’t have it either.
Want to know how you get this super cool designation?
It’s actually quite simple to get approved if you follow these five easy steps…
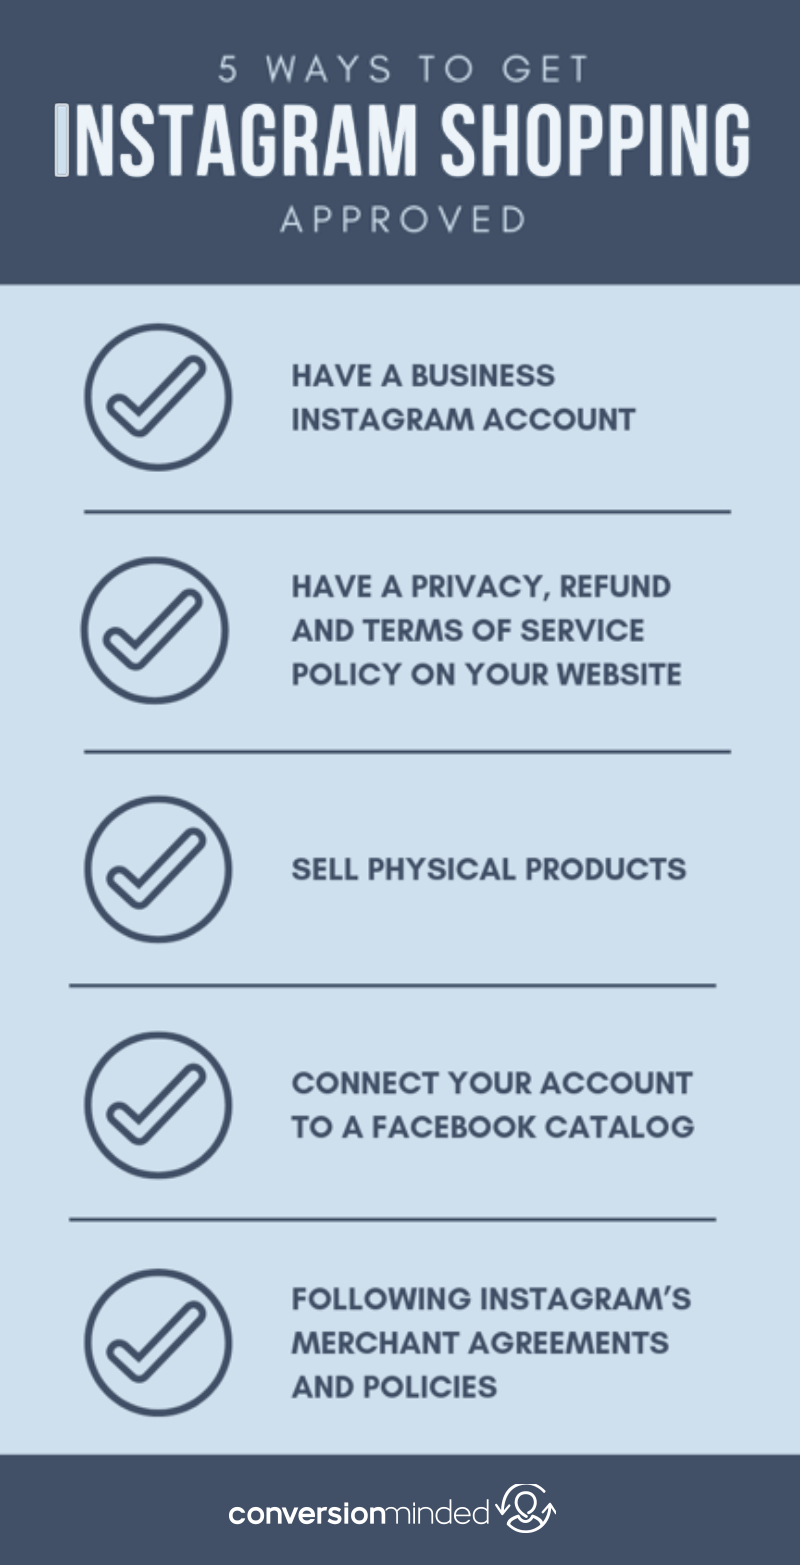
1) First, have a business Instagram account.
This one should be a no-brainer. Why would a personal user need to tag products for people to buy?
Instagram only gives the product tagging to business accounts because they are selling stuff. Also, it’s a way for Instagram to ensure that your business is legitimate and won’t scam users.
To switch over to a business account, go to your settings and click “Switch to Business Profile”.
Related: How to Grow Your Instagram Followers Organically
2) Make sure you have the right policies on your website.
This was the big issue I had with getting approved. You need to have Privacy, Refund, and Terms of Service policies already on your website before you request approval from Instagram.
If you use Shopify, just head to the settings tab and go to the legal section. There, you can create your own policies or use the templates Shopify provides.
If you don’t have Shopify but use something like it (e.g., BigCommerce, WooCommerce), I’m sure they have a section for policies too.
If you use another hosting platform like Squarespace, Wix or WordPress, you can add your policy to the footer, as a link in your cart page or create a dedicated landing page on your website.
Whatever e-commerce platform you use, just make sure you check that all of your policies are there.
3) Sell physical products
This one comes straight from Instagram’s help center. I mean, how do you tag a service?
If you sell both services and products, Instagram will only allow you to tag your products.
If you sell a service or digital product, I recommend using Link in Profile or Link Tree to maximize that one link Instagram gives us. I use Link in Profile for my blog posts and custom order page.
4) Connect your account to a Facebook catalog.
Your Instagram account needs to be connected to a Facebook catalog. If you are using Shopify, head over to the sales channels section and add Facebook first, then Instagram to them.
When you add Facebook, Shopify creates a Shop section on your business Facebook page that displays all of your products. Follow the prompts and wait for Facebook to approve.
I got approved for Facebook right away, so unless your shop contradicts Facebook’s requirements, this shouldn’t be an issue.
If you are not using Shopify, set up your own Facebook page for your business and go to the Shop section. If it isn’t there, you will have to change your page template to the Shopping template. Just click “Set Up Shop” and follow the prompts from there.
Wondering why you need to connect to a Facebook catalog? Because that’s how Instagram can access your products and prices.
Once you have that out of the way, add Instagram to your sales channel and follow the prompts.
If you don’t use Shopify, you will have to manually add Instagram Shopping on Catalog Manager or Facebook’s Business Manager and wait for approval.
5) Comply with the merchant agreement and commerce policies.
This one, in addition to step #2 above, is essential to getting approved by Instagram.
Now, you’re probably already doing this, but it’s worth mentioning that to set up Instagram Shopping, you have to follow both Instagram and Facebook’s guidelines.
If you’re curious, below is a list of content that is prohibited from selling:
- Commerce posts must not violate their Community Standards
- Illegal, prescription or recreational drugs
- Tobacco products and related paraphernalia (e.g. e-cigarettes, tobacco pipes, etc.)
- Unsafe supplements
- Weapons, ammunition or explosives
- Animals
- Adult products or services
- Alcohol
- Healthcare products
- Real money gambling services
- Anything that is fraudulent, misleading, deceptive or offensive
- Subscriptions or electronic products
- Digital media and electronic devices
- Real, virtual or fake currency
- Anything that constitutes Third-Party infringement
- Anything discriminatory
Now, this doesn’t mean that you can’t post about something like this if you are a business account (although you might get shut down). It just means that you will not be approved for Instagram shopping. Which means you won’t be able to tag your products in your posts.
If you do post about and product tag one of the products/topics as mentioned above, Instagram can and probably will revoke your approval. Make sense?
That’s it! That’s how I got approved for Instagram shopping. Have you tried any of these tips? Let me know in the comments!
I even made you an infographic so you can easily share and access these steps:


That’s a great news Yandy! Cant wait to start my business on instagram. Great guide by the way!
Thank you for explaining this in a way that is easy to understand and apply. This is a great article. Very helpful.
It’s a bummer that it only applies to physical products 🙁 I sell printable workbooks and guides, so my shop it just digital downloads. Thanks for the great info though.
Could you add the shopping icon on an Instagram photo, if you are selling your products on Amazon?
All the Best,
Martin
Hi Martin, I’m unsure about tagging Amazon products – I would think so, if you can add Amazon products to a Facebook catalog. Good luck with it!
Hi Sandra! I have had no luck linking making my posts shoppable on Instagram. I keep getting ‘instagram shopping is not available for this account’ when trying to link my account with my Facebook catalog. So frustrating, not sure why. Can you help? http://www.staceyleewebber.com @staceyleewebber
Hi Stacey, I’m sorry you’re having issues setting up your shoppable posts. I would try reaching out to Facebook support through business manager and see if you can get them to send your request to their support group for help. Here’s the link: https://www.facebook.com/business/help. I hope that helps you resolve it!
Looking for advice! I was denied (I believe it was because I did not have your #2 tip up to par!) I have since fixed this and now am having trouble re-applying. It still says “Your Account Wasn’t Approved”. Any advice for how I can move past this and try again?
Hi Ani, Unfortunately it’s not a straightforward process to re-apply. I would take a look at the steps listed in this blog post: https://sachsmarketinggroup.com/approved-instagram-shopping-product-tags/. As a last resort, you can reach out to Facebook business manager support and see if they can help: https://www.facebook.com/business/help. Good luck with it!