Are you curious about how to use content pillars to create social media content but not sure how to get started? You’ve come to the right place! In this illustrated, step-by-step guide, you’ll learn everything you need to know about:
- What they are
- Why you need them if you want results with content marketing
- How to figure out what yours should be so you can attract your dream customers into your audience
- How to use them to create content for social media more effortlessly, and
- How to streamline your content creation process and save tons of time
Not only that, I’m also going to show you how they fit into your larger content strategy and how to easily plan your content so you can stay consistent with less stress.
By the time you’re done reading, you’ll have a roadmap for always knowing what to post and when to post it in order to grow your social media presence.
Sound good?
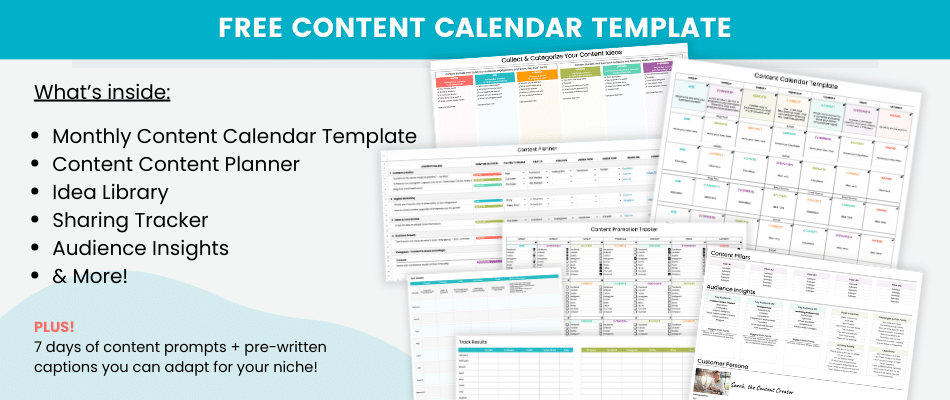
Before we get too far, be sure to download the free Content Planning Template so you can put all the steps you’re about to learn into action.
- What are Content Pillars?
- Social Media Content Pillar Examples
- Content Pillars As Part of Your Larger Social Media Content Strategy
- Figuring Out Your Social Media Content Pillars
- The 6 Content Buckets Your Business Needs to Share
- Connecting Content Pillars and Content Buckets
- Turning Your Content Pillar Strategy into a Daily Action Plan
- Final Tips for Planning Your Social Media Content
First thing’s first:
What are Content Pillars?
Content pillars are the main topics or themes that all of your content can be sorted into.
These themes connect your content to your business goals and make life easier by providing a framework for everything you share so you can attract your ideal audience, earn their trust, and guide them toward becoming a customer.
The biggest benefit of all? Time savings. The average small business owner spends hours each week stuck on the question, “what should I be posting?” because they’re not following a content pillar plan like the one I’m about to show you.
A general rule of thumb is that you want to narrow the topics you post about down to 3-5 broad topic categories to make sure your brand message is focused and your audience knows exactly what to expect when they follow you.
Each of your 3-5 content pillars should represent a topic theme that’s…
- Relevant to your brand and the products and services you sell
- Relevant to your ideal audience
They can have infinite subtopics and specific topics, but they all must relate to the pillar topics.
We’re going to go over the steps to determine your own content pillars shortly, but first it’ll be helpful to see where you’re headed. So let’s kick things off by taking a look at what content pillars look like in practice with some examples…
Social Media Content Pillar Examples
The easiest way to determine your content pillars is to just start brainstorming topics that relate to what you sell, or what you want to sell, and the things your ideal customers might have questions about.
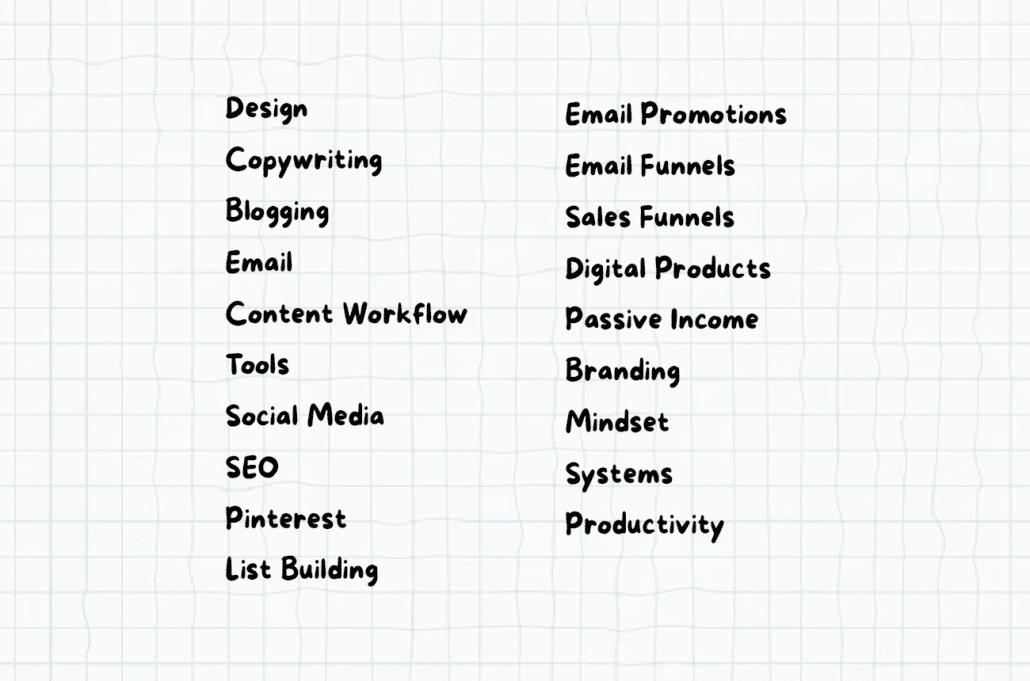
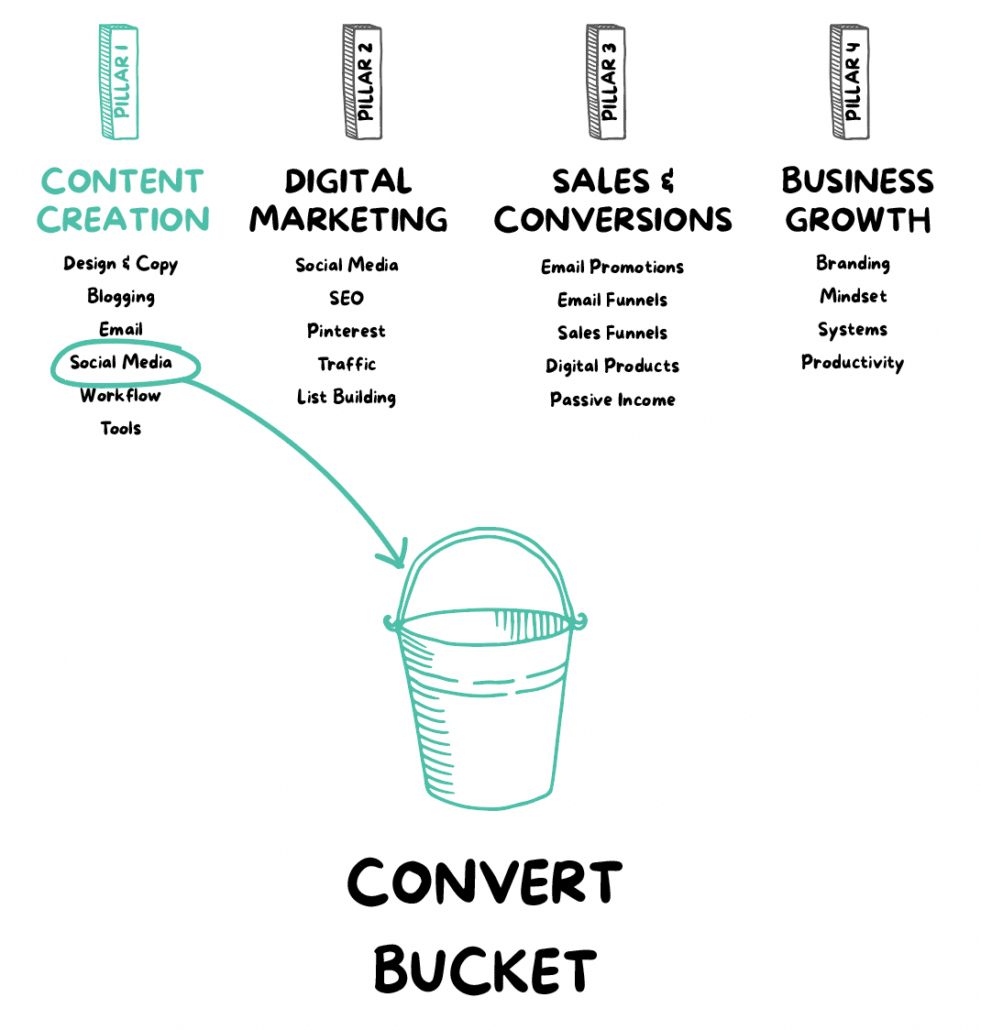
Say you’re a digital product and course creator that helps small businesses with digital marketing. The topics you come up with might look like this…
Once you’ve brainstormed your list of topics, you want to start grouping them together in common themes or “clusters.” It may take some shuffling around, but eventually you should be able to put them all under 3-5 broad topic categories.
(If you come up with 3 that’s perfect, don’t strain yourself trying to get to 5. The more you niche down, the simpler it will be to manage. But if you need 4 pillars or 5 that’s perfectly fine too.)
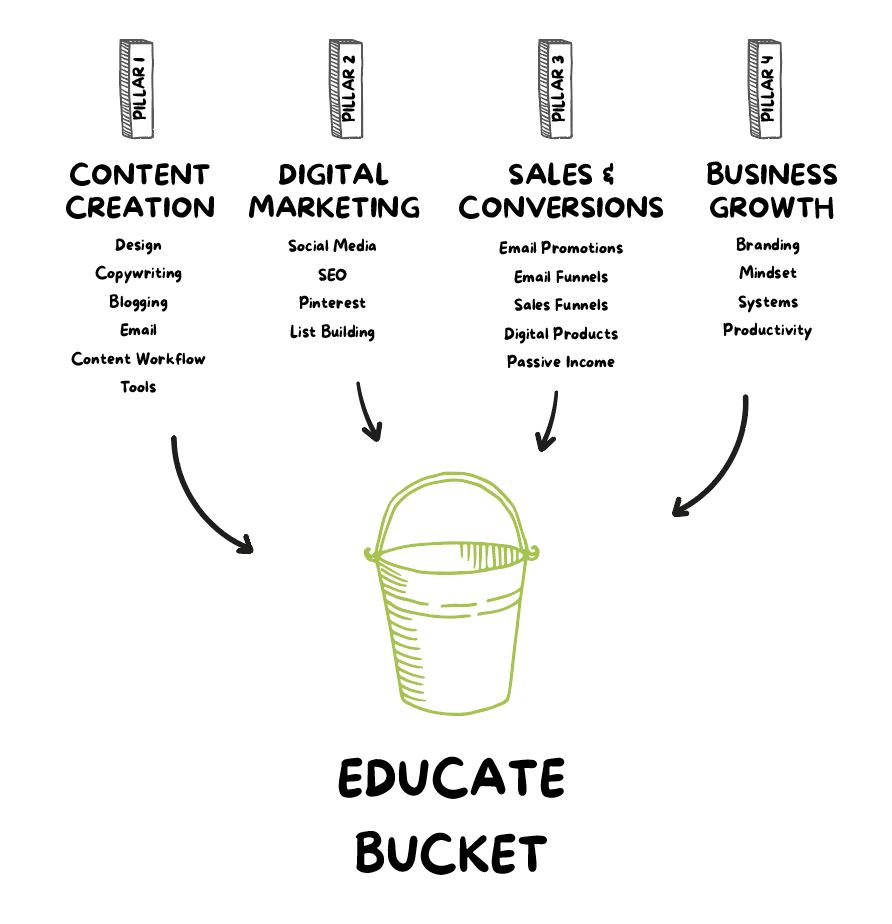
In this example, those main pillars might look something like this…
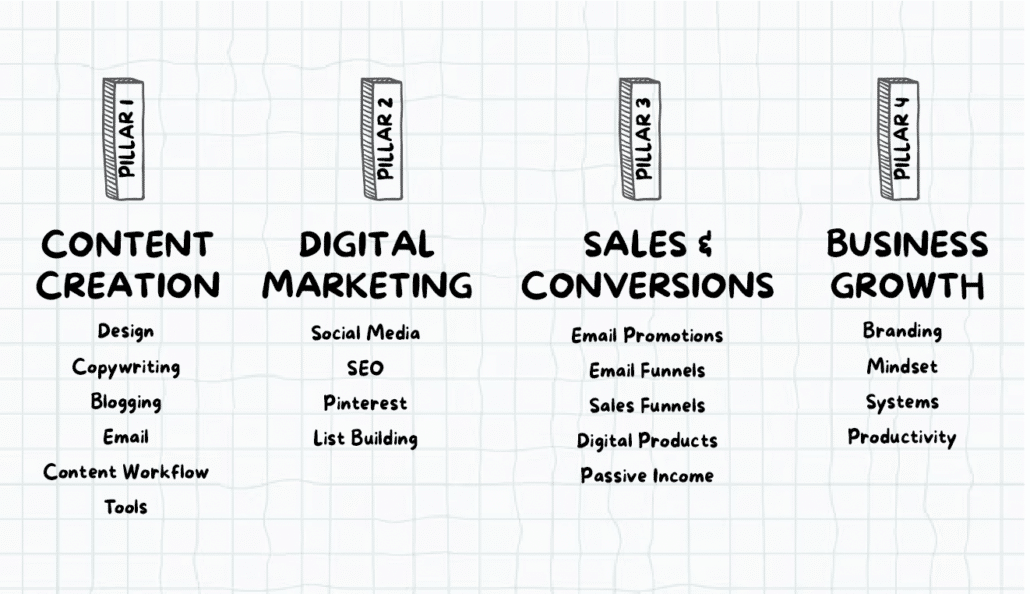
For this business (which happens to be ours!), each pillar relates to the things we sell and topics our ideal customers are interested in (as they relate to what we sell).
That said, this does NOT mean that you should constantly talk about your products and services in your content. Instead, you want to create content that builds brand awareness and trust around the topics that relate to your offerings.
That way, you’ll fill up your audience with people who are most likely to eventually make a purchase.
Since we have multiple product lines, our approach is to focus on one pillar at a time in our content depending on what we’re promoting during that particular time period.
This makes it easier to batch create content for social media posts, emails, blog posts, and videos because we’re immersed in one topic area at a time.
Notice that each of our pillars is broad enough so we can include multiple subtopics.
From those subtopics, we have the flexibility to break them down into an infinite number of tips, personal stories, case studies, how-to guides, industry news updates, and so on and still maintain a cohesive brand story (who we help and how we help them).
Just for fun, I thought I’d show you a few more…
Content Pillar Examples for Different Niches
Let’s explore examples of content pillar topics for various niches to give you inspiration for your own business…
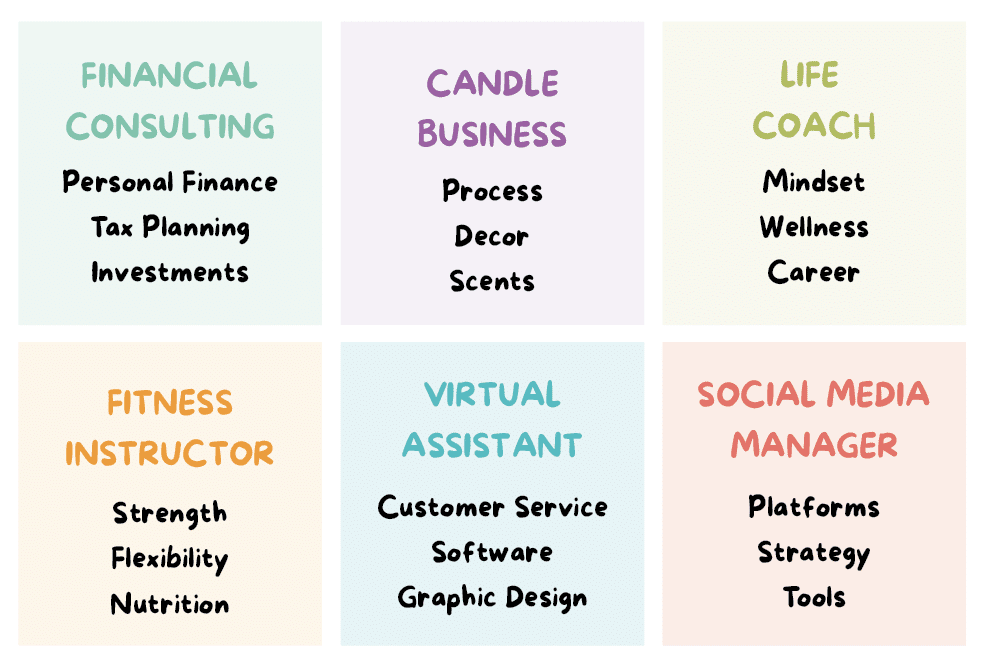
These topics are just fictional examples to get your creative juices flowing. If you see your niche here, your pillars might look completely different and that’s okay! Your pillars are unique to your business.
Now let’s take a look at how your pillars will fit into your larger social media content strategy, because this is a key point a lot of marketing gurus fail to point out…
👉If you want to attract customers and generate leads and sales with your content, having content pillars alone is not enough. You also need to consider the types of content you need for people in your audience who are at different stages of awareness.
Content Pillars As Part of Your Larger Social Media Content Strategy
I want to zoom out and give you the big picture of creating an effective social media strategy because this is the part that can get confusing depending on who you listen to.
Content marketers teach the concept of “content pillars” in two different ways:
1) As the 3-5 topic themes you stay focused on
OR…
2) The types of content you need to be sharing (e.g. personal stories, educational tips, inspirational quotes, etc).
If you landed on this post because you were curious about which one you need, we’re about to clear this up for good!
Content Pillars vs Types of Content
A lot of unnecessary confusion is created when words like “content pillars” and “content buckets” and “content types” are used interchangeably – it gives the impression there’s something complicated about this or even some controversy (there’s not).
It’s actually very simple!
Forget about all the social media marketing lingo for just a second…
What’s important to understand is that there are 2 main components of a social media content strategy, and in plain language they are:
- 3-5 broad topic areas you’ll stay focused on so people understand what you’re about and so you attract the right audience
- Different types of content (e.g. inspirational, educational, promotional, etc.)
The reason we need different types of content is so we can get the attention of people in your audience who are at different stages of awareness (more on that in a second).
Here’s the bottom line 👉You need both.
No matter what people call these components, you need both in order to grow a targeted audience and guide them to a purchase.
This is all going to come together soon but let’s lock in the definitions for how we’ll describe these 2 content strategy components:
Content pillars = broad topic categories (unique to your business)
Content buckets = types of content categories (that all businesses need to share)
Here’s a helpful way to think about it…
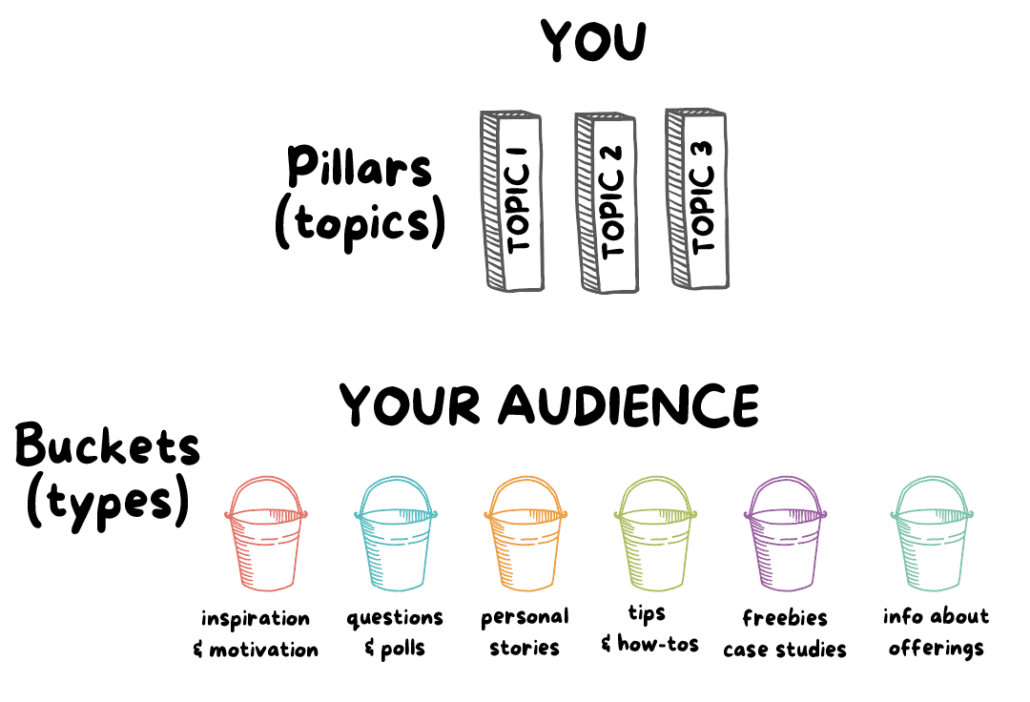
Your content pillars are about YOU 👉 the topics that communicate what your business is about
Your content buckets are about YOUR AUDIENCE 👉 what they need based on their awareness
Each of the different content buckets plays a different role and works to either:
- Get more followers
- Encourage them to like, comment, and share your posts (a positive signal to the the algorithms that helps your content reach more people)
- Create a personal connection and build the know/like/trust factor that leads to sales
- Establish credibility and earn your followers’ trust
- Position you as the best choice when compared to your competition
- Inspire members of your audience to take the next steps with you (sign up to your mailing list, DM you, buy something, etc.)
If you were just to show up and post about the stuff you sell… nobody would follow you, engage with you, or even make a purchase. It would be like asking someone to marry you on the first date.
That said, while a person who doesn’t know anything about you yet isn’t ready for a sales pitch, a brand loyal customer is just waiting to hear what you have to sell them next.
👉They need different types of content.
You need to fill up ALL your buckets because…
Before someone becomes a customer, they go through a decision-making process and that process can take minutes or it can take years but the process is always the same…
Picture it like a timeline:
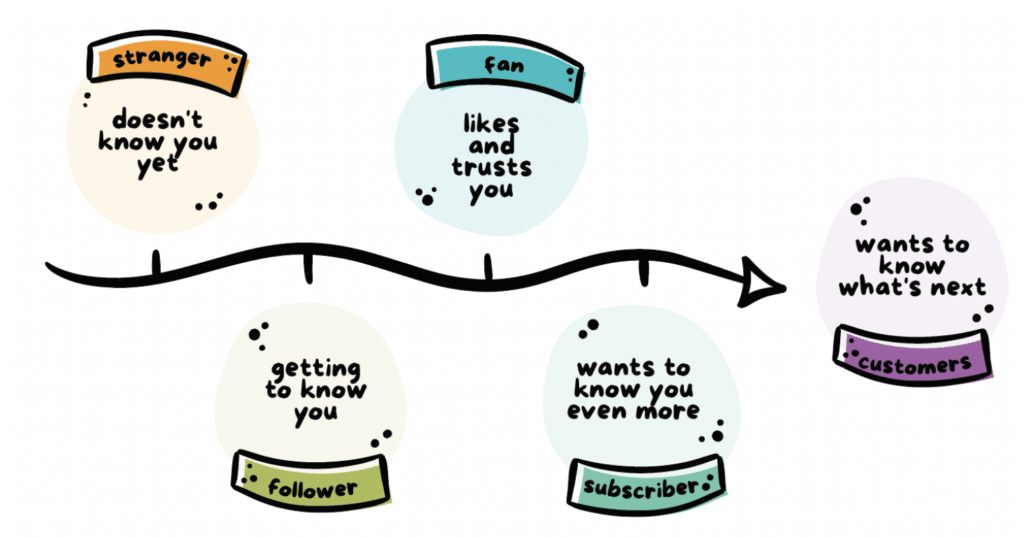
People start out completely unaware of you and with the help of your social media posts…
→ Move toward becoming a follower. Things like inspirational posts and relatable personal stories work great at this stage to help people to get to know you and like what you’re about.
→ Then you want to earn your followers’ trust and you do that by sharing value – educational content, lessons learned, recommendations, success stories and so on.
→ After they know, like, and trust you they’ll consider signing up for your email list or buy your products and services. So a portion of the time – about 20% – you need to be sharing information directly related to your offerings and calling your audience to action.
The other 80% of your time you want to be sharing value to keep guiding people along this timeline.
At this point, try not to over complicate the way you think about this. All you need to know is that you want to mix up the types of content you share and in a moment, we’re going to go over exactly what those are
The way you ensure you’re mixing things up is to use a content calendar to plan it all out.
👉A social media content calendar is where your content pillars and your content buckets come together to form a plan for you to follow.
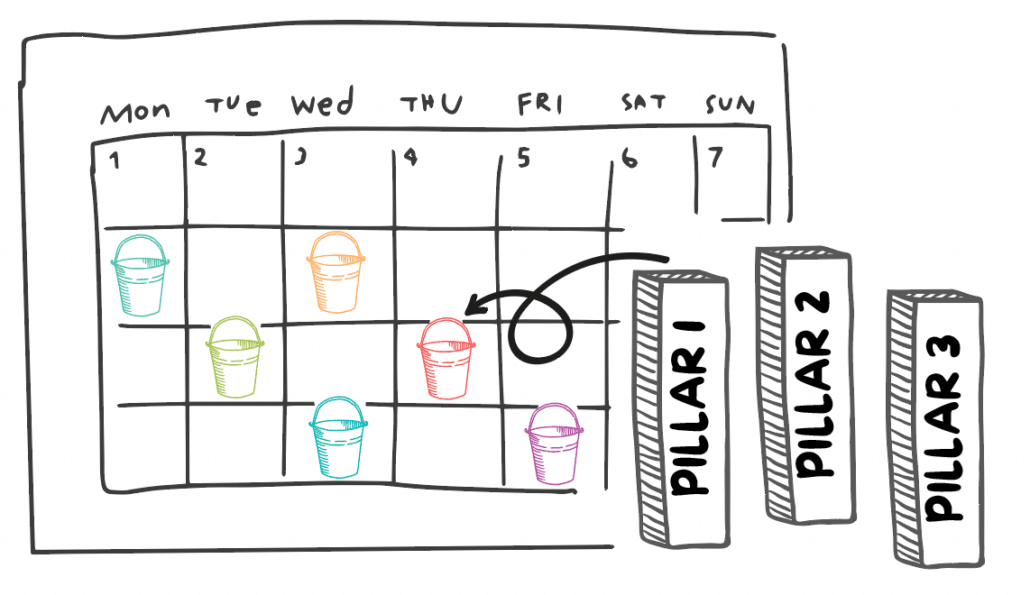
Using a content calendar helps you stay consistent, reduces stress, and simplifies the content creation process.
So from here, we’re going to go over the steps you need to reach the final destination: a content calendar all planned out using your content pillars and content buckets:
→ Determine your content pillars
→ Go over the 6 content buckets you need to share
→ Put them together in a content calendar
Ready?
If you haven’t yet grabbed the Content Planning Template, be sure to do that now so you can follow along with the upcoming exercises.
Figuring Out Your Social Media Content Pillars
Having intel about your ideal customer is an essential component of creating great content that’ll capture their attention and get them to stop scrolling and read your posts.
So we start by getting clarity about who they are and what they need to hear from you…
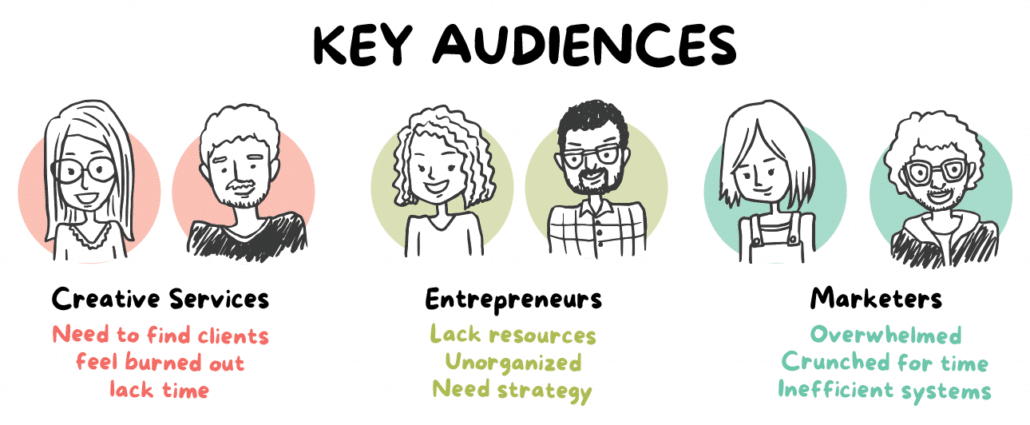
Step 1: Define Key Target Audience Profiles
You’ll need information like demographics, interests and hobbies, challenges and pain points, goals and aspirations, behavioral characteristics, and preferred platforms.
But if you don’t have any of those things yet, don’t sweat it. You can create fictional target audience profiles based on the products and services you sell (or want to sell).
ChatGPT is not so great at writing social media content, but it’s an excellent tool for research which means it can help you create audience profiles. Just open up ChatGTP and insert following prompt (after you’ve customized the text in brackets):
Hello ChatGPT! I’m looking to define target audience profiles for my content strategy, but I need help generating insights. I don’t have specific audience details yet, so I’d like you to help me create fictional profiles based on what I’m offering and the topics I want to focus on.
The products or services I plan to focus on are [describe your products/services]. The general topics I’m interested in are [mention the topics].
Can you assist me in creating target audience profiles based on these offerings and topics? I’d like to understand their potential demographics, interests, challenges, and behavior. Thank you!
ChatGPT will then generate a list of what it considers to be the best target audiences for you and it actually does a pretty great job with its suggestions! When you’re happy with it, you want to store these in a document for handy reference.
The next step is to …
Step 2: Create a Customer Persona
Creating a customer persona (or “buyer persona”) can help you speak to one person rather than a big anonymous target audience. This will help you better connect with the people who fit this profile and make sure your content sounds natural.
You can use ChatGPT for this too. Taking your key target audience profiles you worked on in the last step, you’ll prompt ChatGPT to “now create a customer persona for me and put it in table form.”
Again, save this in a document for reference. We keep ours in the same worksheet.
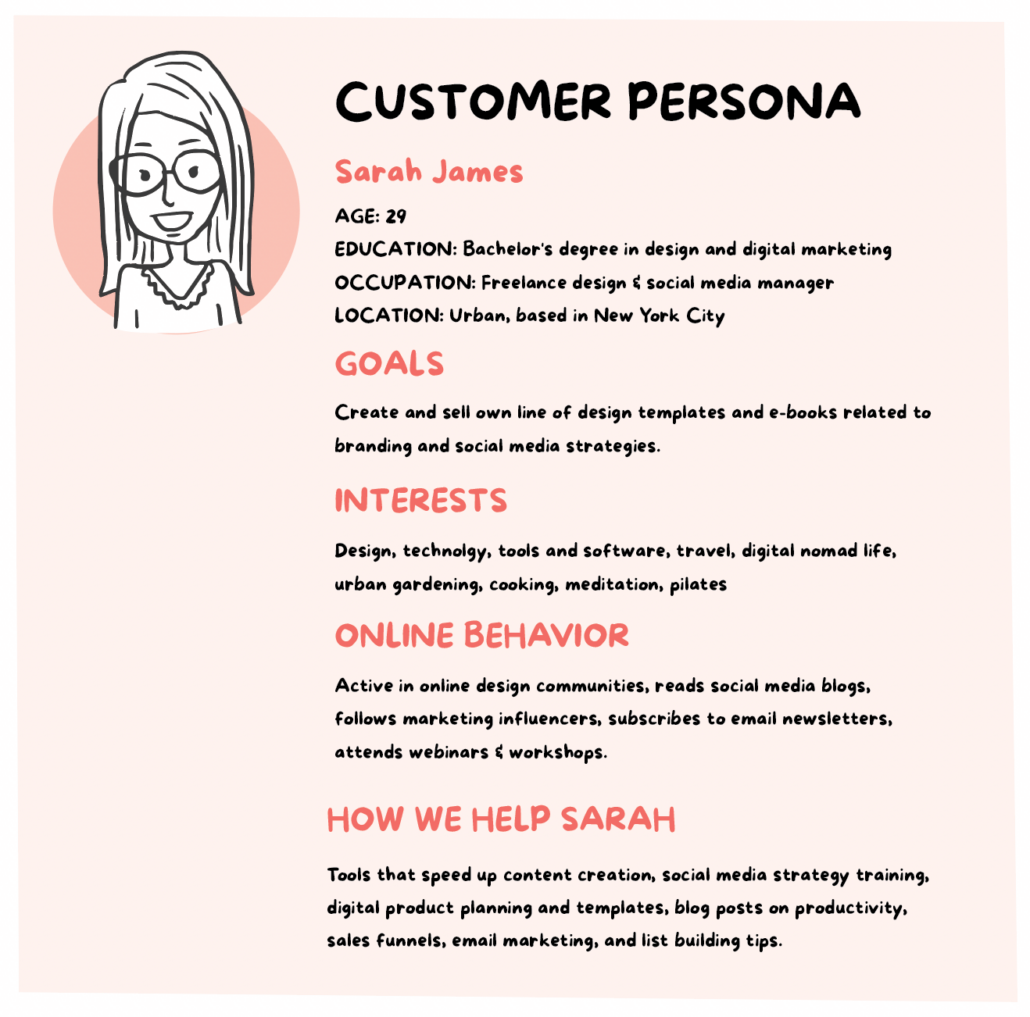
Now rather than speaking to “just anyone” we can picture Sarah and speak directly to her in our content.
But we’re not done. Now it’s time to do a deep dive into figuring out what Sarah really needs…
Step 3: Identify Audience Internal Needs and Emotional Triggers
Defining key audiences and creating a customer persona is a great start but it’s not enough. You also need to get to the bottom of what they’re feeling if you want to create content that gets their attention.
Ask yourself the following questions:
- What are they struggling with?
- What problems keep them up at night?
- What do they desire most?
- What’s standing in their way?
- What beliefs are holding them back?
- What does life look like once they get what they want?
Once you have the answers to these questions you can use “emotional triggers” in every single piece of content to hook them in and keep their attention.
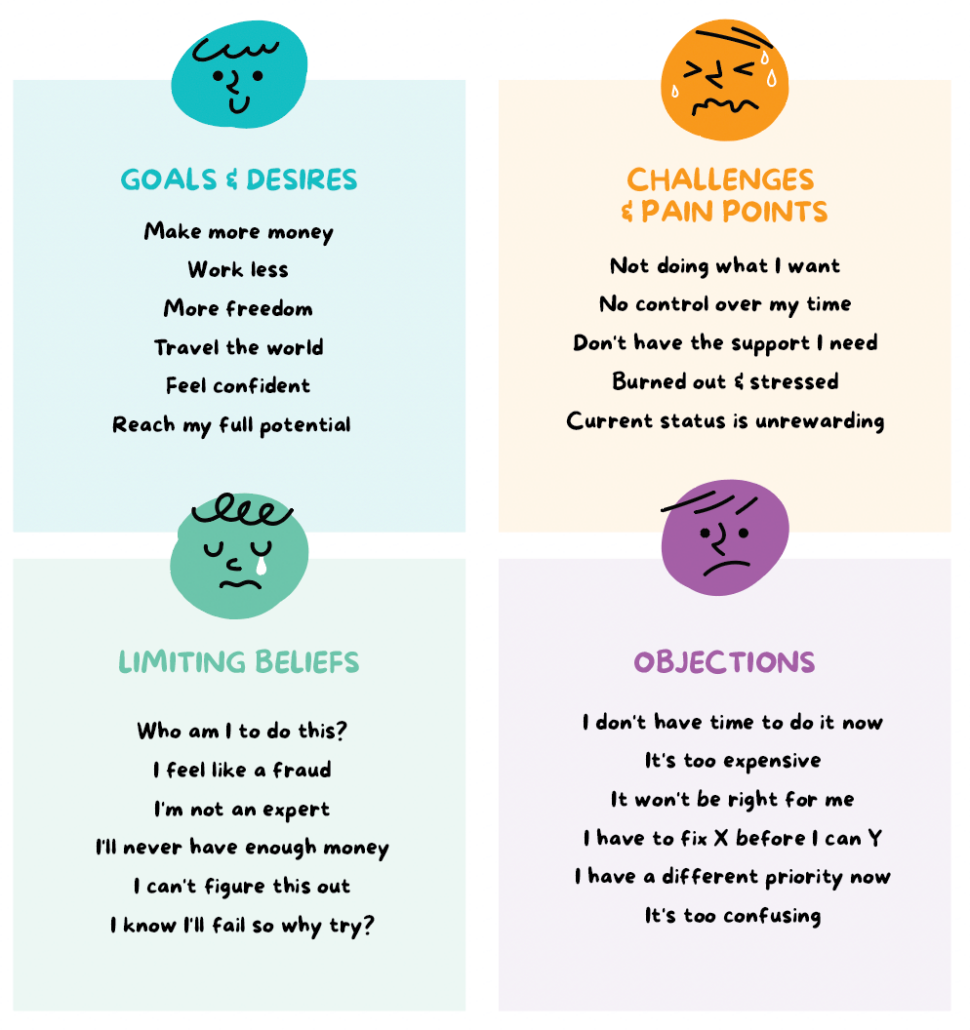
These triggers are universal to us all, and they have EVERYTHING to do with whether your person takes action, and they include:
- Goals + Desires
- Challenges + Pain Points
- Limiting Beliefs
- Objections
Think of this as an “empathy exercise.” When you’re able to see things from your customer’s perspective, and you have one representational person to write content for, you’ll be able to create meaningful content for the people you want to connect with.
When you’re done, you should have something that looks like this:
Keep track of this information for reference and use it when creating any given piece of content!
If you’re tempted to skip over these exercises, don’t! With your audience defined and their “emotional map” figured out, you’ll be able to create high quality content with an authentic tone of voice and trust us… it’ll get their attention!
Now we can move on to the next step and that is to…
Step 4: Identify Core Topics and Key Themes
The next step is to identify the core topics or themes that are relevant to both your audience and your business. Start by generating a list of smaller subtopics or content themes you think would be a good fit for you. This will help:
- Competitor Research: Study your competitors and their content to identify the topics they focus on. This can inspire and provide insights into potential core topics for your content pillars.
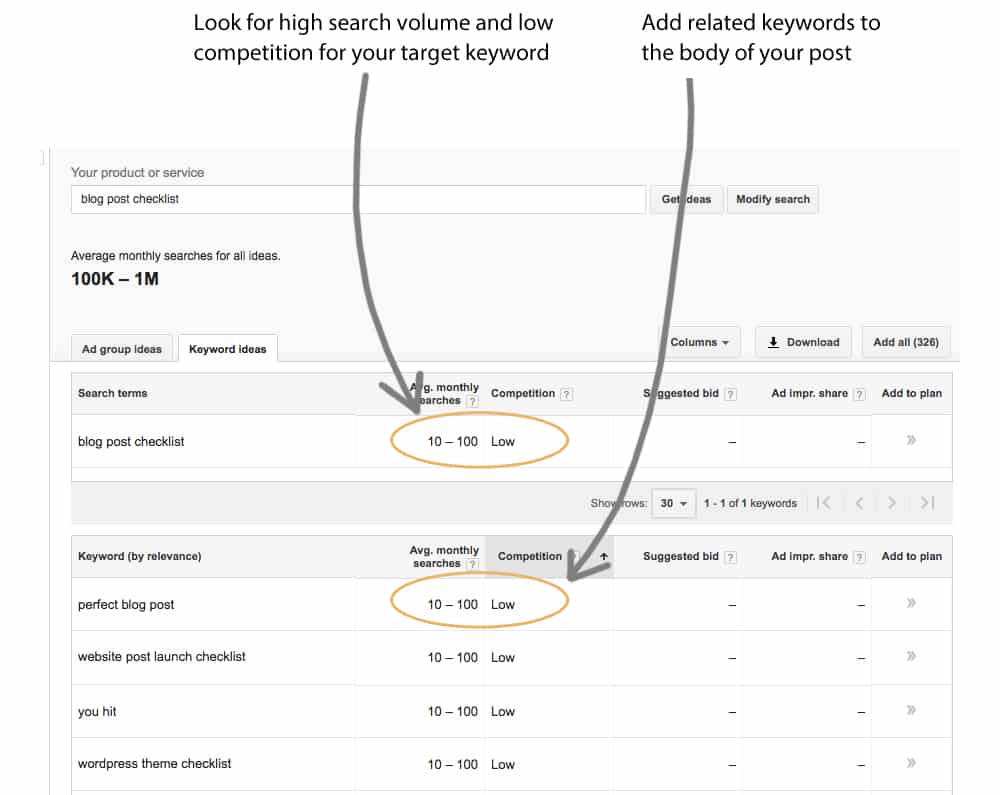
- Keyword Research: Utilize keyword research tools like SEMScoop and AnswerSocrates to identify high-volume keywords and questions related to your niche. What questions do they have? What related questions do they have? As you find topics that relate to your business, add them to your list.
- Brainstorming Sessions: Conduct brainstorming sessions with your team (or with ChatGPT!) to generate more ideas of potential topics related to your products or services you offer and the insights you’ve learned about your audience. If you’re using ChatGPT for this, plug in the audience information you discovered in Step #1 and ask it to generate a list of the most common questions they ask and topics they’re most interested in.
Step 5: Organize Your List of Topics into Topic Clusters
Once you have a list of topics, start organizing them into topic clusters and keep experimenting until all of them neatly fit under 3-5 broad topic themes to create your content pillars.
If you can’t narrow your topics into 5 content pillars or fewer, it could be that you’re not niched down enough. If you try to cover too many broad topics, not only will it be harder for you to create content, it’ll be harder for people to know if your content is meant for them.
Now you should have a pretty good grasp of your own content pillars, but if you feel a little nervous or unsure about it at this point, don’t stress…
This is not set in stone.
You are allowed to change your strategy if you find that something isn’t working or if you change direction in your business.
What matters is that you’re creating a framework for approaching your content so it’s easier to manage day-to-day. In content marketing, if something doesn’t work, you can always adapt and improve it!
But now we’ve got a great starting point, so let’s continue so we can apply these content pillars to your daily content creation activities…
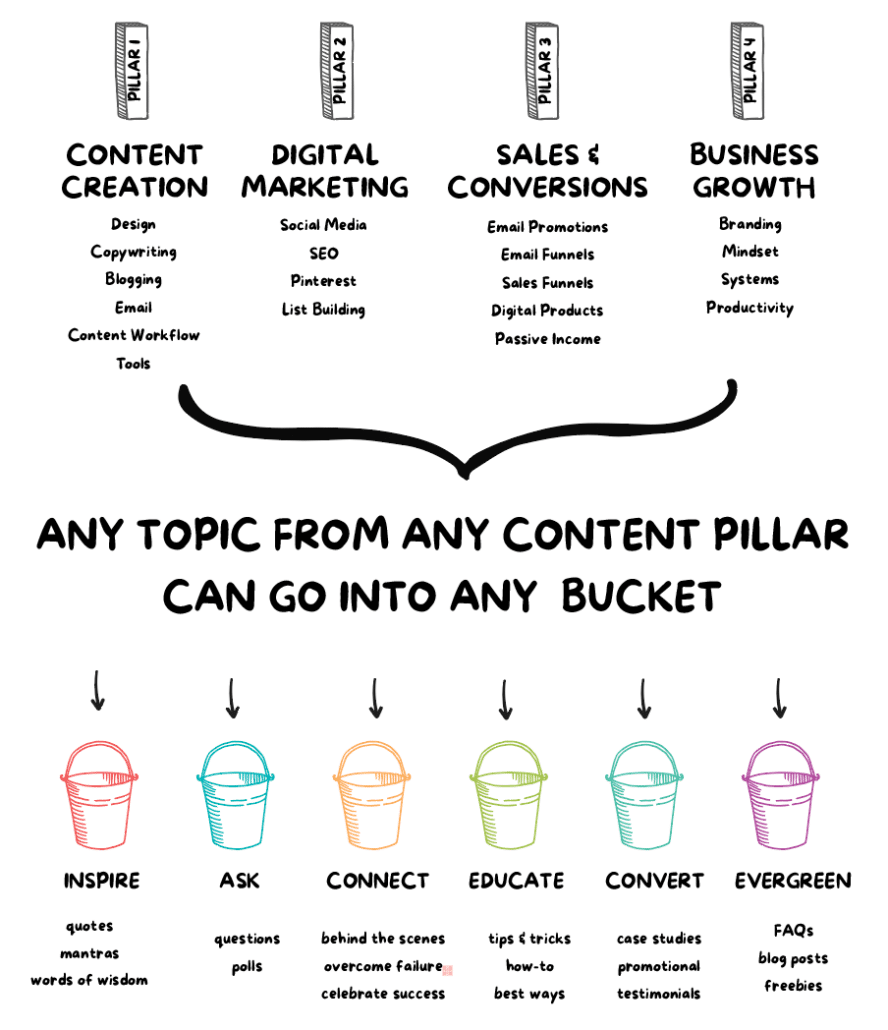
The 6 Content Buckets Your Business Needs to Share
Recall that it’s your social media content calendar that allows you to ensure you’re sharing a mix of content so you can feel confident you’re always attracting, engaging, educating, and converting your audience.
The good news is, this part is super straightforward!
There are 6 content buckets that every business needs to be sharing because they work together to reach people at all stages of awareness.
We call these:
- INSPIRE: Inspirational, motivational, and uplifting content
- ASK: Engaging questions that break the ice and spark conversations and engagement
- CONNECT: Personal stories and anecdotes that create a human connection
- EDUCATE: Educational tips, how-tos, insights, and recommendations
- CONVERT: Information related to your products and services
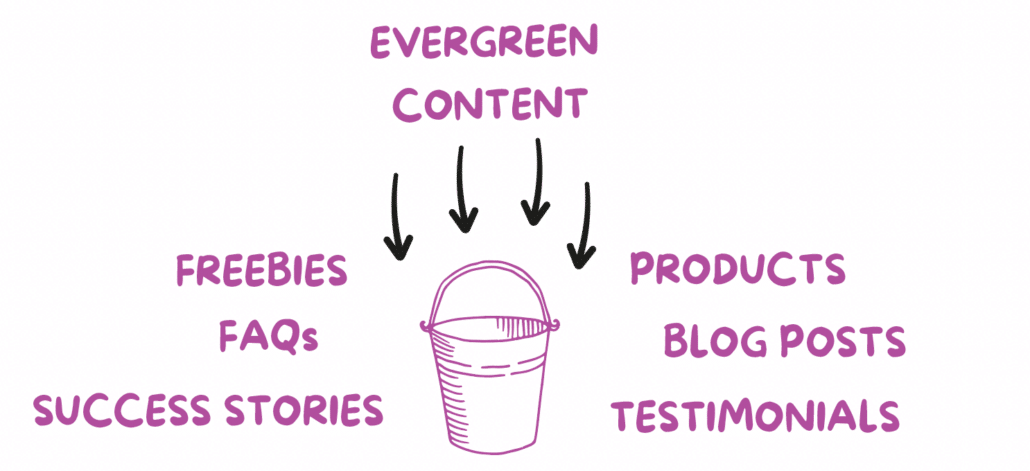
- EVERGREEN: Recurring and timeless content that you need to share for all audiences including answering FAQs and driving traffic to your blog posts and freebies
Let’s see how a content calendar might look when we include all 6 buckets in your content plan:
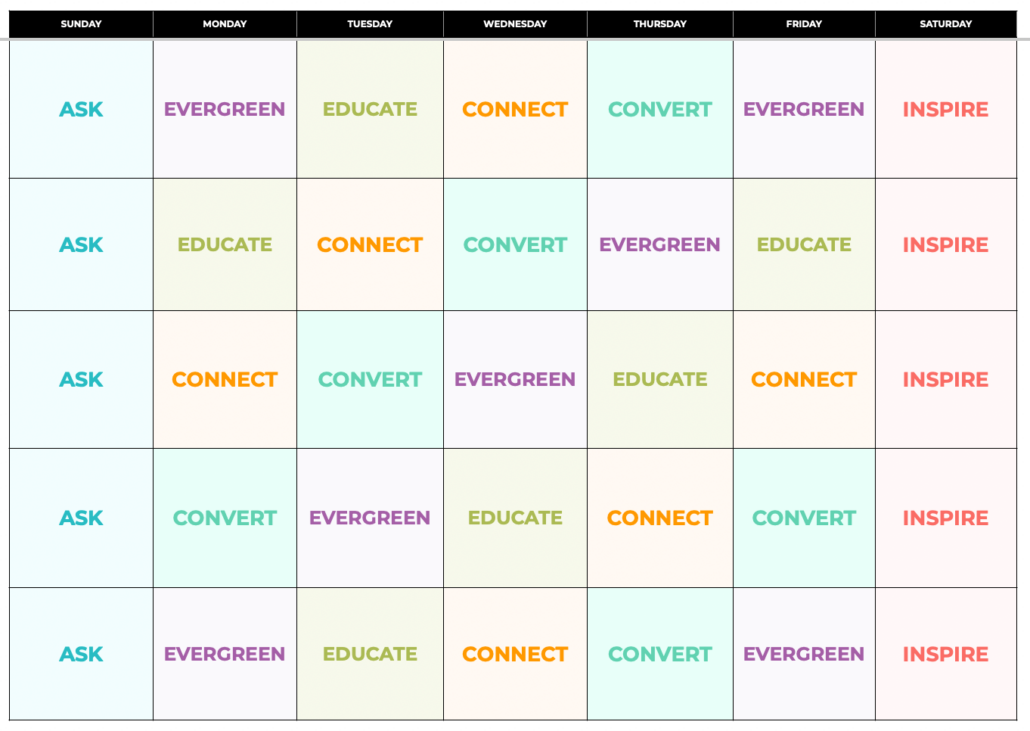
Pretty cool, right?
In the above example, you can see we’ve got some inspirational content, educational content, personal stories to “connect” with your audience, questions to “ask” your audience to spark conversations and so on.
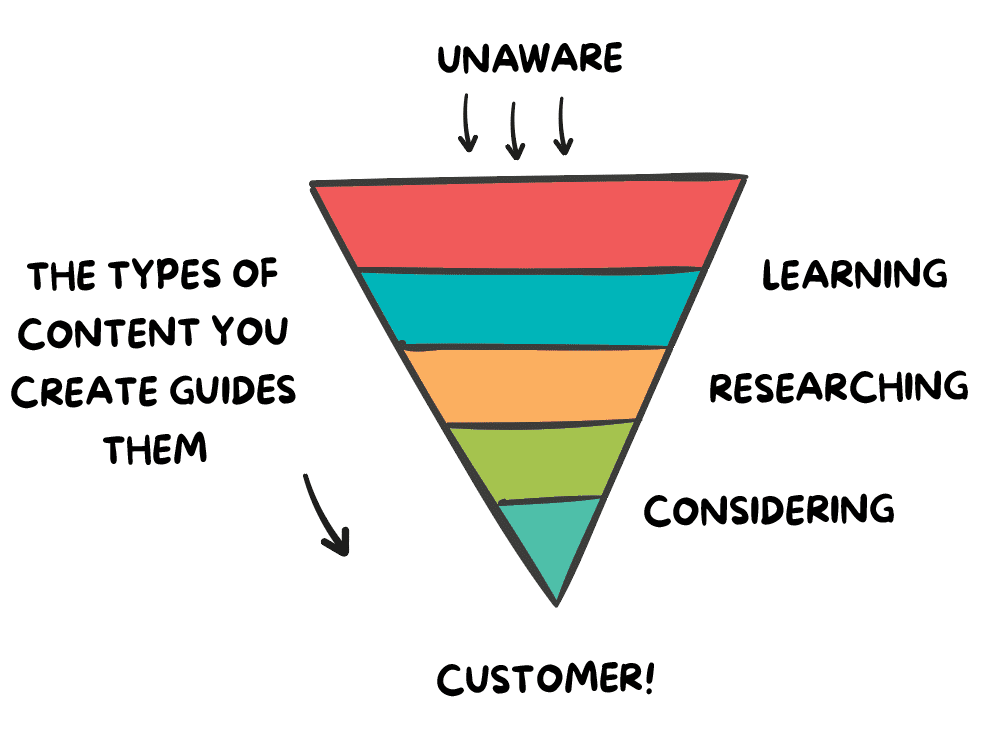
How they correspond with different levels of awareness looks like this:

This is what marketers call the “customer’s journey” and it’s really just a fancy way of describing the process we all go through before we buy something.
When making content, the most important question you always want to ask yourself is…
“What do they already know?”
- Unaware: Doesn’t know they have a problem or anything about your brand.
- Problem Aware: Knows they have a problem, but doesn’t know what the solution is.
- Solution Aware: Knows there are potential solutions to their problem, but they’re still exploring options and might not be aware of specific brands or products.
- Product Aware: Knows about products or services that might help them get what they want. They compare features, benefits, and brands.
- Brand Aware: Knows about your brand and offerings, including features, benefits, and how it addresses their needs or problems. This stage is where most people will make an initial purchase. Then, they evaluate their experience and hopefully share their (great!) experience with others and become a repeat customer.
In content marketing, we say that we “meet people where they are” (in this process) with our content.
As an example, say somebody is “solution aware” – they know they have a problem and they’re gathering intel about the best way to solve it. They will appreciate hearing stories of how you or the people you’ve helped got an outcome they want (e.g., case studies, success stories, testimonials).
→ This type of content gets dropped in the CONVERT bucket.
Let’s say somebody’s “problem aware” and their problem is that they’re feeling demoralized because they can never seem to strike everything off their “to do” list (problem) but they don’t know what’s causing that or how to go about finding solutions.
→ They need EDUCATE content that speaks to their problem – e.g., “Feeling demoralized because you can never keep up with your to-do list? Today, I have 3 tips to help!”
Once you show them you understand what they’re going through, they’ll be receptive to hearing about the solutions you offer that can help them even further.
So far so good? Right now you might be wondering…
Where do content pillars fit in?
Now that we know we need a mix of different content buckets, any given piece of content that goes into those buckets needs to be relevant to your business and to your audience.
That’s where your content pillars come in.
You want to pull from your content pillars to create all these different types of social media posts, but there’s a little twist…
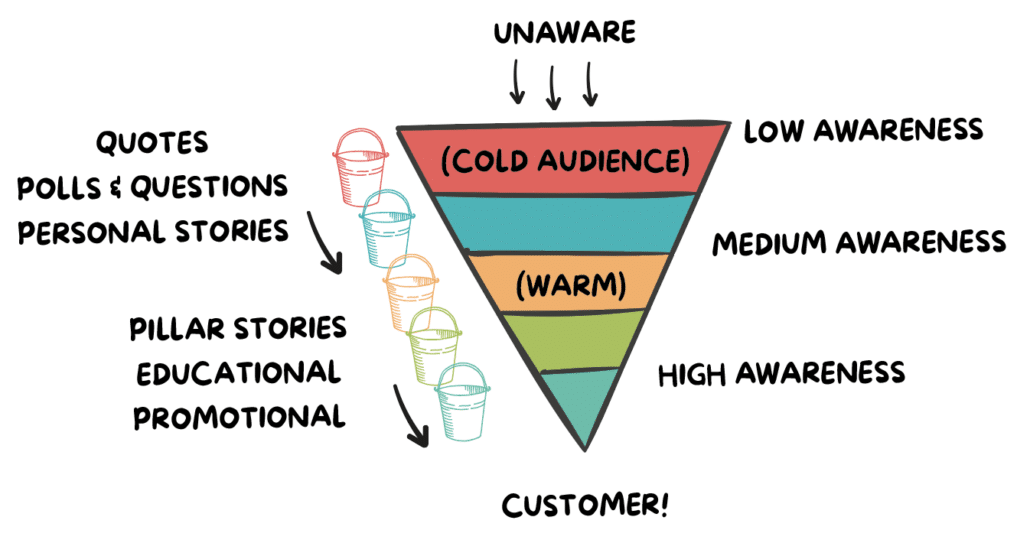
The most important buckets to fill up with content pillar topics are:
EDUCATE: – tips & tricks, how-to’s, “best ways to”, recommendations, etc.
CONVERT: – customer success stories, promotional posts, answering common objections
EVERGREEN:– core and best-performing content from the educate, connect, and convert buckets that you want to share over and over again
The above buckets are for people with medium to high awareness. They’re following you because they need help with the problems your products and services solve.
But it’s okay to go a little off-topic with…
INSPIRE: – motivational content
ASK: – engaging questions
These buckets are for people with low awareness.
It’s okay to have a bit of fun on social media and this type of content drives engagement, they don’t strictly need to pull from your content pillars. If you can, great! Just try to make these posts relevant to your target audience.
This bucket falls somewhere in the middle…
CONNECT: – personal stories
The CONNECT bucket includes personal stories – think “how I achieved something” and “what I learned from failure” stories. These are posts that allow you to connect with your audience on a personal level and build your know/like/trust factor.
You want to try to connect the personal stories you tell to your content pillars as much as possible, but it’s also okay to just share off-topic personal anecdotes and life updates once in a while.
Below, the CONNECT bucket is represented twice in the middle of the customer journey to distinguish between these two types of stories…
- Personal stories – e.g., “Life update! I’m moving to Bali!” will resonate with people at any stage of awareness including low awareness.
- Stories that relate to your content pillars – e.g, “Lessons I’ve learned about [pillar topic]” – will be more relevant to people with problem/solution awareness.
What about the EVERGREEN bucket? Good question!
This is a “wildcard” bucket because there’s certain content you’ll always want to share on an “evergreen” schedule and you want to plug that into your calendar too so you don’t forget.
This includes re-sharing your core or best content from your CONNECT, EDUCATE, and CONVERT bucket as well things like links to blog posts to drive traffic, invitations to sign up for your freebies, and information about your promotions and so on…
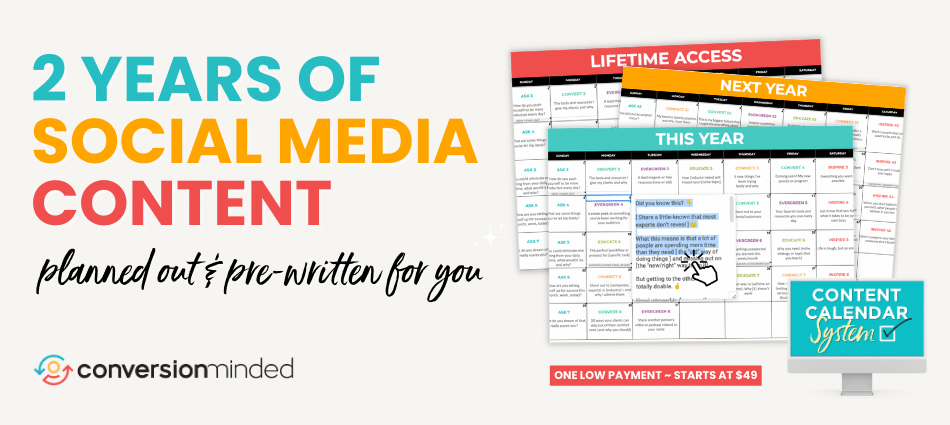
Pssst… If you’re feeling like this is a lot to keep track of, I promise it gets easy with practice. Mentally sorting your content into buckets becomes like second nature! Examples of the types of content that go into each bucket can be referenced from our free content planner. You can also check out our signature Content Calendar System which gives you 2 years of daily content prompts all planned out following the 6-bucket content strategy.
Connecting Content Pillars and Content Buckets
Now let’s take a look at some examples of social media posts that connect the content buckets and content pillars together.
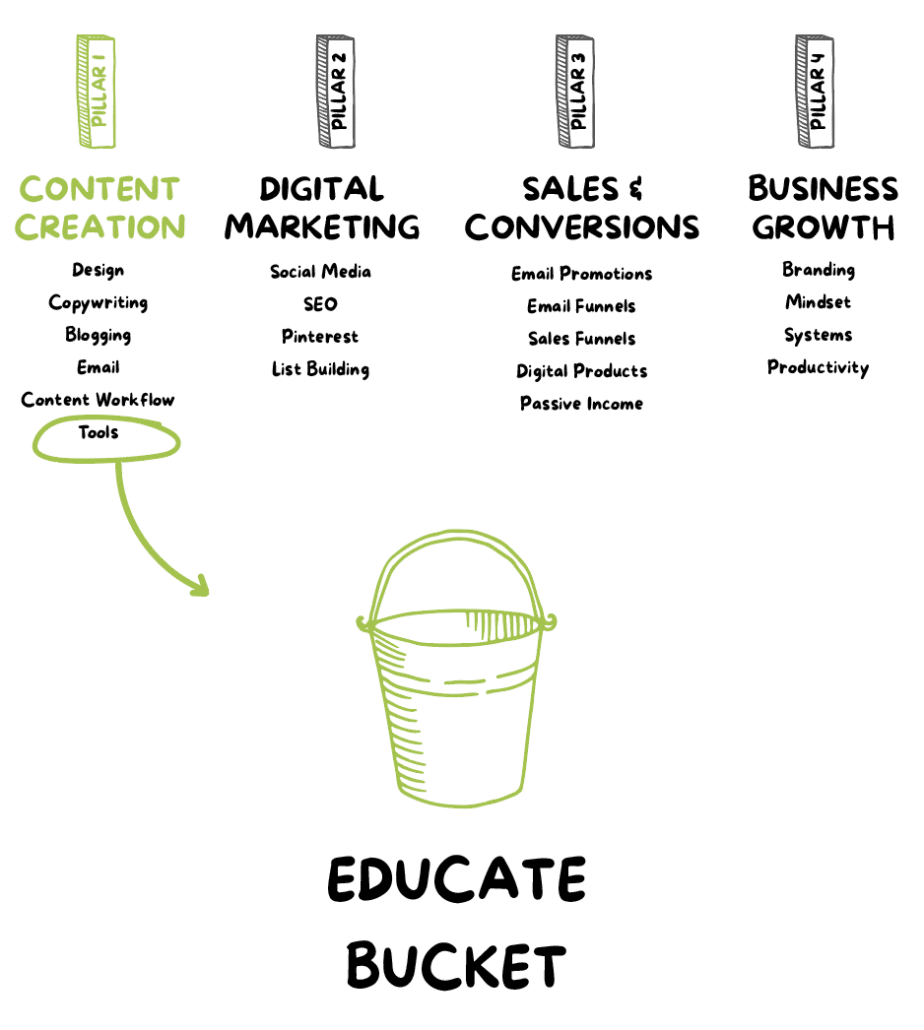
EDUCATE is a no-brainer bucket – it’s always pillar-focused. You can share tips, tutorials, how-tos, best ways to achieve a desired outcome, recommendations and so on from any of your content pillars and drop them into the EDUCATE bucket…
Here’s an example of an EDUCATE post…
Here, we’re sharing tips that relate to our “content creation” pillar…
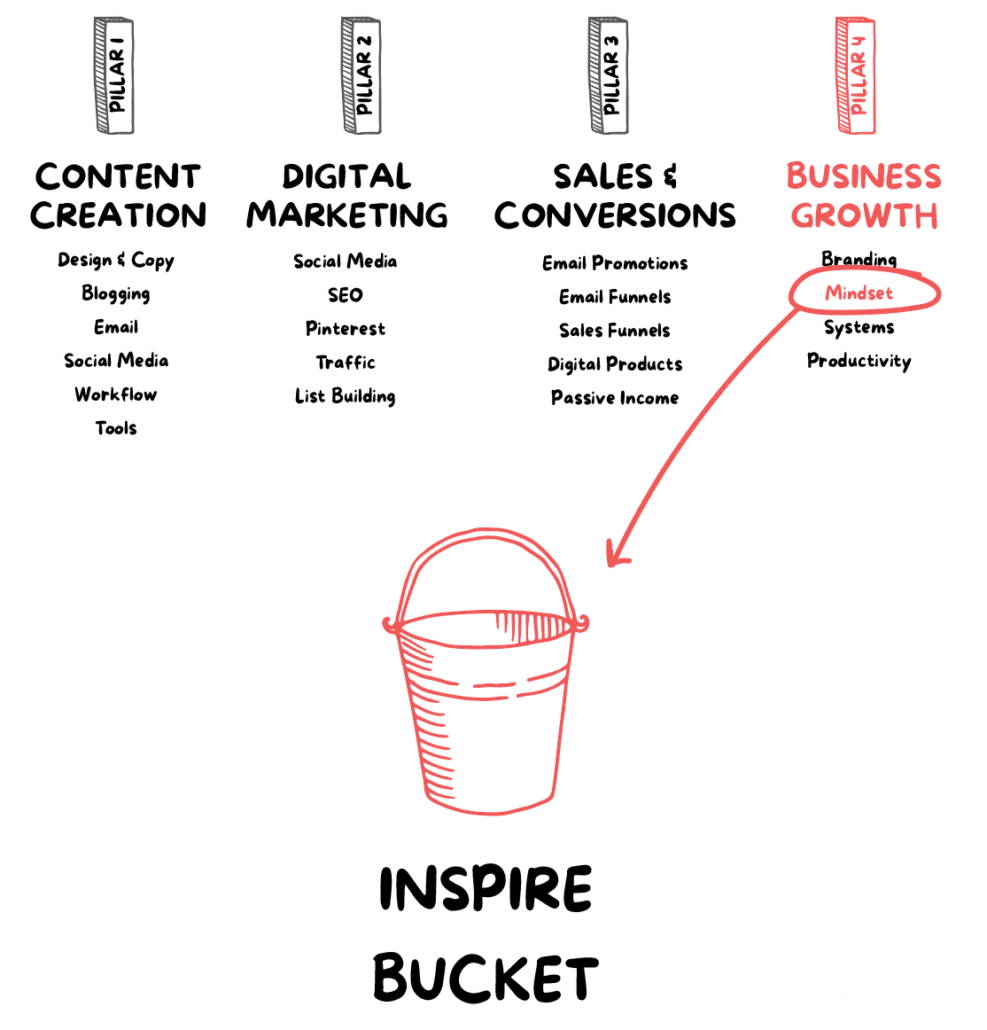
Now let’s look at an example of a post from the INSPIRE bucket…
This is a pep talk about keeping your chin up during times of business adversity. It’s relevant to our audience of entrepreneurs and relates to one of our content pillars…
CONVERT is another bucket that should always pull from your content pillars because it’s the bucket that’s designated for generating leads and sales…
This post invites our audience to sign up for our free content planner and it’s that call to action that makes it a CONVERT post. Your call to action doesn’t always have to be “buy now,” it can be any action you ask them to take that helps guide your audience to the next step.
Connecting this post to our content pillars looks like this…
The bottom line is that you…
👉Always want to be filling up your 6 content buckets.
👉Almost always want to be pulling topics from your content pillars.
If you can connect them all of the time, that’s awesome! Because …
Make sense?
The social media content strategy is starting to come together now!
→ We’ve got social media content pillars ✅
→ And the content buckets we need to fill up ✅
So now that we’ve got our two components for our content strategy figured out, it’s time to use them to create a plan you can follow in your day-to-day.
And the easiest way to do that is to simply map all of this out in a content calendar…
Turning Your Content Pillar Strategy into a Daily Action Plan
Now we’re going to walk you through the system we’ve used to help thousands of small business owners get results on social media without all the stress and overwhelm! 🙌
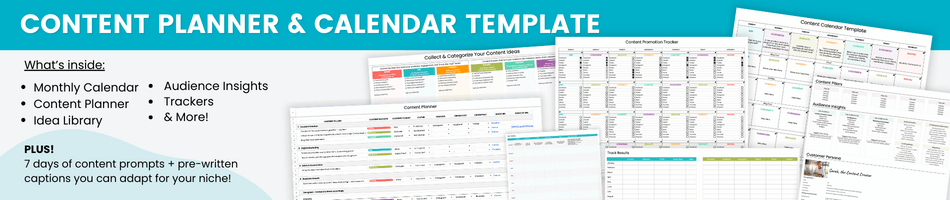
Be sure to download the free content planner (pictured below) and we’ll walk through the process step-by-step…
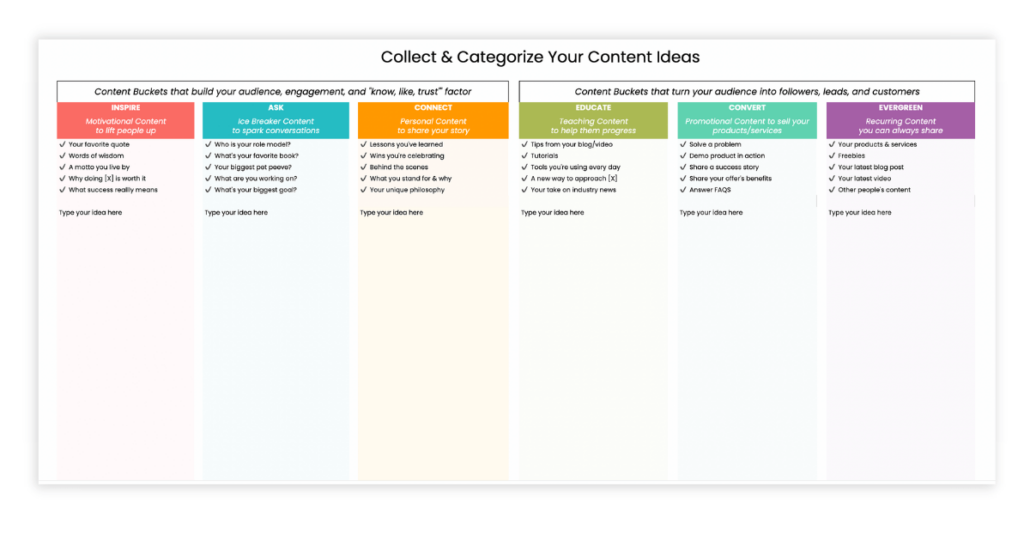
Step 1: Collect & categorize your content ideas and sort them into the 6 content buckets
One of the biggest time-wasters around is not having ideas to pull from when you sit down to create content. The KEY is to have a way to collect them as inspiration strikes or while you’re researching your competition or doing keyword or topic research.
This handy idea library will not only help you capture those ideas, it’ll help you start thinking of them in terms of content buckets.
Each column has examples of the types of content that go into each bucket to use as a reference and above the columns you can see why you’re creating this content and the role each bucket serves in your customer’s journey.
When you want to store an idea, just drop it into the column that makes the most sense. Don’t worry about whether it’s related to a content pillar for now, the important thing is to just capture all your ideas here first.
The next step is to move your ideas into the next tab, which is a content planner where you can organize your ideas by content pillar to make sure you’re staying focused on those…
Step 2: Sort your Ideas into Content Pillars Using the Content Planner
Add your content pillars to the header rows in gray and then copy and paste your ideas from the idea library under them. Then, assign its content bucket with the dropdown menu in the next column.

Next to the content bucket column you’ll have options for…
- Selecting the content format (post, video, story, etc.)
- The status (not started → published)
- The main channel you’re posting to
- The social media channels you’ll also share it to to get more reach (a.k.a. “cross post”).
- Storing URLS to any images or graphic templates that go with the post
- Storing URLs to blog posts, landing pages, etc. you’ll be referencing in your posts
At this stage, you’re planning everything out and gathering up all the assets you need so they’re handy. That way, when you sit down to batch create content, you’re not starting with a blank page – you’re just executing your plan.
Taking the time to plan all this out not only makes your content more strategic, it makes the process exponentially more efficient and less stressful.
Step 3: Add Your Posts to the Social Media Content Calendar
At last, it’s time to move everything into a calendar format!
→ You’ve collected content ideas that relate to your content buckets
→ And organized them by content pillar…
Now all you need to do is make sure you’re sharing a nice mix of content throughout the month.
You want to use color-coding for your content buckets so it’s easy to visualize, and if you grabbed the free content planning template, that’s already set up for you!
In that template, you’ll also have one week of social media posts already planned out (with content ideas from our signature Content Calendar System for each bucket with pre-written captions that you can customize with topics from your content pillars).
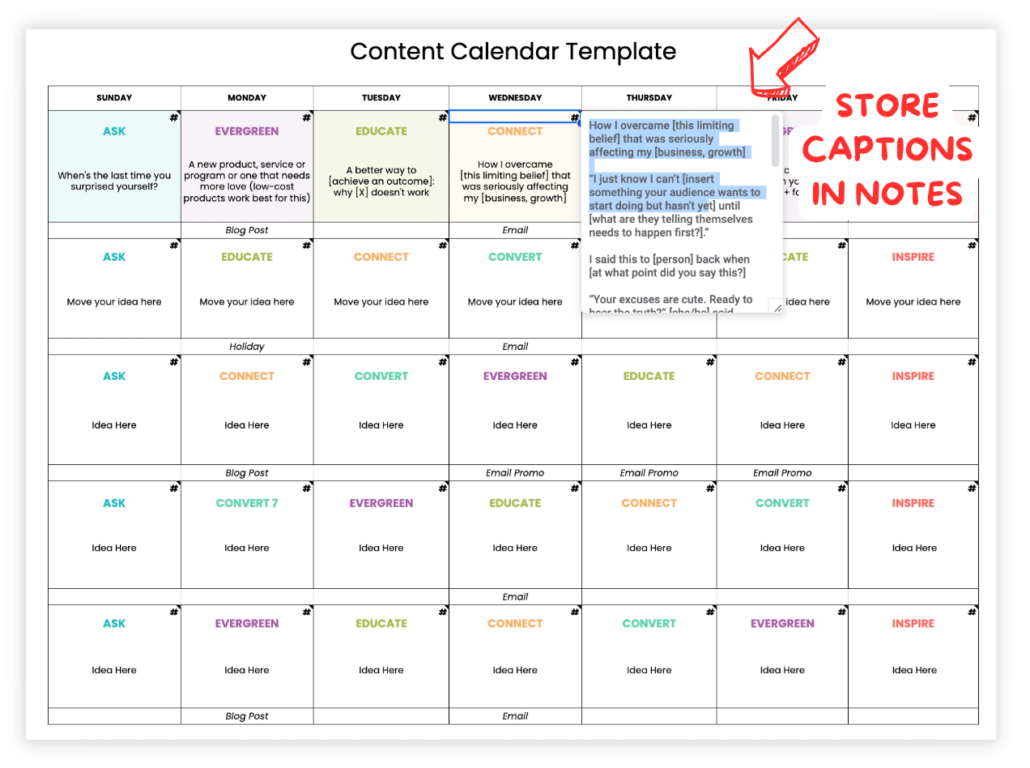
As you move your own post ideas into the calendar, the different colors for each bucket makes it easy to see “where you’re at” with your content mix…
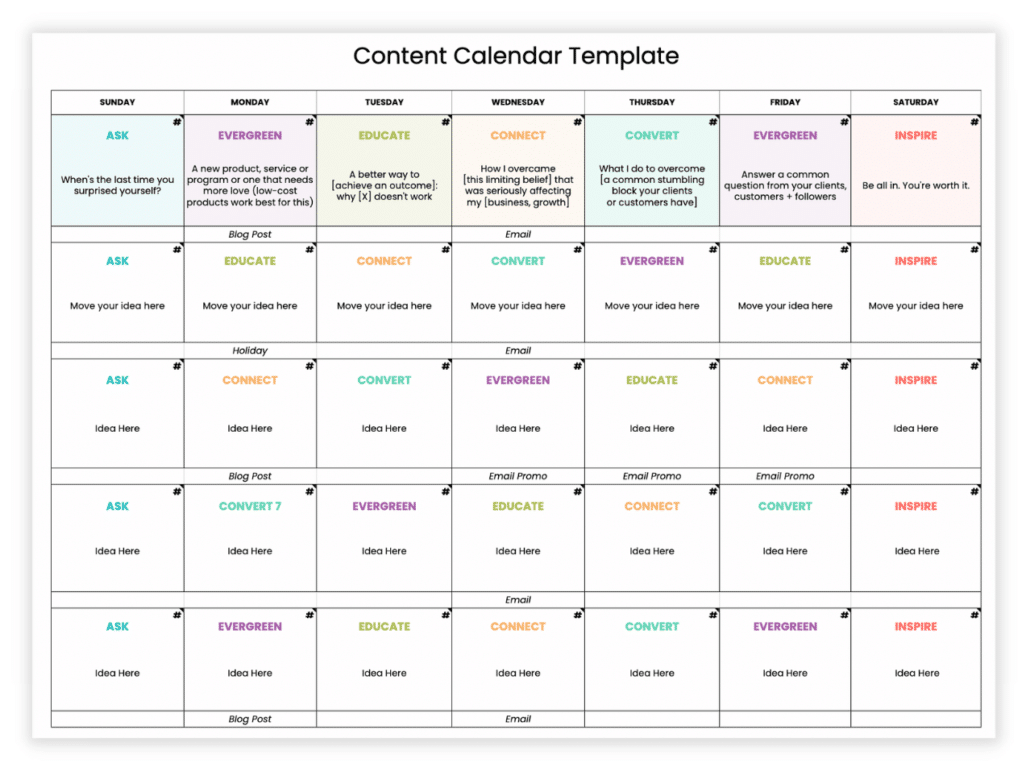
Notice there are tiny black corners in the top right hand side of each day – that’s where you will store your captions so they’re right there when you’re ready to schedule and publish them.
In the first row you’ll see the sample captions we provided for you there, so just follow this example…
Step 4: Share your posts & keep track of where you share them
If you have a social media presence on different platforms, you can check off where you shared your posts to keep track using this template.
This is where it gets really fun because you’ll see a visual of how one piece of content can reach more people just by sharing them to other platforms!
Final Tips for Planning Your Social Media Content
Use a Social Media Scheduler to Crosspost to Different Platforms
We recommend choosing one main social media platform (e.g. Instagram) to focus your energies to start. But look for opportunities to “cross post” that content to other channels!
For example…
- Instagram Posts are great to share to Facebook
- Reels are great to share to TikTok and YouTube, and
- IG Stories are perfect for Facebook and Pinterest too
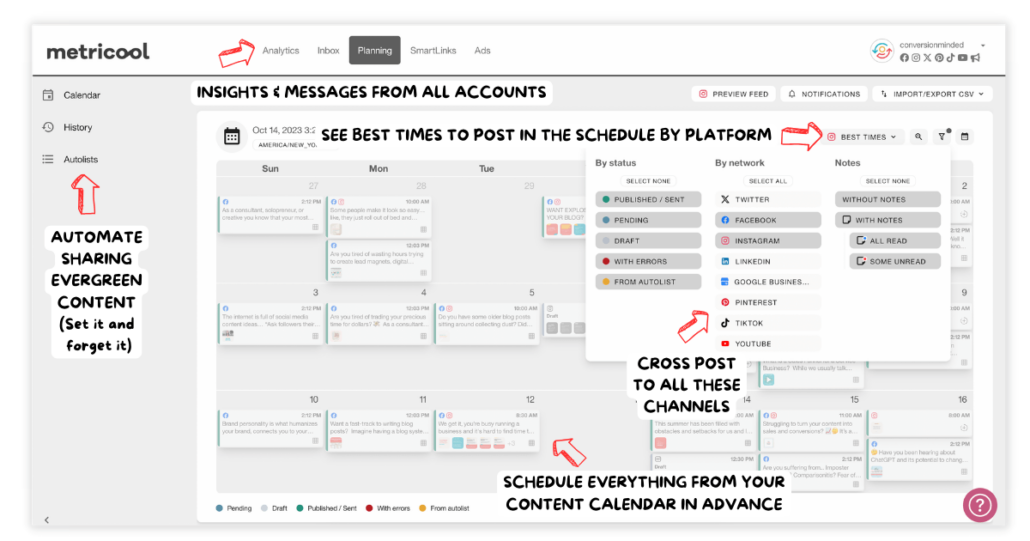
Once you have your content planned out in your calendar, we recommend creating your content in batches and then scheduling them with a tool like Metricool (affiliate link).
This will allow you to select multiple platforms to share your content to and in advance.
That way, you can schedule a week, a month, or even several months ahead of time and then forget about it while you focus on other things in your business – your scheduler will take care of publishing them for you!
There are lots of great schedulers out there but we always like to suggest Metricool because you can get started for free and have full functionality. All your direct messages across all your platforms will be right there and you’ll have analytics and insights for all your channels too.
The only time you need to upgrade is if you’re scheduling a volume of content and by that point, it more than pays for itself in the time it’ll save you.
Use Weekly or Monthly Themes based on Content Pillars
We recommend focusing on one content pillar per week or month, especially if you need to “warm up” your audience around a certain topic to plan for an upcoming launch or email promotion. For instance, if you’re a wellness coach you might make October “Healthy Recipes Month” and focus on your “nutrition” pillar.
Be Consistent
Establish a consistent posting schedule. You don’t have to post every day if you can’t swing it, but it’s good to find a rhythm that works for you and keeps your audience engaged.
It’s better to be consistent and post 2-3x per week than it is to post every day for the first week and then nothing for the rest of the month.
Batch Create & Schedule
Plan out all your content in one sitting and then batch create the actual content in a separate session. This will save you heaps of time and keep your mind focused on one aspect of the process at a time, making it much less overwhelming.
Monitor and Adjust Your Strategy as Needed
Monitor the performance of your content and adjust your content strategy accordingly. If certain content buckets are generating more results for you, consider allocating more energy to those.
Since we’re an educational business, we go a bit more heavy with EDUCATE content. If you’re a life coach, you may need to go a bit more heavy with CONNECT content. And that’s okay!
These are both “middle of the funnel” buckets for people who are problem aware so it’s perfectly okay to swap those out in your schedule if it makes sense for your business and audience.
If you’re just getting started in your business, you may not have a lot of stories to share or offers to promote, so you might start off sharing lots of inspirational content and asking engaging questions. That’s okay too.
As your business and following grows, you can move toward a more balanced content mix and layer on more content buckets.
Tailor Content for Each Social Media Platform
Consider tailoring your content in a way that works best for each platform – whether it’s Facebook, Instagram, LinkedIn, Twitter, or others.
While all six buckets are perfect to share on any platform, things to consider when sharing to the following social media accounts:
- Facebook and LinkedIn: Ideal for sharing industry insights, thought leadership, and links to your long-form content
- Instagram & Pinterest: Perfect for visually appealing content that showcases products, services, freebies
- Twitter and LinkedIn: Great for sharing quick updates, relevant blog posts and videos, and engaging in industry conversations related to your content pillar strategy
And that’s a wrap! Thank you for reading this illustrated guide to content pillars!
We hope this has helped you get clarity around your content pillars and overall social media strategy, and most of all, we hope you feel ready to plan out a content calendar that’ll save you time and help you crush your business goals.
Last chance to download the free content calendar template for Google Sheets by clicking on the image below and get started with seeing better results on social media without all the overwhelm!
If you have any questions about anything you’ve learned in this post, please don’t hesitate to drop us a comment below. We’re always happy to help.
Further reading and resources:
- 18 Social Media Content Ideas for Better Engagement
- CONTENT REPURPOSING SYSTEM that’s Easy and Works
- Write Social Posts that Convert (4-Step Copy Formula)
- 885 Caption Templates to Promote Your Small Biz
- 4 Ways to turn Captions into Instagram Reels & TikToks
And before you go, if you’d like to get your hands on the ultimate plug-and-play content plan, Content Calendar System includes 2 years of content already planned out for you with 885 daily caption templates you can use to adapt for your niche. You’ll have hundreds of content ideas at your fingertips already organized in the 6 content buckets your business needs to be sharing so you never get stuck on what to post again! We hope to see you inside! 🙂