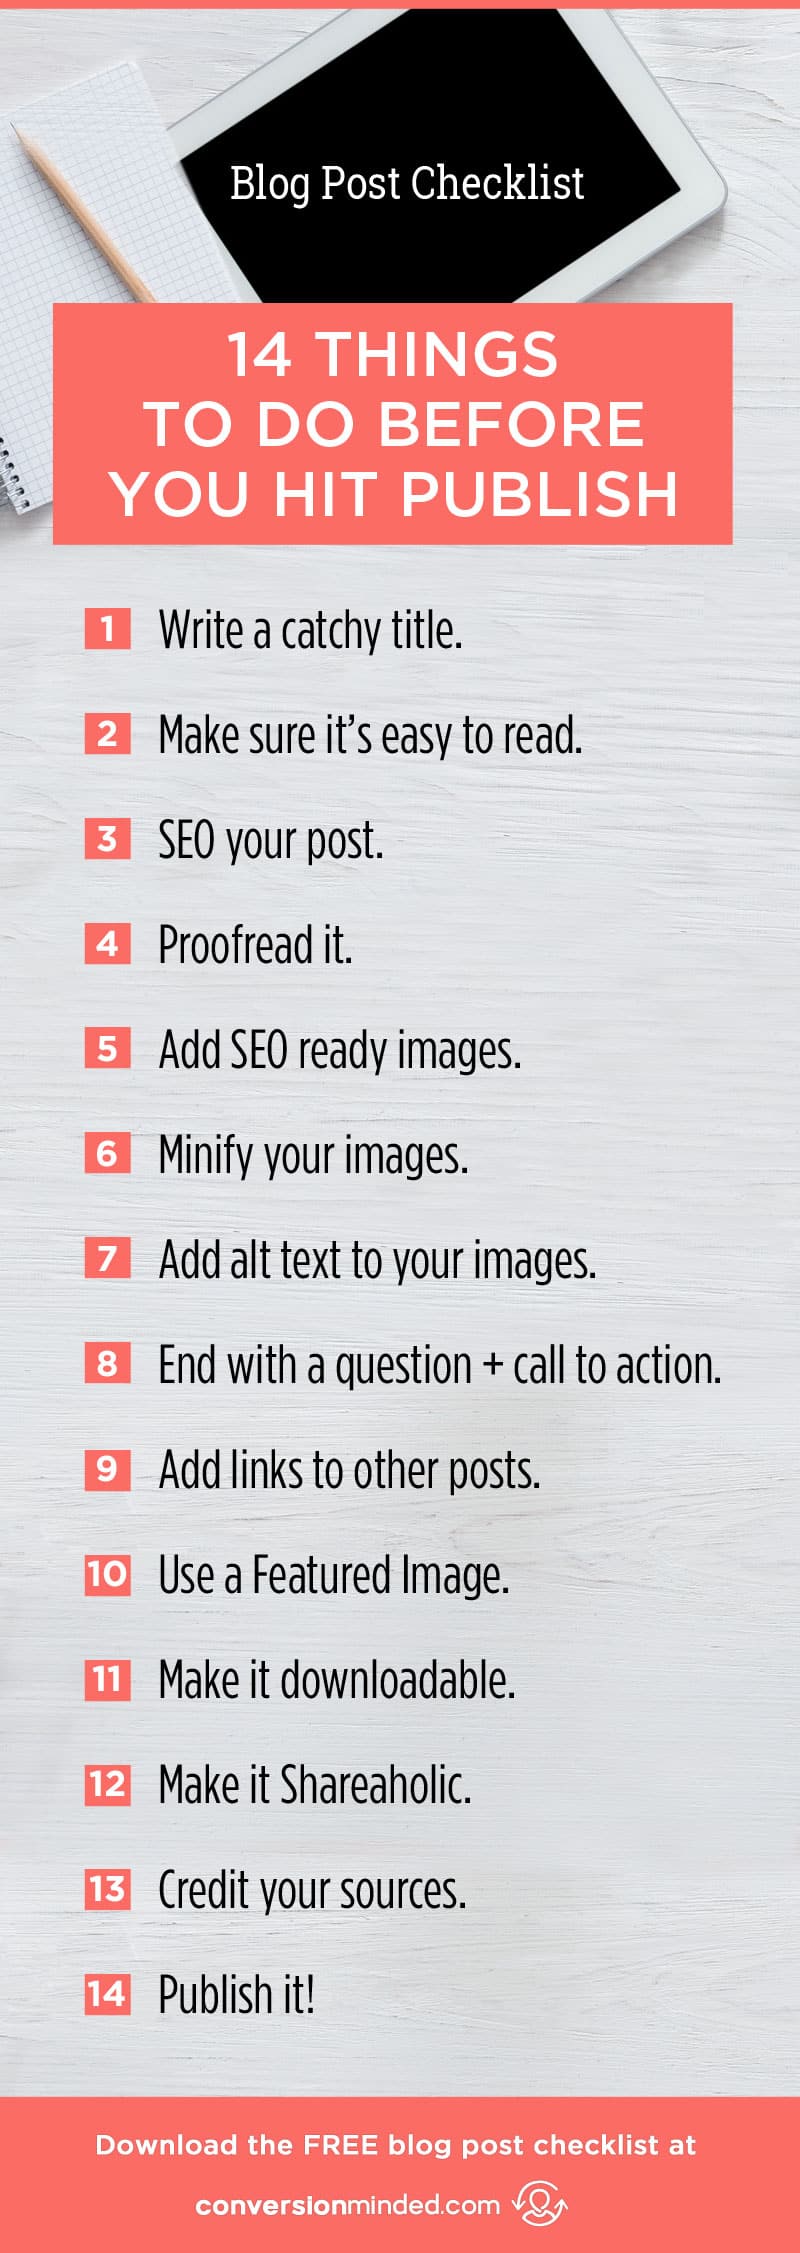
Blog Post Checklist: 14 Things to Do Before You Hit Publish

 So you’ve got your blog up and running and you’re posting on the regular. High five!! Today I have a blog post checklist to help you step up your game even more to get traffic to it (and leads from it!)
In this blog post, I share 14 things you should do before you publish each post.
Well, maybe not before every post. If you’ve got a flow going with your writing, you can always go back through the list after you publish and update it. I like to work in batches of five, where I publish five posts and then tweak them using the checklist.
It may seem like a lot to do, but once you get into a workflow it gets a lot easier and quicker. And when you put so much heart and soul into writing your post, it makes sense to give it the best shot you can to rank higher on Google, get more shares, and build your list.
Step#1: Write a catchy title
You’ve probably heard this a hundred times, and it’s true. A catchy title is key to getting people to read your post. It’s your ticket to more traffic and more subscribers.
A persuasive and descriptive title will grab people’s attention better than one that’s “fuzzy”. People are busy and will only commit to a click if they know what’s in it for them. The descriptive keywords are also great for search engines. You’ll get a boost in rankings just by including keywords in your title and in other places throughout your post, which I’ll get into later.
I know the posts I’ve written with “meh” titles don’t get nearly as many opens as catchier ones.
Here’s an example of a so-so title: “How to Double Your Blog Conversion Rates”
This title is just hard to digest. First, you have to think about what “conversion rate” means. Then you have to figure out what it has to do with blogging. All of that thinking just hurts.
Here’s a better title: “How Songwriting Helped Me Grow My Blog (Plus 10 Tips for New Bloggers)”
The second is better because:
- It’s highly targeted and direct. The title speaks directly to my audience.
- It creates a curiosity gap. I want to know what songwriting has to do with blogging. It just sounds interesting.
- It’s keyword-rich. It includes important terms that people might type into Google to find your post (grow your blog, new bloggers).
Step #2: Make sure it’s easy to read
Every time I read a post that’s like a chapter in a book, I think “time suck”.
Here’s the thing:
People on the web are looking for something and they’re going to scan your post to see if you’ve got it. Then they’re going to read the text. So you have to break your text up into sections that are easy to read.
Here’s how you can do that:
Use bullet points and subheads: If you use WordPress, style your subheads with an H2 tag so that the heading jumps off the page.
Use short sentences and words: Short sentences, short paragraphs, short words, that’s what you want to go for. People are much more likely to keep reading when there’s some white space on the page. Plus, short words are easier to digest than longer words. For instance, use “hard” instead of “difficult” or “challenging”.
Write a great intro: The first few sentences of your post really have to hook people in. Your intro should be long enough to tell a story and create interest and at the same time lead up to the main points of your post. Bonus if you can squeeze in your keyword in the first paragraph, but I wouldn’t go crazy here. If it works, great. If not add it wherever it fits naturally in your post.
Try to limit your intro to 3 or 4 short paragraphs. I’ve written intros that were so long I’m sure they put people to sleep by the time they got to the main points. Once I read them again it was obvious that I was rambling, kind of hunting for what I was trying to say.
Here’s an example of an intro that’s interesting but quickly gets to the point (funny that it talks about rambling – I must have that on my brain!)
Stick to the structure.
That’s what my instructors would hammer into my head over and over again when I was learning how to write songs. And every time I went off-script and let my creative juices just flow, my lyrics would ramble on and on. They had no real beginning, no section breaks, and no end.
This got me thinking about the challenges copywriters face with blogging. Is there a way we can limit our rambling so that we don’t lose readers? Can we apply a song-structure approach to blogging to help us create great experiences that are inviting and easy for people to digest?
If it seems like people aren’t paying attention to your posts, try these ways to keep them engaged and reading…
Here’s why this intro works:
It starts with a relateable story and then leads people quickly to the main point of the post. The third paragraph ties things together and the fourth paragraph leads right into bullet points. Quick and to the point without being boring – that’s what you should aim for with your intro.
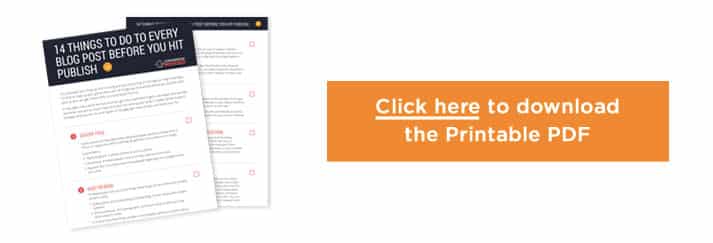
(Download the printable PDF so you have it on hand for your next blog post.)

Step #3: SEO your post
What would a blog post checklist be without mentioning SEO?
When you blog, you’ve got to think about two things: blogging for real people and blogging for SEO. So even though keywords can be a real pain, you still have to think about them. This is definitely one of the very last things I address because it messes me up to think about it when I’m writing. It’s kind of like switching off one brain and turning the other on.
Basically, you want to include the keyword in six places on your post:
- the title
- the URL (for WordPress, this is your permalink)
- the meta description or post snippet
- your subheadings (H2 tags)
- throughout your content
- in your image names (change the default name to one with a keyword)
I suggest installing the Yoast SEO plugin for WordPress. It’s super easy to add your focus keyword in your title and meta description, like this:
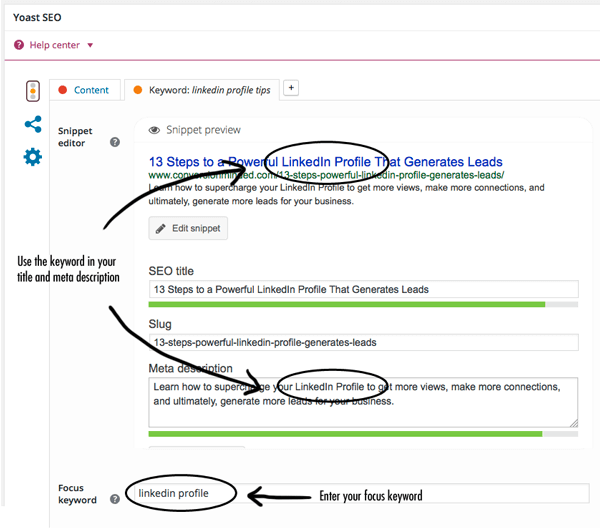
Plus, you’ll see everything you need to optimize, like adding the keyword to your content, H2 tags, and so on.
Step #4: Proofread it
I have to admit, this is one of my downfalls. I tend to be sloppy on the keyboard and keep my fingers crossed that Word will auto-correct anything I miss.
And of course, you know you have to proofread. That’s a no-brainer, right? Still, I find that I can proofread my posts a million times and still find typos that are off the charts a week later. Not cool!!
Here’s the deal, though.
As bloggers and business owners, we’re really publishers. We can’t afford to show up sloppy or poorly dressed if we want people to take us seriously.
So what can you do?
Have someone else proof it for you, or save it as a draft and come back to it a few days later with fresh eyes. Both Word and the WordPress edit window will flag most of the obvious typos and grammar issues.
You still need to manually comb through your post for things that Word may have missed. For instance, I’ve written “and or” when what I meant to write was “and”. Errors like these are harder for programs to spot and need human eyes. One thing I’ve found that works well is to read it backwards, kind of like “a slug” in traditional proofreading terms.
Step #5: Add SEO-ready images
Add blog post images where you can…they add a level of detail to your post and help break up the text for easy reading. When people can visually see what you’re saying, it’s easier to understand. If your post explains how to do something, grab some screenshots with call-outs and comments that help clarify and explain it.
Make sure the images you create are on-brand and fit with your colors, fonts, and tone. I suggest creating templates for your blog post images. A little prep work upfront will save you boat loads of time with your post, plus you’ll have a consistent look for each post.
SEO-ready just means changing the name to something like “blog-post-checklist.jpg” with your keyword.
Step #6: Minify your images
Page speed is important, both for SEO and for people. If your post loads too slowly, people are going to get squirmish. Some may become impatient and hit the back button if they have to wait more than two or three seconds. I recommend doing everything you can to make sure your post loads as quickly as possible.
One of the things that can really bog down page speed is large images. The good news is that there are plugins like TinyPNG you can install that will automatically compress or “optimize” your images.
You can also upload your images directly to their website before you add them to your post. One reason you may want to do it yourself is if your web host doesn’t support these types of plugins (I know some don’t, such as Flywheel).
Step #7: Add alt text to your images
You want to add alt text with keywords and a call to action to your images. This is good for search engines, plus the alt text will automatically be added to the “description” when someone pins an image from your site.
Include your title in the alt text plus one or two descriptive sentences and end with a call to action like, “Click through to check out the tips.”
If you’re wondering where to enter the alt text in WordPress, it’s here:

Step #8: End with a question and call to action
A simple and effective way to encourage your readers to interact and engage with your post is to ask a question at the end of it. It can be as simple as “What tips do you find helpful?”
The point is to encourage people to become part of the conversation. Then when people comment, you can deepen and extend the comments or pose another question. This makes for loyal readers because people will know you’re paying attention and that their opinion is important to you.
You can even install a poll plugin and add a poll at the end of your post, then highlight that conversation on social media and re-share the post. This type of extended sharing amplifies the community and interaction and shows that you value conversation.
Or why not add an activity at the end of the posts that people can do? This gives you another legitimate way to share your blog post again and get even more engagement.
(Download the printable PDF so you have it on hand for your next blog post.)
Step #9: Add links to other posts
This is called internal linking, where you link your post to other posts or pages on your site that are relevant to your post. Internal links are a form of “link building”, which is a large part of what Google uses to find the best pages about a topic and rank it high in search results.
Link building is a big deal because it’s a way for people to vote on your content. Search engines use that data as an indication of your site’s popularity.
So with internal link building (versus external link building, where someone else votes for your post by linking to it), you basically vote for yourself and show Google the importance of your post. The more links you have, the better your chances of search engines finding you and in turn, getting more traffic to your site.
There are two ways to add links:
You can either weave links into your text naturally, or you can add related topics to the end of your post like this:
- 11 Ways to Build your Mailing List
- 6 Steps to Getting More Clients and Referrals Through Your Content
- How to Drive Tons of Traffic to Your Content (and your business)
This second method is great if you’re blogging around themes, which I highly recommend you do. Taking people on a journey with your posts where you elaborate on each one is a great way to build momentum and continuity, almost like offering a mini course. It’s also a smart way to “brand” your blog, so to speak.
Step #10: Use a Featured Image
Featured images are important for a couple of reasons:
First, there’s a good chance your featured image will be shared on social media. For this reason, you want to add the title of your post directly onto your image for sites like Pinterest and Instagram that are largely visual. This way when people scroll it will quickly stand out and people will know what your post is about right away.
If you’re wondering what a featured image is, in WordPress it’s right here:
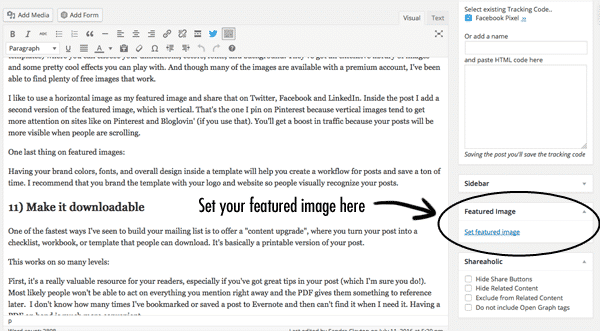
Canva is great for creating featured images. They’ve got horizontal and vertical templates (their Blog Title and Blog Graphic templates) where you can choose your dimensions, colors, fonts, and background. They’ve got an extensive library of images and some pretty cool effects you can play with. And though many of the images are available with a premium account, I’ve been able to find plenty of free images that work.
I like to use a horizontal image as my featured image and share that on Twitter, Facebook and LinkedIn. Inside the post I add a second version of the featured image, which is vertical. That’s the one I pin on Pinterest because vertical images tend to get more attention on sites like on Pinterest and Bloglovin’ (if you use that). You’ll get a boost in traffic because your posts will be more visible when people are scrolling.
One last thing on featured images:
Having your brand colors, fonts, and overall design inside a template will help you create a workflow f0r posts and save a ton of time. I recommend that you brand the template with your logo and website so people visually recognize your posts.
Step #11: Make it downloadable
One of the fastest ways I’ve seen to build your mailing list is to offer a “content upgrade”, where you turn your post into a checklist, workbook, or template that people can download. It’s basically a printable version of your post.
This works on so many levels:
First, it’s a really valuable resource for your readers, especially if you’ve got great tips in your post (which I’m sure you do!). Most likely people won’t be able to act on everything you mention right away and the PDF gives them something to reference later. I don’t know how many times I’ve bookmarked or saved a post to Evernote and then can’t find it when I need it. Having a PDF on hand is much more convenient.
Second, it’s a powerful asset for your business. Just add a pop-up where people enter their contact info and poof! – just like that you’ve got new subscribers. Plus, you know what interests them so you can send them related tips in your emails.
Here are some ways to do a content upgrade:
- Copy your post verbatim and save it as a PDF
- Expand on your post a bit with a worksheet, blueprint, or action plan.
It really depends on how much time you have to create your freebie.
Step #12: Make it Shareaholic
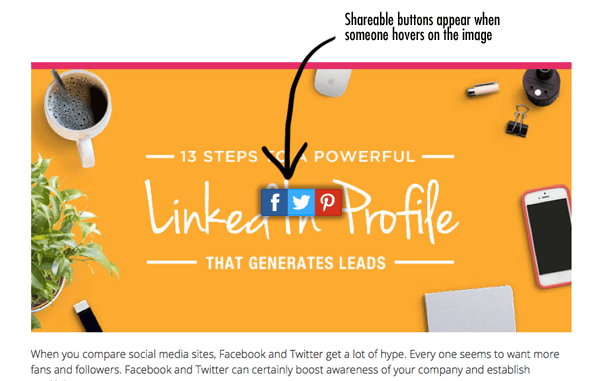
I recommend installing the Shareaholic or SumoMe (for WordPress) plugin to your site. Both of these will let you easily add social share buttons to your post and encourage people to share it with their followers and fans. They also show “social proof” – the more shares people see on your post, the more they’ll want to share it too.
Here are two great ways to use them:
- Add share buttons to the beginning, end, or left side of your post.
- Add them directly to your blog post images so people can share those too. Tip: change the settings so the buttons only appear on blog post images, not your other pages. See how when you hover over the image, the social buttons appear? Pretty cool!!
Step #13: Credit your sources
If your post is a round-up, or if you’ve mentioned a quote or reference from another blogger, make sure you give them credit with a link back to their site.
This is a powerful way to add credibility to your post and build relationships with influencers around your niche. Once you publish your post you can reach out to them and let them know you mentioned them in your post, just in case they want to share it too. This should give you a boost in traffic.
Step #14: Publish it!
Hah! Sounds crazy, I know. You’d be surprised how many times I thought my post was live and found out days later that I forgot to actually publish it. Give it one last preview before you do. Test the internal links to make sure they work, make sure your content upgrade link is working, check for typos one last time, and make sure your featured image and blog post images are on-brand and reflect your aesthetic.
Then:
Hit Publish, grab a glass of wine, and pat yourself on the back. You’re done – woo!
Next up –> Blog Checklist: 7 Things to Do After Your Post Goes Live